FREEZER use & care Introduction........................................................2 Storage Features............................................ 14 Important Safety information.....................3 Saving Energy................................................. 15 Features ..............................................................5 Care and Cleaning......................................... 16 Installation..........................................................7 Troubleshooting ...........
INTRODUCTION Welcome to our family Thank you for bringing Frigidaire into your home! We see your purchase as the beginning of a long relationship together. This manual is your resource for the use and care of your product. Please read it before using your appliance. Keep it handy for quick reference. If something doesn’t seem right, the troubleshooting section will help you with common issues.
IMPORTANT SAFETY INFORMATION WARNING Please read all instructions before using this appliance. Safety Definitions This is the safety alert symbol. It is used to alert of potential personal injury hazards. Obey all safety messages that follow this symbol to avoid possible injury or death. DANGER DANGER indicates an imminently hazardous situation which, if not avoided, will result in death or serious injury.
IMPORTANT SAFETY INFORMATION Proper Disposal of your Appliance • If voltage varies by 10% or more, appliance performance may be affected. Operating the unit with insufficient power can damage the motor. Such damage is not covered under the warranty. If you suspect your household voltage is high or low, consult your power company for testing. • To prevent the appliance from being turned off accidentally, do not plug unit into an outlet controlled by a wall switch or pull cord.
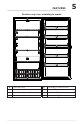
FEATURES Features may vary according to model F G E E G G C G D C G B H A H A Power On LED E Full-Depth Freezer Shelves B Freezer Wire Basket F Interior LED C Short-Depth Freezer Shelves G Fixed Door Bins D Temperature Control Knob H Front Leveling Feet 5
FEATURES IMPORTANT Cleaning your Appliance Remove tape and glue residue from surfaces before turning on the appliance. Rub a small amount of liquid dish soap over the adhesive with your fingers. Rinse with warm water and dry with a soft cloth. Do not use sharp instruments, rubbing alcohol, flammable fluids, or abrasive cleaners to remove tape or glue. These products can damage the surface of your appliance.
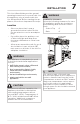
INSTALLATION This Use & Care Guide provides general operating instructions for your model. Use the appliance only as instructed in this Use & Care Guide. Before starting the appliance, follow these important first steps. Location • Choose a place that is near a grounded electrical outlet. Do Not use an extension cord or an adapter plug. • If possible, place the appliance out of direct sunlight and away from the range, dishwasher or other heat sources.
INSTALLATION Leveling Rest all bottom corners firmly on a solid floor. The floor must be strong enough to support a fully loaded appliance. NOTE It is VERY IMPORTANT for your unit to be level in order to function properly. If the appliance is not leveled during installation, the door may be misaligned and not close or seal properly, causing cooling, frost or moisture problems. To Level the Appliance: Adjust the bottom feet by turning counterclockwise to lengthen and clockwise to shorten.
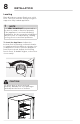
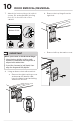
DOOR REMOVAL/REVERSAL IMPORTANT Before you begin, turn the appliance temperature control to “off” and remove the electrical power cord from the wall outlet. Remove any food from door shelves. 1. 9 4. Unscrew the door stopper on right side with Phillips screw driver and pry off the stopper with flathead screw driver. Then screw it on the left side. Keep the 2 plastic door spacers between door and cabinet as shown below. The spacers are used to make sure the distance between door and cabinet is 1/2 inch.
7. DOOR REMOVAL/REVERSAL b. Attach the bottom hinge (A) with 4 screws (B) and adjustable leveling foot (C) on the left side of the cabinet. Φ10 Bottom of Unit A B x4 C tinU fo mottoB IMPORTANT When you screw on the bottom hinge: • Move the door slightly in left or right direction to make sure that hinge hole is aligned with cabinet hole. • Insert the 4 screws by half depth, then align the hinge and fully tighten. 8. Using an 8mm socket with a ratchet: a.
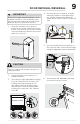
DOOR REMOVAL/REVERSAL 9. Using an adjustable wrench and pliers, remove the hinge pin from the right side to the left side. 11 b. Remove positioning guide from accessory bag and attach it to the top left of cabinet. c. Insert the hinge into positioning guide. Move door up and insert hinge pin. Attach the hinge onto cabinet with screws Φ10 10. With a flat head screwdriver, gently pry upward on hinge pin bearing to remove from door. Reinstall on the opposite side of the door. 11.
DOOR REMOVAL/REVERSAL CAUTION This procedure will require 2 people to safely perform. 12. Raise the appliance to the upright position. Open and close the door to check if door moves smoothly. 90° 13. Allow 1 hour before plugging the unit back into electrical outlet.
CONTROLS AND SETTINGS Cool Down Period • • For safe food storage, allow 4 hours for the appliance to cool down completely. The unit will run continuously for the first several hours. Foods that are already frozen may be placed in the unit after the first few hours of operation. Unfrozen foods should NOT be loaded into freezer until freezer has operated for 4 hours. When loading freezer, freeze only 3 pounds of fresh food per cubic foot of freezer space at one time.
STORAGE FEATURES Shelf Adjustment Fixed Door Bin Appliance shelves are easily adjusted to suit individual needs. Before adjusting the shelves, remove all food. The fixed door bin is especially designed to hold large containers or freezer bags. To adjust sliding shelves, remove shelf by pulling forward. To replace shelf, rest side edges on any pair of shelf rails and carefully push shelf back into position.
SAVING ENERGY 15 • The appliance should be located in the coolest area of the room, away from heat producing appliances or heating ducts, and out of direct sunlight. • Let hot foods cool to room temperature before placing in the unit. Overloading the appliance forces the compressor to run longer. Foods that freeze too slowly may lose quality or spoil. • Be sure to wrap foods properly and wipe containers dry before placing them in the unit. This cuts down on frost build-up inside the unit.
CAUTION Damp objects stick to cold metal surfaces. Do not touch interior metal surfaces with wet or damp hands. Some upright freezers are frost-free and defrost automatically, but should be cleaned occasionally. Cleaning the Inside Wash inside surfaces of the unit with a solution of 2 tbsp. (25 g) of baking soda in 1 qt. (1 l) warm water. Rinse and dry. Wring excess water out of the sponge or cloth when cleaning in the area of the controls, or any electrical parts.
TROUBLESHOOTING 17 Let us help you troubleshoot your concern! This section will help you with common issues. If you need us, visit our website, chat with an agent, or call us. We may be able to help you avoid a service visit. If you do need service, we can get that started for you! 1-800-374-4432 (United States) Frigidaire.com CONCERN CAUSE 1-800-265-8352 (Canada) Frigidaire.ca SOLUTION APPLIANCE OPERATION Appliance does not run. Appliance runs too much or too long.
TROUBLESHOOTING CONCERN CAUSE Temperature inside appliance is too warm. • Control is set too warm. • Door is opened too frequently or too long. • Door may not be seating properly. • Large amounts of warm or hot food has been stored recently. SOLUTION • Turn control to a colder setting. Allow several hours for temperature to stabilize. • Warm air enters the appliance every time the door is opened. Open door less often. • See “DOOR PROBLEMS” in TROUBLESHOOTING section.
TROUBLESHOOTING CONCERN CAUSE 19 SOLUTION WATER / MOISTURE / FROST INSIDE APPLIANCE Moisture forms • Weather is hot and • The rate of frost buildup and internal on inside walls. humid. sweating increases. This is normal. • Door may not be seating properly. • See “DOOR PROBLEMS” in the TROUBLESHOOTING section. • Door is opened too • Open door less often. often or too long. WATER / MOISTURE / FROST OUTSIDE APPLIANCE Moisture forms • Door may not be • See “DOOR PROBLEMS” in the on outside.
LIMITED WARRANTY Your appliance is covered by a one year limited warranty. For one year from your original date of purchase, Electrolux will pay all costs for repairing or replacing any parts of this appliance that prove to be defective in materials or workmanship when such appliance is installed, used and maintained in accordance with the provided instructions. Exclusions This warranty does not cover the following: 1.
welcome home Our home is your home. Visit us if you need help with any of these things: owner support accessories service registration (See your registration card for more information.) Frigidaire.com 1-800-374-4432 Frigidaire.