
Complete Owner's Guide


7
WARNING
The anti-tip device must be
installed according to the
instructions in your Use &
Care Manual. Failure to do
so may result in injury.
NOTE
If your appliance is placed with the door
hinge side against a wall, you may have
to allow additional space for the handle
so the door can be opened wider.
This Use & Care Guide provides general
operating instructions for your model. Use
the appliance only as instructed in this
Use & Care Guide. Before starting the ap-
pliance, follow these important first steps.
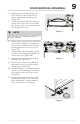
Guidelines for final positioning of
your appliance:
• All 4 corners of the cabinet must rest
firmly on the floor.
• The cabinet should be level at the
front and rear.
• The door should be level.
Setting the anti-tip bracket:
Models are equipped with an anti-tip
bracket. The anti-tip brackets are located
on the lower front corners of the cabinet.
Lower the anti-tip on each side clockwise
until they contact the floor. Do not raise
the cabinet.
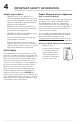
Location
• Choose a place that is near a ground-
ed electrical outlet. Do Not use an
extension cord or an adapter plug.
• If possible, place the appliance out of
direct sunlight and away from the range,
dishwasher or other heat sources.
• Install the appliance on a floor that is
level and strong enough to support a
fully loaded appliance.
Freezer
⅜"
(10 mm)
⅜"
(10 mm)
1"
(25 mm)
⅜" (10 mm)
Lower
Anti-tip Bracket
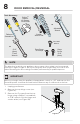
INSTALLATION
WARNING
Installation
Allow the following clearances
for ease of installation, proper air
circulation, and plumbing and electrical
connections:
Sides & Top ⅜ inch (9.5 mm)
Back 1 inch (25.4 mm)
WARNING
DO NOT install the appliance where
the temperature will drop below 0°F
(-18°C) or rise above 110°F (43°C). The
compressor will not be able to maintain
proper temperatures inside the unit.
CAUTION
Do not block the lower front of your ap-
pliance. Sucient air circulation is essen-
tial to operate your appliance properly.