
Installation Guide

4
nOtE
The exterior walls of the wine cooler may become quite
warm as the compressor works to transfer heat from
the inside. Temperatures as much as 30° F warmer
than room temperature can be expected. For this
reason it is particularly important in hotter climates to
allow enough space for air circulation around your wine
cooler.
Leveling
The wine cooler must have all bottom corners resting
rmly on solid oor. The oor must be strong enough
to support a fully loaded wine cooler. NOTE: It is Very
Important for your wine cooler to be level in order to
function properly. If the wine cooler is not leveled during
installation, the door may be misaligned and not close
or seal properly, causing cooling, frost, or moisture
problems.
To Level Your Wine Cooler:
After removing all interior and exterior packaging
materials, use a carpenter’s level to level the wine cooler
from front-to-back. Adjust the leveling legs in front, ½
bubble higher, so that the door closes easily when left
halfway open.
Cleaning
Wash any removable parts of the wine cooler interior, •
and exterior with mild detergent and warm water.
Wipe dry. Do not use harsh cleaners on these
surfaces.
Do not use razor blades or other sharp instruments, •
which can scratch the appliance surface when
removing adhesive labels. Any glue left from the tape
can be removed with a mixture of warm water and
mild detergent, or touch the residue with the sticky
side of tape already removed. Do not remove the
serial plate.
Important Safeguards: Do not store food in your wine
cooler as interior temperature may not get cool enough
to prevent spoilage. In summer months or areas of high
humidity, the glass door may build up moisture. To
remove the moisture, wipe it away.
Handle Installation
Set handle over the two mounting studs at top of 1.
door.
Use hex head screw driver or allen wrench to tighten
2.
set screws from bottom to secure handle to door.
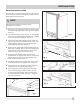
� Handle
ĸ Wooden Shelf Made of Beech
Ĺ Control Panel
� Glass Door
� Control Switch of Lamp
� Adjustable Leg
Placement of Wine Cooler
The wine cooler should be placed in dry and ventilated room. The location of
the wine cooler should not be irradiated by direct sunshine. The wine cooler
should be far away from heating sources, such as: cooking stove or heating
radiator. If the wine cooler has to be placed near heating source, please adopt
proper heating insulation board for insulation or keep the wine cooler at least
the following minimum distances away from the heating sources:
For electric stove: 3 .
For oil or coal stove: 30 .
Replacement of Door Hinge
The door hinges of this wine cooler can be interchanged between the left and
right sides.
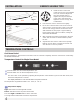
Installation of Handle
1. Set the handle on the fixation shaft.
Fixation Shaft of Handle
Set Handle
2. Screw down the fixation pins of the handle with screw driver.
- 7 -
Mounting stud
Locate handle
Screw driver
Handle Fixation Pin
Screw Driver
Level the Wine Cooler
Place the wine cooler on the planned location and level it.
The front screw of leg is adjustable.
Pay Attention to Room Temperature & Ventilation
The climate type is marked on the model nameplate. It indicates the room
temperature range for operation of wine cooler.
Climate Type Indoor Temperature Range
N +16°C to 32°C
ST +18°C to 38°C
T +18°C to 43°C
- 8 -
Set screw
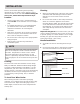
InStALLAtIOn
This Use & Care Guide provides general operating
instructions for your model. Use the appliance only as
instructed in this Use & Care Guide. Before starting the
wine cooler, follow these important rst steps.
Location
Choose a place that is near a grounded electrical •
outlet. Do Not use an extension cord or an adapter
plug.
For optimal performance, it is recommended that •
you install the wine cooler where the ambient
temperature is between 70 and 78 degrees
fahrenheit.
Allow space around the unit for good air circulation. •
Leave a 2 inch space on the back and sides of the
wine cooler for adequate circulation.
Be sure the wine cooler stays in the upright position •
during transport.
Keep the wine cooler from any hazardous or •
combustible agents.