
Installation Instructions


Instructions d’installation
ÉVACUATION À L’EXTÉRIEUR PAR L’ARRIÈRE
(Conduit horizontal)
B
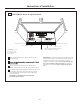
VUE D’ENSEMBLE
DE L’INSTALLATION
B1. Préparation du mur arrière
B3. Fixation de la plaque de montage au mur
B4. Préparation de l’armoire supérieure
B5. Ajustement du ventilateur
B6. Installation du four à micro-ondes
REMARQUES IMPORTANTES :
• Assurez-vous que les vis du moteur du
ventilateur et de la plaque du ventilateur
sont solidement vissées lorsque vous les
remettez en place. Cela évitera les
vibrations excessives.
• Assurez-vous que les fils du moteur sont
bien acheminés, fixés et qu’ils ne sont pas
coincés.
• Lisez les instructions figurant sur le GABARIT POUR
MUR ARRIÈRE.
• Collez-le au mur arrière.
• Percez l’ouverture en suivant les instructions sur le
GABARIT POUR MUR ARRIÈRE.
PRÉPARATION DU MUR
ARRIÈRE POUR L’ÉVACUATION
À L’EXTÉRIEUR PAR L’ARRIÈRE
Vous devez percer une ouverture dans le mur arrière
pour l’évacuation à l’extérieur.
B1.
B2.
ENLÈVEMENT DE
L’PLAQUE DU VENTILATEUR
Enlevez et conservez la vis qui retient la plaque du
ventilateur au four à micro-ondes. Soulevez la plaque
du ventilateur.
Plaque du ventilateur
Arrière du four
à micro-ondes
B2. Enlèvement de l’plaque du ventilateur
3
/
8
"
TO
EDG
E
NO
TE
:
I
T IS
V
ERY
I
M
PO
R
TANT TO
READ AND FO
LLO
W
T
HE
D
IRECTIO
N
S
IN THE
I
NSTALLAT
ION
INSTRU
CTI
O
N
S
BE
FO
RE PR
O
CEEDI
N
G
W
ITH
T
H
IS
REAR W
A
LL TE
M
PLA
T
E
.
T
h
is
R
e
a
r
Wall T
e
mp
l
a
te
s
e
r
ve
s
to
p
os
itio
n
th
e
b
o
tto
m
mou
ntin
g p
l
a
te
a
n
d
to l
o
c
ate th
e
h
o
r
i
z
on
ta
l
ex
h
au
s
t
ou
tle
t.
1
.
Us
e a l
e
vel
t
o
c
h
e
ck
th
at th
e t
emp
la
te
is p
os
ition
ed
a
ccur
a
te
ly
.
2.
L
o
c
a
t
e
a
nd
m
ar
k
a
t
le
a
s
t
o
ne
stu
d
on
th
e
le
ft o
r
r
igh
t
s
id
e
o
f
the
c
e
n
te
rl
i
n
e
.
I
t is im
p
o
rt
an
t
to u
s
e
a
t le
ast
o
ne
wo
od
scre
w
mo
u
nted
fi
r
mly
i
n a
s
tu
d
to
suppor
t
th
e
weigh
t
o
f
th
e mic
r
ow
ave.
M
ar
k
tw
o
a
d
d
i
tion
a
l, e
ve
nl
y
spa
c
e
d
lo
c
atio
n
s f
o
r
th
e
s
uppl
ied
to
ggle
bo
l
t
s.
3. D
ri
ll
h
ol
e
s
in
th
e m
a
r
k
ed lo
catio
n
s.
Whe
r
e t
h
e
r
e is
a
s
t
ud
,
d
r
ill
a
3/16" h
ol
e
for
woo
d
s
c
r
e
w
s
.
F
o
r
h
oles
th
at
d
o
n
ot
lin
e
up
w
ith
a
s
tu
d
, d
r
il
l 5
/
8
"
h
ole
s fo
r
to
gg
l
e
bo
lts
.
D
O
NO
T
I
N
S
T
A
L
L
T
H
E
MO
U
NT
I
N
G P
L
A
T
E
A
T
T
H
IS
T
IME.
4.
Re
m
ove th
e
t
e
mpla
t
e
fr
om
t
he
r
ea
r
wal
l.
5
.
R
e
vie
h
t
w
e
In
sta
llation
Ins
t
r
u
c
t
i
on b
oo
k f
or
y
ou
r
i
n
sta
lla
t
io
n
s
i
tua
t
ion.
Locat
e and m
ar
k
holes
to ali
gn wi
t
h
holes
i
n t
he
mountin
g
p
l
ate.
IM
PO
RTANT
:
LO
C
A
T
E
AT
LEA
S
T
O
N
E
S
TUD
ON E
I
T
HER
SIDE
O
F
TH
E
CENTER
LI
N
E
.
MARK
T
HE LOCATIO
N
F
OR 2 ADDIT
IO
N
A
L,
E
V
E
NLY
SP
ACE
D TO
G
GLE
BO
LTS
IN
THE MO
UN
TING
PLATE
AREA
.
Loc
at
e an
d
mar
k
hol
es
to al
i
gn with holes
in t
he
.
e
t
a
l
p
g
n
i
t
n
u
o
m
IMPO
RTANT
:
LO
CA
T
E AT LEA
S
T ON
E
ST
UD
O
N EI
T
HE
R
SI
D
E O
F
TH
E
CENT
E
R
LIN
E
.
MARK
T
HE LO
CA
TIO
N
F
O
R 2 ADDITION
A
L
, EV
EN
L
Y
SP
A
CE
D
T
O
G
GLE
BO
L
T
S IN
THE MO
UN
TING
PLATE
AR
E
A
.
T
rim t
he r
e
ar w
al
l
temp
lat
e
a
long
t
he
d
o
tted
line
.
Trim t
he rear
wa
l
l t
e
m
pla
t
e along
t
h
e dot
ted line
.
12"
4"
D
ar
l
e
v
u
e
lt
a
a
la
ho
j
a
p
a
r
a
c
o
ns
u
l
t
a
r
la
v
e
r
s
i
ón
e
n
Es
pa
ño
l
.
FR-16