All about the Use & Care of your Built-In Range TA B L E O F C O N T E N T S Setting Oven Controls...........................................17 Important Safety Instructions..................................3 Setting Keep Warm Drawer Control (If equipped)... 35 Features at a Glance...............................................6 Care & Cleaning (Cleaning Chart)..........................36 Before Setting Surface Controls...............................9 Care & Cleaning................................
WELCOME & CONGRATULATIONS Product Registration Register Your Product The PRODUCT REGISTRATION CARD should be filled in completely, signed and returned to Electrolux Home Products. Serial Plate Location Congratulations on your purchase of a new appliance! At Electrolux Home Products, we are very proud of our product and are completely committed to providing you with the best service possible. Your satisfaction is our number one priority.
IMPORTANT SAFETY INSTRUCTIONS Read all instructions before using this appliance. Save these instructions for future reference. DEFINITIONS This is the safety alert symbol. It is used to alert you to potential personal injury hazards. Obey all safety messages that follow this symbol to avoid possible injury or death. WARNING This symbol will help alert you to situations that may cause serious bodily harm, death or property damage.
IMPORTANT SAFETY INSTRUCTIONS CAUTION Do not store items of interest to children in the cabinets above the appliance. Children climbing on the cooktop to reach items could be seriously injured. • Do not leave children alone. Children should not be left alone or unattended in the area where an appliance is in use. They should never be allowed to sit or stand on any part of the appliance.
IMPORTANT SAFETY INSTRUCTIONS utensils are suitable for cooktop service without breaking due to the sudden change in temperature. Check the manufacturer’s recommendations for cooktop use. • Do Not Use Decorative Surface Burner Covers. If an element is accidentally turned on, the decorative cover will become hot and possibly melt. Burns will occur if the hot covers are touched. Damage may also be done to the cooktop.
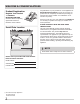
FEATURES AT A GLANCE - MODEL A Your built-in range Features: 1. 2. 3. 4. 5. 6. 7. Electronic oven control with kitchen timer. Left front element control. Left rear element control. Right rear element control. Right front element control. Keep warm zone control. Element on indicator light. 8. 9. 10. 11. 12. 13. 14. 15. 16. 17. 18. Automatic oven door light switch. Self-clean door latch. Oven vent. Broil element. Self-cleaning oven interior. Convection bake cooking system.
FEATURES AT A GLANCE - MODEL B Your built-in range Features: keep warm zone delay start Electronic oven control with kitchen timer. Electronic element control digital displays. Keep warm zone control. Warm & serve drawer control. Left front element control. Left rear element control. Right rear element control. Right front element control. Element on indicator light. Cooktop on indicator light. 11. 12. 13. 14. 15. 16. 17. 18. 19. 20. 21. Automatic oven door light switch. Self-clean door latch.
FEATURES AT A GLANCE - MODEL C Your built-in range Features: 1. 2. 3. 4. 5. 6. 7. 8. 9. 10. Electronic oven control with kitchen timer. Left rear burner control. Keep warm zone control. Warm & serve drawer control. Left front element control. Left rear element control. Right rear element control. Right front element control. Element on indicator light. Cooktop on indicator light. 11. 12. 13. 14. 15. 16. 17. 18. 19. 20. 21. Automatic oven door light switch. Self-clean door latch. Oven vent.
BEFORE SETTING SURFACE CONTROLS About the ceramic glass cooktop The ceramic cooktop has radiant surface elements located below the surface of the glass. The design of the ceramic cooktop outlines the area of the surface element underneath. Be sure to match the pan size with the diameter of the element outline on the cooktop and only flat-bottom cookware should be used.
BEFORE SETTING SURFACE CONTROLS The electronic surface element control (ESEC) (Models B & C only) The Electronic Surface Element Control (ESEC) feature includes digital display windows. The ESEC feature provides a numeric digital setting for the radiant surface element positions on the cooktop. These settings work the same way as normal knob setting indicators work except the settings are displayed in digital windows.
BEFORE SETTING SURFACE CONTROLS Using proper cookware Cookware material types Cookware should have flat bottoms that make good contact with the entire surface heating element (Figure 1). Check for flatness by rotating a ruler across the bottom of the cookware (Figure 2). Aluminum- Excellent heat conductor. Some types of food will cause it to darken (Anodized aluminum cookware resists staining & pitting).
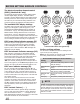
SETTING SURFACE CONTROLS Single radiant surface elements (all models) The cooktop has 2 or 3 SINGLE radiant surface elements: the left rear position (Figures 1, 2 & 3), the right rear position (Figures 1 and 2), and the right front position (Figures 1 and 3). The left rear element may also be used with the Bridge element (Model C only - Figure 3). To Operate the Single Radiant Surface Elements 1. Place correctly sized cookware on the radiant surface element. 2.
SETTING SURFACE CONTROLS Dual Surface Radiant Element (all models) The cooktop is equipped with 1 or 2 dual radiant surface elements located at the left front (Figures 1& 2) and the right front (Figure 2) or the right rear (Figure 3) position. Symbols around the knob are used to indicate which coil of the dual radiant element will heat. The symbol indicates that only the inner coil will heat (Figure 4). The symbol indicates that both inner and outer coils will heat (Figure 5).
SETTING SURFACE CONTROLS Bridge surface radiant element (Model C only) The cooktop is equipped with a “BRIDGE” surface element located at the left front and middle (Fig. 1) positions. The Bridge can be used when cooking with rectangular (like a griddle) or oval shaped cookware. The element will maintain an even temperature setting across both portions of the Bridge. If needed for normal cookware, the Bridge element can work like a single element without the Bridge (Fig. 4).
SETTING SURFACE CONTROLS Keep warm zone (Models B & C only) The purpose of the keep warm zone is to keep hot cooked foods at serving temperature. Use the keep warm feature to keep cooked foods hot such as: vegetables, gravies, casseroles, soups, stews, breads, pastries and oven-safe dinner plates. Always start with hot food. It is not recommended to heat cold food on the keep warm zone. All food placed on the keep warm zone should be covered with a lid to maintain quality.
BEFORE SETTING OVEN CONTROLS Oven vent location Arranging oven racks The oven is vented as shown below. When the oven is on, warm air is released through the vent. This venting is necessary for proper air circulation in the oven and good baking results. DO NOT BLOCK OVEN VENT. Never close off the openings with aluminium foil or any other material. delay start bake time 1 2 3 ALWAYS ARRANGE OVEN RACKS WHEN THE OVEN IS COOL (PRIOR TO OPERATING THE OVEN). Always use oven mitts when using the oven.
BEFORE SETTING OVEN CONTROLS Types of oven racks Your built-in range may be equipped with one or more of the oven racks styles shown; • Flat handle oven rack (All models- Figure 1). • Offset oven rack (Model A only- Figure 2). • Flat oven half rack (Models B & C only- Figures 3 & 4). • EffortlessTM oven rack (Models B & C only- Figure 5). Figure 1 - All models Flat handle oven rack Figure 2 - Model A only Offset oven rack CAUTION Always use pot holders or oven mitts when adjusting the oven racks.
BEFORE SETTING OVEN CONTROLS The Effortless™ oven rack system Some models are equipped with a special oven rack system that automatically partially extends the oven rack from the interior oven glides to assist in easier access to your food items. This feature works whenever the oven door is opened or closed. To assemble the Effortless™ Oven Rack system: 1. Locate all required parts.
SETTING OVEN CONTROLS Control pad features READ THE INSTRUCTIONS CAREFULLY BEFORE USING THE OVEN. For satisfactory use of your oven, become familiar with the various features and functions of the oven as described below. Detailed instructions for each feature and function follow later in this Use & Care Guide.
SETTING OVEN CONTROLS MINIMUM AND MAXIMUM CONTROL PAD SETTINGS All of the features listed below have minimum and maximum time or temperature settings that may be entered into the control. An ENTRY acceptance beep will sound each time a control pad is touched (the acceptance beep on the Oven Lockout pad is delayed 3 seconds). An ENTRY ERROR tone (3 short beeps) will sound if the entry of the temperature or time is below the minimum or above the maximum settings for the feature.
SETTING OVEN CONTROLS SETTING CONTINUOUS BAKE OR 6 HOUR ENERGY SAVING The TIMER and SELF CLEAN pads control the Continuous Bake or 6 Hour Energy Saving features. The oven control has a factory preset built-in 6 Hour Energy Saving feature that will shut off the oven if the oven control is left on for more than 6 hours. The oven can be programmed to override this feature for Continuous Baking. To set the control for Continuous Bake or 6 Hour Energy Saving features 1. Press and hold TIMER for 6 seconds.
SETTING OVEN CONTROLS SETTING MINUTE TIMER The TIMER ON.OFF pad controls the Minute Timer feature. The Minute Timer serves as an extra timer in the kitchen that will beep when the set time has run out. It does not start or stop cooking. The Minute Timer feature can be used during any of the other oven control functions. Refer to “Minimum and Maximum Control Pad Settings” for time amount settings. To set the Minute Timer (example for 5 minutes) 1. Press TIMER ON.OFF.
SETTING OVEN CONTROLS SETTING QUICK OR POWERPLUSTM PREHEAT Use the preheat feature when using single rack baking to quickly heat the oven to bake temperatures. Use this feature only for standard baking. A reminder tone will sound indicating when to place the food in the oven. When the oven is finished preheating quick preheat will become just like the bake feature and continue to bake until cancelled. To set the Preheat temperature for 375°F 1. Arrange the interior oven racks. 2. Press PREHEAT.
SETTING OVEN CONTROLS SETTING CONVECTION BAKE 4 This mode of cooking enables you to obtain the best culinary results when baking with multiple pans and racks. Multiple rack baking may slightly increase cook time for some foods but the overall result is time saved. Some food may cook faster and more evenly with Convection Bake. Convection baking uses the three elements and a fan to circulate the oven’s heat evenly and continuously within the oven.
SETTING OVEN CONTROLS SETTING CONVECTION CONVERT SETTING CONVECTION ROAST The Convection Convert pad is used to automatically convert a standard baking recipe for convection baking. When set properly, this feature is designed to display the actual converted (reduced) temperature in the display. Convection Convert may ONLY be used with a Convection Bake cooking mode. It can be used with the features Delay Start and Bake Time (see their sections for directions).
SETTING OVEN CONTROLS SETTING CONVECTION BROIL (some models) Use this mode for thicker cuts of meat, fish and poultry. The Convection Broiling gently browns the exterior and seals in the juices. Convection broiling uses the broil element and a fan to circulate the oven’s heat evenly and continuously within the oven. The oven can be programmed for Convection Broiling at any temperature between 400°F to 550°F with a default temperature of 550°F.
SETTING OVEN CONTROLS SETTING BAKE TIME SETTING DELAY START Bake Time allows the oven to be set to cook for a specific length of time and shut off automatically. The BAKE, CONVECTION BAKE, BAKE TIME and DELAY START pads control the Delayed Time Bake feature. The automatic timer of the Delayed Time Bake will turn the oven on and off at the time you select in advance. The oven will shut off and will beep when the countdown is finished.
SETTING OVEN CONTROLS SETTING KEEP WARM SETTING PIZZA (some models) This mode is best for keeping oven baked foods warm for serving after cooking has finished. The KEEP WARM pad turns ON the Keep Warm feature and will maintain an oven temperature of 170°F (77°C). The Keep Warm feature will keep oven baked foods warm for serving up to 3 hours after cooking has finished. After 3 hours the Keep Warm feature will shut the oven OFF.
SETTING OVEN CONTROLS SETTING CHICKEN NUGGETS SETTING MY FAVORITE (some models) The CHICKEN NUGGETS pad has been designed to give optimum cooking performance when cooking your favorite chicken nuggets. The Chicken Nuggets pad is preset for a Convection Bake at (400°F) with a Bake Time of 18 minutes, ending with a Keep Warm setting. If needed, a different target temperature or Bake Time than the presets can be entered.
SETTING OVEN CONTROLS SETTING BROIL This mode is best for meats, fish and poultry up to 1” thick. Broiling is a method of cooking tender cuts of meat by direct heat under the broil element of the oven. The high heat cooks quickly and gives a rich, brown outer appearance. The BROIL pad controls the Broil feature. An optional Searing Grill, Broiler Pan and Insert are available via the enclosed accessories brochure (Figure 2 & 3).
SETTING OVEN CONTROLS SETTING THE SABBATH FEATURE (for use on the Jewish Sabbath & Holidays) The BAKE TIME and DELAY START pads are used to set the Sabbath feature. The Sabbath feature may only be used with the BAKE pad. The oven temperature may be set higher or lower after setting the Sabbath feature (the oven temperature adjustment feature should be used only during Jewish Holidays), however the display will not visibly show or provide any audible tones indicating whether the change occurred correctly.
SETTING OVEN CONTROLS ADJUSTING OVEN TEMPERATURE OVEN LIGHT The temperature in the oven has been pre-set at the factory. When first using the oven, be sure to follow recipe times and temperatures. If you think the oven is cooking too hot or too cool for the temperature you select, you can adjust the actual oven temperature to be more or less than what is displayed. Before adjusting, test a recipe by using a temperature setting that is higher or lower than the recommended temperature.
SETTING OVEN CONTROLS SELF-CLEANING What to Expect during Cleaning A self-cleaning oven cleans itself with high temperatures (well above normal cooking temperatures) which eliminate soils completely or reduces them to a fine powdered ash you can wipe away with a damp cloth. While the oven is in operation, the oven heats to temperatures much higher than those used in normal cooking. Sounds of metal expansion and contraction are normal. Odor is also normal as the food soil is being removed.
SETTING OVEN CONTROLS SETTING SELF-CLEAN CYCLE TIME LENGTH The SELF CLEAN pad controls the Self-Cleaning feature. If you are planning to use the oven directly after a self-clean cycle remember to allow time for the oven to cool down and the oven door to unlock. This normally takes about one hour. So a 3 hour self-clean cycle will actually take about 4 hours to complete.
SETTING KEEP WARM DRAWER CONTROL (If equipped) Keep warm drawer rack positions The rack can be used in 2 ways: • In the upright position (Figure 1) to allow low profile food items to be placed both under and on top of the rack (for example, rolls or biscuits on top of the rack and a casserole dish underneath). • In the downward position (Figure 2) to allow you to place light weight food items and empty dishware (for example, rolls or pastries and dinner plates) on the rack.
CARE & CLEANING (Cleaning Chart) Cleaning various parts of your appliance Before cleaning any part of the appliance, be sure all controls are turned off and the appliance is COOL. REMOVE SPILLOVERS AND HEAVY SOILING AS SOON AS POSSIBLE. REGULAR CLEANING WILL REDUCE THE NUMBER OF MAJOR CLEANING LATER. Surfaces How to Clean Aluminum (trim pieces) & Vinyl Use hot, soapy water and a cloth. Dry with a clean cloth.
CARE & CLEANING Ceramic glass cooktop cleaning & maintenance Consistent and proper cleaning is essential to maintaining your Ceramic glass cooktop. Prior to using your cooktop for the first time, apply the recommended CERAMA BRYTE® Cleaning Creme to the ceramic surface. Clean and buff with a non abrasive cloth or pad. This will make cleaning easier when soiled from cooking. The special cooktop cleaning cream leaves a protective finish on the glass to help prevent scratches and abrasions.
CARE & CLEANING Cleaning recommendations for the ceramic glass cooktop (continued) Plastic or foods with a high sugar content: These types of soils need be removed immediately if spilled or melted onto the ceramic cooktop surface. Permanent damage (such as pitting of the cooktop surface) may occur if not removed immediately. After turning the surface elements OFF, use a razor blade scraper or a metal spatula with a mitt and scrape the soil from the hot surface (as illustrated).
CARE & CLEANING Changing oven light Around CAUTION Oven door Be sure the oven is unplugged and all parts are COOL before replacing the oven light bulb. Do not turn the oven light on during a self-cleaning cycle. High temperature will reduce lamp life. Hinge Figure 3 Figure 4 Special door care instructions - Most oven doors contain glass that can break. Read the following recommendations: 1. Do not close the oven door until all the oven racks are fully in place. 2.
CARE & CLEANING To remove and replace storage drawer with extendible glide (some models) To Remove Storage Drawer 1. Open the drawer to the fully opened position. 2. Locate the latches on both sides of the warmer drawer. 3. Pull up on the left glide latch and push down on the right glide latch. 4. Pull the drawer away from the appliance. To Replace Storage Drawer 1. Align the glide latches on both sides of the drawer with the slots on the drawer. 2. Push the drawer back into the appliance.
BEFORE YOU CALL (Solutions to Common Problems) Oven baking For best cooking results, heat the oven before baking cookies, breads, cakes, pies or pastries, etc. There is no need to preheat the oven for roasting meat or baking casseroles. The cooking times and temperatures needed to bake a product may vary slightly from your previously owned appliance. Baking Problems and Solutions Chart Baking Problems Causes Corrections Cookies and biscuits burn on the bottom.
BEFORE YOU CALL (Solutions to Common Problems) IMPORTANT Before you call for service, review this list. It may save you time and expense. The list includes common occurrences that are not the result of defective workmanship or materials in this appliance. OCCURRENCE POSSIBLE CAUSE/SOLUTION Range is not level. Poor installation. Place oven rack in center of oven. Place a level on the oven rack. Adjust leveling legs at base of range until the rack is level.
BEFORE YOU CALL (Solutions to Common Problems) OCCURRENCE POSSIBLE CAUSE/SOLUTION Scratches or abrasions on cooktop surface. Coarse particles such as salt or sand between cooktop and utensils can cause scratches. Be sure cooktop surface and bottoms of utensils are clean before usage. Small scratches do not affect cooking and will become less visible with time. Cleaning materials not recommended for ceramic-glass cooktop have been used.
MAJOR APPLIANCE WARRANTY Your appliance is covered by a one year limited warranty. For one year from your original date of purchase, Electrolux will pay all costs for repairing or replacing any parts of this appliance that prove to be defective in materials or workmanship when such appliance is installed, used and maintained in accordance with the provided instructions. Exclusions This warranty does not cover the following: 1.