
Installation Guide


9
ELECTRIC WALL OVEN INSTALLATION INSTRUCTIONS
(with side-by-side and cooktop combination specialty installations)
Only certain cooktop models may be installed over certain
built-in electric oven models. Approved cooktops and built-in
ovens are listed by the MFG ID number and product code
(see the insert sheet included in the literature package and
cooktop installation instructions for dimensions). Do not
install a side-by-side conguration under countertops, or in
combination with a cooktop.
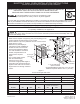
G
F
H
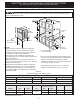
36” Min.
(91.4 cm) Min.
Use 3/4” (1.9 cm) plywood, installed on
two runners, ush with toe plate. Base
must be capable of supporting 150
pounds (68 kg) for 27" models and 200
pounds (90 kg) for 30" models.
Cut an opening in wood base minimum 9” x
9” (23 X 23 cm), 2” (5 cm) from left side ller
panel, to route armored cable to junction box.
* If no cooktop is installed directly over
the oven unit, 5” (12.7 cm) maximum
is allowed above the oor.
208/240 Volt junction box
for built-in oven.
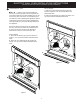
Figure 10. TYPICAL UNDER COUNTER INSTALLATION OF A SINGLE ELECTRIC BUILT-IN
OVEN WITH AN ELECTRIC COOKTOP MOUNTED ABOVE
Approx. 3”
(7.5 cm)
Cabinet side ller panels
are necessary to isolate the
unit from adjoining cabinets.
Cabinet side ller height
should allow for installation of
approved cooktop models
To reduce the risk of
personal injury and tip-
ping of the wall oven,
the wall oven must be
secured to the cabi-
net (s) by mounting
screws.
4 1/2” (11.5 cm) Max.*
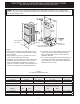
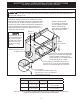
CUTOUT DIMENSIONS AND CABINET WIDTH
F. WIDTH G. DEPTH H. HEIGHT
27" (68.6 cm)
24
7
/
8
" (63.2 cm) Min.
25
1
/
4
" (64.1 cm) Max.
24 (61.0)
27
1
/
4
(69.2) Min.
28
1
/
4
(71.8) Max.
30" (76.2 cm)
28
1
/
2
" (72.4 cm) Min.
29" (73.7 cm) Max.
24 (61.0)
27
1
/
4
(69.2) Min.
28
1
/
8
(71.4) Max.
TYPICAL UNDER-COUNTER INSTALLATION
Do not remove spacers (if equipped) on the side walls of the built-in oven. These spacers
center the oven in the space provided. The oven must be centered to prevent excess heat buildup that may
result in heat damage or re.