
Installation Guide


7
ELECTRIC WALL OVEN INSTALLATION INSTRUCTIONS
(and Optional Electric or Gas Cooktop Combination)
Heavy Weight Hazard
• Use 2 or more people to move and install wall oven.
• Failure to follow this instruction can result in injury
or damage to the unit.
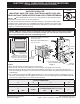
7. Cabinet Installation
IMPORTANT
Do not lift the oven by the door handle.
Install the Anti-Tip Mounting Screws:
The wall oven can tip when the door is
open. The anti-tip mounting screws supplied with the
wall oven must be installed to prevent tipping of the
wall oven and injury to persons.
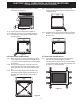
1
Unpack the wall oven. Remove the bottom trim
taped on the oven side panel.
2
The mounting holes in the side trims may be used
as a template to locate the appliance mounting
screwholes(seegure15).
3
Usethetwoscrewssuppliedtoxtheapplianceto
the cabinet.
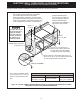
Anti-Tip Mounting Holes
Figure 15
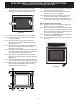
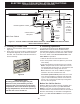
4
Insert the oven into the cabinet opening. Slide
oven inward leaving 1½" (3,8 cm) clearance
between the oven and front of cabinet (see Figure
16). Pull the armored cable through the hole for it
inthecabinetandtowardthejunctionboxwhile
moving the appliance inward.
Figure 16
1½" (3,8 cm)
clearance
between unit