All about the Use & Care of your Gas Range TABLE OF CONTENTS Setting Oven Controls ................................. 14-28 Before Setting Oven Controls .......................... 7-9 Self-Cleaning ............................................. 29-31 Before Setting Surface Controls ................... 10-11 Care & Cleaning ......................................... 32-35 Setting Surface Controls .................................. 12 Before You Call ..........................................
PRODUCT RECORD AND REGISTRATION Contents Product Registration ..................................................... 2 Important Safety Instructions ........................... 3-6 Before Setting Oven Controls .............................. 7-9 Oven racks ............................................................ 7-8 Effortless™ Oven Rack system and assembly .............. 9 Before Setting Surface Controls ...................... 10-11 Cookware material types .........................................
IMPORTANT SAFETY INSTRUCTIONS Read all instructions before using this appliance. Do not attempt to install or operate your appliance until you have read the safety precautions in this manual. Safety items throughout this manual are labeled with a WARNING or CAUTION statement based on the risk type. Definitions This is the safety alert symbol. It is used to alert you to potential personal injury hazards. Obey all safety messages that follow this symbol to avoid possible injury or death.
IMPORTANT SAFETY INSTRUCTIONS WARNING • Stepping, leaning or sitting on the door or drawers of a range can result in serious injuries and also cause damage to the appliance. DO NOT allow children to climb or play around the range. The weight of a child on an open oven door may cause the range to tip, resulting in serious burns or other injury. • NEVER use this appliance as a space heater to heat or warm the room. Doing so may result in carbon monoxide poisoning.
IMPORTANT SAFETY INSTRUCTIONS IMPORTANT INSTRUCTIONS FOR USING YOUR OVEN • Use care when opening oven door , warmer drawer or lower oven door—Stand to the side of the range when opening the door of a hot oven. Let hot air or steam escape before you remove or replace food in the oven. • Keep Oven Vent Ducts Unobstructed. The oven vent is located below the backguard. Touching the surfaces in this area when the oven is operating may cause severe burns.
IMPORTANT SAFETY INSTRUCTIONS SELF-CLEANING OVENS Grounding Instructions WARNING WARNING • Do not touch the oven during the self-clean cycle. • Keep children away from oven during self-clean cycle. • Failure to follow these instructions can result in burns. • Clean in the self-cleaning cycle only the parts listed in this Use & Care Manual. Before selfcleaning the oven, remove the broiler pan and any utensils or foods from the oven.
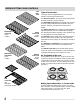
BEFORE SETTING OVEN CONTROLS Oven vent location Oven rack stop The oven vent is located below the control panel (Fig. 1). When the oven is heating, warm air passes through this vent. This venting is necessary for proper air circulation in the oven which helps to provide good baking results. Do not block the oven vent. Most flat and offset oven racks slide on rack guides provided along the oven cavity sides.
BEFORE SETTING OVEN CONTROLS flat oven rack Types of oven racks Your range may be equipped with one or more of the following oven rack types listed below: The flat oven rack may be used for most cooking needs and may be placed in all rack positions. The flat handle oven rack (some models) may be used for most cooking needs and may be placed in all* rack positions. Similar to the flat rack but comes with a handle.
BEFORE SETTING OVEN CONTROLS Effortless™ Oven Rack system Some models are equipped with a special oven rack system that automatically partially extends the oven rack from the interior oven glides to assist in easier access to your food items. This feature works whenever the oven door is opened or closed. To assemble the Effortless™ Oven Rack system: 1. Locate all required parts.
BEFORE SETTING SURFACE CONTROLS Cookware material types Set proper burner flame size The most popular materials available are: Aluminum - Excellent heat conductor. Some types of food will cause it to darken (Anodized aluminum cookware resists staining & pitting). Copper - Excellent heat conductor but discolors easily. Stainless - Slow heat conductor with uneven cooking results. Is durable, easy to clean and resists staining. Cast Iron - A slow heat conductor however will retain heat very well.
BEFORE SETTING SURFACE CONTROLS Check for proper burner cap placement Visually check for proper burner cap placement before operating any of the surface burners (See Fig.1). WARNING To prevent flare-ups and avoid creation of harmful by-products, do not use the cooktop without all burner caps properly installed to insure proper ignition and gas flame size. CAUTION To avoid possible burns DO NOT touch burner caps or surface burner grates after using any of the surface burners.
SETTING SURFACE CONTROLS Setting surface controls The ability to heat food quicker and in larger volumes increases as the burner size increases. Your gas appliance may be equipped with many different sized surface burners. It is important to select cookware that is suitable for the amount and type of food being prepared. Select a burner and flame size appropriate for the cookware size. The standard size burner or burners may be used for most surface cooking needs.
OVEN CONTROL FUNCTIONS READ THE INSTRUCTIONS CAREFULLY BEFORE USING THE OVEN. For satisfactory use of your oven, become familiar with the various keypad functions as described below. Oven control keypads (for models with probe feature only) easy probe keypad— press to momentarily display internal food temperature while cooking with the probe. bake time keypad— up and down arrow keypads— use with the use to enter the length feature or function keypads to set oven of baking time needed.
SETTING OVEN CONTROLS Setting the clock When the appliance is first powered up or when the power supply to the appliance has been interrupted and restored, the display will flash the time of day. Be sure to set the clock with the correct time of day before using the oven. To set the clock when the display is flashing: 1. Press once. "CLO" will appear in the display. 2. Within 5 seconds, adjust the time by pressing the or and release the keypad when the correct time displays.
SETTING OVEN CONTROLS Setting lock feature Setting the timer The oven control may be set to lock the oven door and most oven control keypad operations. The built-in minute timer may be used as an extra reminder in the kitchen that will beep when the set time has run out. To set the lock feature: To set the timer: Press and hold the keypad for 3 seconds. "Loc" will appear in display, the "door locked" indicator light will flash and the motor driven door lock will begin to lock the oven door.
SETTING OVEN CONTROLS Setting bake Bake time The oven may be set to bake at any temperature from 170°F to 550°F (77°C to 287°C). The factory preset automatic bake temperature is 350°F (177°C). A bake time setting may be added to most oven baking features. Use the bake time setting to start the oven immediately and to turn off automatically after the set bake time runs out. To set bake: 1. Press 2. Within 5 seconds, press the or keypad. The display will show 350°F (177°C).
SETTING OVEN CONTROLS Start time Use this keypad to add start time instructions to the bake time setting or with the self-clean feature. WARNING FOOD POISONING HAZARD. Do not let food sit for more than one hour before or after cooking. Doing so can result in food poisoning or sickness. CAUTION When the set bake time runs out: 1. "End" will appear in the display window and the oven will shut-off automatically. 2.
SETTING OVEN CONTROLS Quick bake (some models) Benefits of the quick bake feature — Foods will cook faster, saving time and energy. — Multiple rack baking. — No special pans or bakeware needed. 7 6 5 4 3 How quick bake works Quick bake uses a fan to circulate the oven's heat uniformly and continuously around the oven. This improved heat distribution allows for fast, even cooking and browning results. It also gives better baking results when using two racks at the same time.
SETTING OVEN CONTROLS Easy probe handle For the best results when cooking many foods such as roasts, hams or poultry, use the easy probe feature. This feature also works well with foods such as meat loaf and casseroles. NOTES probe cable The easy probe will provide you with the internal temperature of the food during cooking and eliminates any need for guesswork. For some foods, especially poultry or roasts, checking the internal temperature is the best way to insure properly cooked food.
SETTING OVEN CONTROLS Easy probe (cont’d) probe receptacle probe connector handle Fig. 1 Proper probe placement in food: • Always insert the probe so that the probe tip rests in the center of the thickest part of meat or food. For best results, do not allow probe temperature sensor tip to contact any bone, fat, gristle or the cookware. • For bone-in ham or lamb, insert the probe into the center of lowest large muscle or joint.
SETTING OVEN CONTROLS Broil Use the broil feature to cook meats that require direct exposure to radiant heat for optimum browning results. When broiling, always remember to arrange the oven racks while the oven is still cool. Position the rack as suggested in the broil settings table (See Figs. 1 & 4). 7 6 5 To set broil: 1. Arrange the oven rack while oven is still cool. 2. Press broil keypad. " — — "will appear in display. or 3. Press and hold the Fig.
SETTING OVEN CONTROLS Adjusting the oven temperature Operating the oven light Your appliance has been factory calibrated and tested to ensure accurate baking temperatures. For the first few uses, follow your recipe times and temperature recommendations carefully. If you think the oven is cooking too hot or too cool for your recipe times, you may adjust the control so the oven cooks hotter or cooler than the temperature displayed.
SELF-CLEANING Preparing for self-clean Read before starting self-clean A self-cleaning oven cleans itself using high temperatures that are well above normal cooking temperatures. The self-clean feature, if used properly, will eliminate soils from the oven completely or reduce them to a fine powdered ash. Once the oven has cooled, simply wipe away the ash using a damp cloth. Your oven provides three self-cleaning duration choices.
SELF-CLEANING Setting clean To set self-clean: 1. Remove all items from the oven interior, cooktop, storage (some models) or warmer drawer (some models), all oven racks from the oven and be sure the oven door is completely closed. 2. Press the keypad. "---" appears in the display. 3. To start press the or keypad once. "3:00" will appear in the display indicating that a 3 hour selfclean time is selected.
SELF-CLEANING Setting self-clean with start time You may add start time instructions to the self-clean feature, which will automatically start clean at a later time. IMPORTANT Immediately after setting clean using start time instructions the oven door will start to lock. Check to be sure the oven is completely empty before setting clean with start time.
CARE & CLEANING Cleaning recommendation table Surface type Recommendation Control knobs (some models) Painted body parts Painted decorative trim Aluminum, plastic or vinyl trim For general cleaning, use hot, soapy water and a cloth. For more difficult soils and built-up grease, apply a liquid detergent directly onto the soil. Leave on soil for 30-60 minutes. Rinse with a damp cloth and dry. Do not use abrasive cleaners on any of these materials; they can scratch.
CARE & CLEANING Cleaning the cooktop and surface burners CAUTION To avoid possible burns DO NOT attempt the cleaning instructions provided below before turning OFF the surface burners and provide sufficient time for the cooktop and all cooktop parts to cool. Checking for proper burner cap placement (cont’d) On round style burners, the burner cap lip should fit snug into the center of burner head and rest level (Fig. 1).
CARE & CLEANING Cleaning the cooktop and surface burners Do not use oven bottom liners or use aluminum foil to cover the oven bottom or any oven racks. CAUTION To avoid possible burns DO NOT attempt any of the cleaning instructions provided below before turning OFF all of the surface burners and allow them to cool. To clean the surface burner heads For proper gas flow it may be necessary to clean the burner head and slots. To clean, first use a clean DAMP cloth to soak up any spills.
CARE & CLEANING Removing and replacing the lift-off oven door Oven door hinge locations with oven door fully open. CAUTION To avoid possible injury when removing or replacing the oven door, follow the instructions below carefully and always handle the oven door with both hands positioned away from the door hinge areas. IMPORTANT Fig. 1 The door is heavy. For safe, temporary storage, lay the door flat with the inside of the door facing down. K LOC To remove oven door: 1.
BEFORE YOU CALL • Solutions to common problems Problem Possible Causes Solutions Display flashes time. Power interruption. Press cancel then set the correct time of day. Oven control displays F __ (followed with a number) and oven control beeps. The oven control has detected a fault or error condition. Press cancel to clear the display & stop beeping. Try bake or broil feature again.
Solutions to common problems • BEFORE YOU CALL Problem Possible Causes Solutions Oven portion of appliance does not operate. Gas cooktop burners operate. Gas regulator shut-off valve may have been moved to OFF at installation. Be sure gas regulator valve is set to the ON position. See installation instructions. Incorrect oven control setting. Be sure the oven control was set correctly for the requested feature.
BEFORE YOU CALL • Solutions to common problems Problem Possible Causes Solutions bake or self-clean did not start at the time expected. The time of day is incorrect. Set clock with correct time of day before adding a delay start setting. See "Setting the clock" in Setting Oven Controls section. Strong odor from range or smells hot. Self-clean was started for the first times or from a new range. It is normal for odors to occur during self-clean, especially during the first self-clean cycle.
Solutions to common problems • BEFORE YOU CALL Problem Possible Causes Solutions Oven smokes excessively when broiling. Oven door was left open. Be sure oven door is closed when broiling. Meat too close to upper burner. Reposition oven rack lower to provide proper clearance between the food & the upper burner. Meat not prepared for broil. Remove excess fat from meat. Remove fatty edges. Insert placed incorrectly on broil pan (some models).
NOTES 34
NOTES 35
MAJOR APPLIANCE WARRANTY This page is left blank intentionally Your appliance is covered by a one year limited warranty. For one year from your original date of purchase, Electrolux will pay all costs for repairing or replacing any parts of this appliance that prove to be defective in materials or workmanship when such appliance is installed, used and maintained in accordance with the provided instructions. Exclusions This warranty does not cover the following: 1. 2. 3. 4. 5. 6. 7. 8. 9. 10. 11. 12. 13.