All about the Use & Care of your Refrigerator TA B L E O F C O N T E N T S Automatic Ice Maker - Freezer………………....24 Features at a Glance....................................4 Storage Features…………………………………….25 Installation.................................................5 Storing Food and Saving Energy……………….29 Door Removal Instructions.........................10 Normal Operating Sounds and Sights………..30 Installing Door Handles..............................13 Changing the Filter………………………………….
IMPORTANT SAFETY INSTRUCTIONS WARNING Please read all instructions before using this refrigerator. For your Safety • DO NOT store or use gasoline, or other flammable liquids in the vicinity of this or any other appliance. Read product labels for warnings regarding flammability and other hazards. • DO NOT operate the refrigerator in the presence of explosive fumes.
IMPORTANT SAFETY INSTRUCTIONS Child Safety Destroy or recycle the carton, plastic bags, and any exterior wrapping material immediately after the refrigerator is unpacked. Children should NEVER use these items to play. Cartons covered with rugs, bedspreads, plastic sheets or stretch wrap may become airtight chambers, and can quickly cause suffocation. Risk of child entrapment Child entrapment and suffocation are not problems of the past.
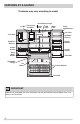
FEATURES AT A GLANCE *Features may vary according to model *Features may vary according to model *Incandescent Light *Fresh Food Flipper *LED Water Ice Bin Ice Maker Guide Light Filter *Air Filter *Can Rack SpillSafe® Shelves Flipper Mullion SpillSafe ® Shelves Crisper Drawer Crisper Drawer StoreMoreTM Drawer Adjustable Hinges *Dairy Compartment *Door Bin *Ice Maker Freezer Baskets Toe Grille IMPORTANT Features not purchased with your refrigerator can be purchased at www.frigidaire.
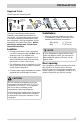
INSTALLATION Required Tools You will need the following tools: Components Provided: Top Hinge Cover Front Screw Tools Necessary: Top Hinge Cover Rear Screw (OR) Top Hinge Screw Lower Hinge Screw Phillips™ Head or #2 Square Drive Head This Use & Care Guide provides general installation and operating instructions for your model. We recommend using a service or kitchen contracting professional to install your refrigerator. Use the refrigerator only as instructed in this Use & Care Guide.
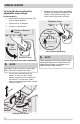
INSTALLATION Leveling Freezer Drawer (if necessary) To level the freezer drawer: 1. Check gasket seal around top, bottom, and sides of freezer drawer. 2. If gasket is not sealed, open drawer and slightly loosen four (4) drawer screws (two (2) on each side) to allow drawer to rotate. Remove Hex Head Drawer Screw Remove Hex Head Drawer Screw Do Not Remove Other Screws Do Not Remove Other Screws Remove Hex Head Drawer Screw 3. Close drawer and recheck the seal on the gasket (A).
INSTALLATION 2. You can raise or lower each door. Use a 3/8” socket wrench to turn the adjustment screws (1 per side). To raise: turn adjustment screw clockwise. 1. Open door to provide access to screw. 2. Loosen screw. 3. Adjust door to desired location. To lower: turn adjustment screw counterclockwise. 3. Ensure both doors are bind-free with their seals touching the cabinet on all four sides and that cabinet is stable. 4. After unit is leveled, lower anti-tip leg until it contacts the floor.
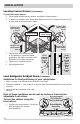
INSTALLATION To level the doors using the adjustable lower hinge (select models): 1. Remove all food items from door bins on door being adjusted. 2. Open doors to 90 degrees. 3. Loosen or remove screw. Screw Screw (where applicable) Bottom of Door Loosen/Remove Screw (where applicable) NOTE Adjustable hinge should only be used after doors have been leveled with rollers. 4. Lift the door while adjusting the washer. To raise the door, rotate washer clockwise (when viewed from the bottom).
INSTALLATION To adjust the flipper mullion: 1. Loosen the screw located on the flipper mullion hinge. Flipper Mullion Screw Flipper Mullion Hinge Adjusting Flipper Mullion Screw 2. Adjust flipper mullion height. For proper connection with the flipper mullion guide, there should be a separation about the thickness of a coin (0.060 inches, or 1.5 mm) between the guide and flipper mullion. Mullion Guide Flipper Mullion Thickness of a Coin Adjusting Flipper Mullion Height 3. Retighten screw.
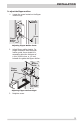
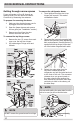
DOOR REMOVAL INSTRUCTIONS Getting through narrow spaces If your refrigerator will not fit through an entrance area, you can remove the doors. Check first by measuring the entrance. To remove the refrigerator doors: 1. Trace lightly around the door’s top hinges with a pencil. This makes reinstallation easier. 2. Disconnect the harness by grasping both sides of the connector firmly, depress the latch, and pull apart. Remove the two (2) screws from the top hinge.
DOOR REMOVAL INSTRUCTIONS NOTE You will be pulling approximately five (5) feet of water tube from the back of the refrigerator. 4. Unscrew the three (3) lower hinge screws and hinge if necessary. To reinstall the right door, reverse the above steps. Lower Hinge Removal Once both doors are in place, ensure they are aligned with each other and level (Please see the “Installation” section for more details), and replace the top hinge cover.
DOOR REMOVAL INSTRUCTIONS NOTE Do not remove center screw from freezer drawer. This is a factory adjustment. Push Against Freezer Drawer CAUTION Drawer is heavy. Use caution when lifting. 1. Lift drawer up and out to remove. Installing Freezer Drawer 1. With lower slides pulled out, hang drawer onto slide brackets ensuring pins on each side are fully inserted into slots on each side. Drawer Assembly Fully Extend Drawer Slides Pin Cabinet Slot 2.
INSTALLING DOOR HANDLES Door Handle Mounting Instructions for Frigidaire Gallery® 1. Remove handles from carton and any other protective packaging. 2. Position fresh food handle end over upper and lower pre-installed shoulder bolts (A) that are fastened into door, ensuring the holes for the set screws are facing towards the opposite door. 3. While holding handle firmly against door, fasten upper and lower Allen set screws (B) with supplied Allen wrench. 4.
INSTALLING DOOR HANDLES Mounting Freezer Handle CAUTION Wear gloves and safety goggles. Use extreme CAUTION when installing these handles. Door Handle Mounting Instructions for Frigidaire Professional® 1. Remove handles from carton and any other protective packaging. 2. Position fresh food handle end over upper and lower pre-installed shoulder bolts (A) that are fastened into door, ensuring the holes for the set screws are facing towards the opposite door. 3.
INSTALLING DOOR HANDLES NOTE All set screws should be tightened so the screw is below the surface of the handle. The handles should be drawn tight to freezer and refrigerator doors with no gaps. Opening the opposite door while tightening the Allen screw makes installation easier. The door handle may loosen over time or if it was installed improperly. If this happens, tighten the set screws on the handles.
INSTALLING DOOR HANDLES Mounting Freezer Handle CAUTION Wear gloves and safety goggles. Use extreme CAUTION when installing these handles.
CONNECTING THE WATER SUPPLY WARNING To avoid electric shock, which can cause death or severe personal injury, disconnect the refrigerator from electrical power before connecting a water supply line to the refrigerator. CAUTION To Avoid Property Damage: • Copper or Stainless Steel braided tubing is recommended for the water supply line. Water supply tubing made of ¼ inch plastic is not recommended to be used.
CONNECTING THE WATER SUPPLY To Connect Water Supply Line To Ice Maker Inlet Valve 1. 2. 3. 4. 5. 6. 7. 8. 9. 18 Disconnect refrigerator from electric power source. Place end of water supply line into sink or bucket. Turn ON water supply and flush supply line until water is clear. Turn OFF water supply at shutoff valve. Remove plastic cap from water valve inlet and discard cap. If you use copper tubing - Slide brass compression nut, then ferrule (sleeve) onto water supply line.
CONTROLS deactivate. This restricts undesired changes to the refrigerator’s settings and prevents use of the ice and water dispenser. NOTE Your appliance may have some or all of the features listed below. Become familiar with these features and their use and care. ice off (Fresh Food Ice Maker) quick freeze (Freezer Ice Maker, select models) Press and hold for three (3) seconds to turn the ice maker “ON” or “OFF”. The ice maker is turned off when the LED above the “Ice Off” icon is illuminated.
CONTROLS Your refrigerator is equipped with a touch control panel. It is only necessary to gently touch the control panel. There are three (3) dispenser modes: 1. 2. 3. Water Ice Cubes Crushed Ice A green indicator light will be illuminated above the active feature. IMPORTANT Pressing the power on/off icon does not turn off power to your refrigerator. You must unplug the power cord from the wall outlet. Sabbath Mode acknowledge the alarm. Other modes may be turned off until the alarm is acknowledged.
CONTROLS LCD Controls (select models) options User Interface power on-off Your refrigerator is equipped with a user interface display. It is only necessary to touch the panel. There is no need to press with force. Touch an icon (Water/Cube/Crush) to activate the desired dispenser mode. light on-off On / Off control lock Press and hold for three (3) seconds to activate and deactivate. The Lock icon will be displayed in the LCD window.
AUTOMATIC ICE & WATER DISPENSER Priming the water supply system CAUTION For proper dispenser operation, recommended water supply pressure should fall between 30 psi and 100 psi. Excessive pressure may cause water filter to malfunction. 1. Begin filling the tank by pressing and holding a drinking glass against the water dispenser paddle. 2. Keep the glass in this position until water comes out of the dispenser. It may take about 1½ minutes. 3.
AUTOMATIC ICE & WATER DISPENSER IMPORTANT On occasion, unusually small ice cubes may be noticed in the bucket or in dispensed ice. This could occur in normal operation of the ice maker. If you start seeing these more frequently, it may be an indication of low water pressure or the water filter needs to be replaced. As the water filter nears the end of its useful life and becomes clogged with particles, less water is delivered to the ice maker during each cycle.
AUTOMATIC ICE MAKER - FREEZER Operation & Care of the Freezer Ice Maker • The following sounds are normal when the ice maker is operating: - Motor running (select models) - Ice dropping into ice bin After the refrigerator is installed properly, the ice maker can produce ice within 24 hours. It can completely fill the ice bin in about three (3) days. When using the ice maker for the first time and in order for the ice maker to work properly, it is necessary to clear air from water filter tubing.
STORAGE FEATURES Crispers CAUTION To avoid personal injury or property damage, handle tempered glass shelves carefully. Shelves may break suddenly if nicked, scratched, or exposed to sudden temperature change. Allow the glass shelves to stabilize to room temperature before cleaning. Do not wash in dishwasher. Crisper drawers are designed for storing fruits, vegetables, and other fresh produce. NOTE Features may vary according to model.
STORAGE FEATURES Deli drawer 6. Place bin liner into bin. Ideal for storage of deli meats and cheese. Accessories (vary by model) Removable Can Dispenser Doors Storage bins The can dispenser holds six 12 ounce cans. Insert cans into top of bin and dispense from the bottom. The doors to your fresh food compartment use a system of modular storage bins. All of these bins are removable for easy cleaning. Some of them have fixed positions, while others can be adjusted to your needs.
STORAGE FEATURES Freezer Features (vary by model) Stabilizer Bar To Remove Lower Basket 1. Remove all items from basket. 2. Remove the basket by tilting it forward and lifting it from the retainer clips. Basket Retainer Clips Two Freezer Baskets To Remove Upper Basket 1. Remove all items from basket. 2. Remove basket by pulling baskets out to their full extension and lift out. Basket Retainer Removing Lower Basket To reinstall lower basket, insert basket into retainer clips.
STORAGE FEATURES Lift up on the rear of the lower divider and pull out. Lower Basket Divider Spill Guard Tray Lower Basket Divider & Spill Guard Tray To reposition the pivoting divider (some models), lift up and slide to desired location. The pivoting divider is not designed to be removed. Spill Guard Tray Lower Basket Pivoting Divider Lower Basket Pivoting Divider (some models) NOTE Spill Guard Tray should be hand washed in warm water.
STORING FOOD AND SAVING ENERGY Ideas for storing foods Fresh food storage • Keep the fresh food compartment between 34° F and 40° F with an optimum temperature of 37° F. • Avoid overcrowding the refrigerator shelves, which reduces air circulation and causes uneven cooling. Fruits and vegetables • Store fruits and vegetables in crisper drawers, where trapped moisture helps preserve food quality for longer time periods. • Wash items and remove excess water.
NORMAL OPERATING SOUNDS AND SIGHTS Understanding the sounds you may hear Your new, high-efficiency refrigerator may introduce unfamiliar sounds. These sounds normally indicate your refrigerator is operating correctly. Some surfaces on floors, walls, and kitchen cabinets may make these sounds more noticeable. The following is a list of major components in your refrigerator and the sounds they can cause: A. Evaporator Refrigerant through the evaporator may create a boiling or gurgling sound. B.
CHANGING THE FILTER Locating the Filters Your refrigerator is equipped with water filtering system. The water filter system filters all dispensed drinking water, as well as the water used to produce ice. Water Filter The water filter is located at the top right side of the fresh food compartment. Replacing the Water Filter In general, you should change the water filter every six months to ensure the highest possible water quality.
CHANGING THE FILTER To replace your water filter: It is not necessary to turn the water supply off to change the filter. Be ready to wipe up any small amounts of water released during the filter replacement. 1. Turn Off the ice maker power switch. 2. Remove the filter by pushing on the end/face of the filter. 3. Slide the old water filter cartridge straight out of the housing and discard it. 4. Unpackage the new filter cartridge.
CARE & CLEANING Protecting your investment Keeping your refrigerator clean maintains its appearance and prevents odor build-up. Wipe up any spills immediately and clean the freezer and fresh food compartments at least twice a year. NOTE Do not use abrasive cleaners such as window sprays, scouring cleansers, flammable fluids, cleaning waxes, concentrated detergents, bleaches, or cleansers containing petroleum products on plastic parts, interior doors, gaskets, or cabinet liners.
CARE & CLEANING Care and cleaning tips Part Interior & Door Liners Door Gaskets Drawers & Bins Glass Shelves Toe Grille Exterior & Handles Cleaning Agents • Soap and water • Baking soda and water • Soap and water • Soap and water • • • • • • • Soap and water Glass cleaner Mild liquid sprays Soap and water Mild liquid sprays Vacuum Soap and water • Non abrasive glass cleaner Exterior & Handles (Stainless Steel Models Only) • Soap and water • Stainless steel cleaners Tips and Precautions • Use two (2) t
CARE & CLEANING Installing the Ice Chute Extension 1. Turn the refrigerator off using the button on the control panel (refer to the “Controls” section of this Manual). 2. Align the extension with the ice chute so that the snap clips are just inside the front edge of the chute. 3. Push upward until the extension snaps into place. 4. Turn your refrigerator back on. Replacing LED Lights (select models) The fresh food compartments of your refrigerator may have LED lights.
CARE & CLEANING To replace light bulbs: Light Sockets Located Behind Glass Shelves Light Bulb 1. Unplug your refrigerator’s power cord. 2. Wear protective gloves. 3. Remove light cover, if necessary. 4. Unscrew and replace old bulb with an appliance bulb of the same type and wattage (normally 40 watts). 5. Replace light cover, if necessary. 6. Plug in the refrigerator’s power cord.
BEFORE YOU CALL 1-800-944-9044 (United States) 1-800-265-8352 (Canada) CONCERN POTENTIAL CAUSE Visit our web site at www.frigidaire.com. COMMON SOLUTION AUTOMATIC ICE MAKER Ice maker is not making any ice. • Ice maker is turned off. • Refrigerator is not connected to water line or water valve is not open. • The water supply line is kinked. • The water filter is not seated properly. • The water filter may be clogged with foreign material.
BEFORE YOU CALL CONCERN POTENTIAL CAUSE COMMON SOLUTION DISPENSER (Ice & Water) Dispenser will not dispense ice. • Dispenser lock out is engaged. • There is no ice in the bin to be dispensed. • The refrigerator doors are not completely closed. • Dispenser paddle has been pressed too long and the dispenser motor has overheated. • Press and hold control lock for three (3) seconds. • See the “Ice maker is not making any ice” section above. • Be sure the refrigerator doors are completely closed.
BEFORE YOU CALL CONCERN POTENTIAL CAUSE COMMON SOLUTION OPENING/CLOSING OF DOORS/DRAWERS (Continued) Drawers are difficult to move. • Food is touching shelf on top of drawer. • Track that drawers slide on is dirty. • Remove top layer of items in drawer. • Ensure drawer is properly installed on track. • Clean drawer, rollers, and track. See Care & Cleaning. RUNNING OF REFRIGERATOR Compressor does not run. • Freezer control is set to “OF” or “0”. • Refrigerator is in defrost cycle.
BEFORE YOU CALL CONCERN POTENTIAL CAUSE COMMON SOLUTION WATER/MOISTURE/FROST OUTSIDE REFRIGERATOR Moisture collects on outside of refrigerator or between doors. 40 • Weather is humid. • Door is slightly open, causing cold air from inside refrigerator to meet warm air from outside. • This is normal in humid weather. When humidity is lower, the moisture should disappear. • See CONCERN column OPENING/ CLOSING OF DOORS/DRAWERS.
MAJOR APPLIANCE WARRANTY Your appliance is covered by a one year limited warranty. For one year from your original date of purchase, Electrolux will pay all costs for repairing or replacing any parts of this appliance that prove to be defective in materials or workmanship when such appliance is installed, used and maintained in accordance with the provided instructions. Exclusions This warranty does not cover the following: 1.