
Use and Care Guide

8
DOOR REMOVAL INSTRUCTIONS
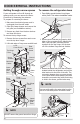
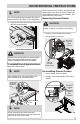
2 Disconnect the harness by grasping both
sides of the connector rmly, depress the
latch, and pull apart. Remove the two
screws from the top hinge. Lift the door
off of the bottom hinge and set it aside.
3 Detach the water tube from the connector
located behind the refrigerator and pull the
tube back out to the front of the unit. The
connector releases when you press inward
on the outer sleeve while pushing the tube
toward the connector then while continuing
to hold in the sleeve, pull the tube away.
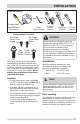
Getting through narrow spaces
If your refrigerator will not t through an
entrance area, you can remove the doors.
Check rst by measuring the entrance.
To prepare for removing the doors:
1 Make sure the electrical power cord is
unplugged from the wall outlet.
2 Open the freezer drawer and remove the
toe grille (see Installation section).
3 Remove any food from the door shelves
and close the doors.
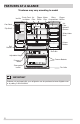
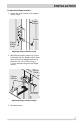
To remove the top hinge covers:
1 Remove the two screws from each cover
over the top door hinges.
2 Lift inside edge of hinge cover and tilt back.
Rear
Cover
Screw
Ground
Screw
Top
Hinge
Top Hinge
Cover
Hinge
Screws
Multi-wire
Cables
Leave
Hinge
With
Door
Front
Cover Screw
Water
Line
Rear
Cover
Screw
Top
Hinge
Ground
Screw
Front
Cover Screw
Top Hinge
Cover
Hinge
Screws
Leave
Hinge
With
Door
To remove the refrigerator doors
1 Trace lightly around the door’s top hinges
with a pencil. This makes reinstallation easier.
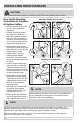
Press
Press
Approximately
5 feet
Water
Line
NOTE
DO NOT remove the ground screw from hinge.
NOTE
Use care while pulling the water tube from the
unit to be sure that you do not kink the tube.