FRIGIDAIRE Ssh iOE (= TABLE OF CONTENTS Important Safety Instructions. Features at a Glance... Installation Door Removal Instructions... Handle Installation Connecting Water Supply... Controls. www dungaree. com USA 1-800-944-0044 Storage Features. Automate Ice & Water Dispenser Changing the Filter Normal Operating Sounds and Sights... 22 Care and Cleaning Before you Call. Mayor Appearance Warranty weensfrigdaire.
IMPORTANT SAFETY INSTRUCTIONS AL were Please read all instructions before using this refrigerator. For your Safety DO NOT store or use gasoline, or other flammable liquids in the vicinity of this or any either appliance, Read product Labels for warnings regarding flammability and other hazards, DO NOT operate the refrigerator in the presence of explosive fumes. Avoid contact with any moving parts of automatic ice maker. Remove all staples from the carton.
IMPORTANCE SAFETY INSTRUCTIONS — even if they will sit for “just a few days” if you are getting rid of your oid refrigerator or freezer, please follow the instructions below to help prevent accidents. Proper Disposal of Refrigerators Freezers We strongly encourage responsiveness appliance recycling/tisposal methods.
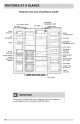
FEATURES AT A GLANCE Features may vary according to model SpillSafe® ioe Cream Shelf. y Adjustable Shelf ice Wake A Sifter Water Sifter Fixed Dior Bin Dairy Compartment ice Container Door Bin SpiiSate® Shelf Justifiable Shelf Wine Rack Tall Boiler Tit Cut Retainer Door Bin Door Bin Special tern Massif Basket Spec Glide Out feat Keeper Basket and Cover Can Rack Crisper Pan and Cover Fixed Door Bin Se Toe Rile = money Features not included with your refrigerator can be purchased at www.
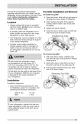
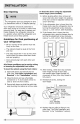
INSTALLATION This Use & Care Guide provides general Toe Grille Installation and Removal operating instructions for your model, Use the . 5 refrigerator only as instructed in this Use & Care 10 install toe grille Guide. Before starting the refrigerator, 4 Open both doors, Slide left and right sides of follow these important first steps. we grille aver lower hinges of refrigerator.
INSTALLATION Door Opening 3 nom The refrigerator doors are designed to shut by themselves within a 20 degree opening. Your refrigerator should be positioned to allow ens access ta a counter or table when removing food.
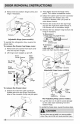
“Tools Necessary: Philips ™ Head Socket ‘ Adjustable Wrench Set Wrench 3/8" Vised Wrench Top Hinge Top Hinge Caver Front, Color Stay Resew & Getting through narrow spaces If your refrigerator will not fit through an entrance area, you can reduce its size by removing the doors, Check first by measuring the entrance.
DOOR REMOVAL INSTRUCTIONS 3 Remove the two bottom hinge screws and 2 Trace lightly around the hinge with a Hinge if necessary, pencil. This makes re installation easier. 3 3 Detach the water tube from the connector located below the freezer door The connector releases when you press its outer sieve inward. 4 Remove the screws from the top hinge and pull the multi-wire cable through it. Lift the door off of the bottom hinge, 5 Remove the two bottom hinge screws and hinge if necessary.
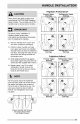
£L cumin Wear gloves and safely goggles and use extreme CAUTION when installing these handles. The rounded end of the handles may be sharp (some models). P9 pollutant Ta ensure proper installation of handles, please review these instructions and Illustrations thoroughly prior to installing the handles. 1 Remove handles from carton and any other protective packaging.
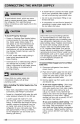
CONNECTING THE WATER SUPPLY Ah warns To avoid electric shock, which can cause death or severe personal injury, disconnect the refrigerator from electrical power before connecting a water supply line to the refrigerator. AL cardamon To Avoid Property Damage: Copper or Stainless Steel braided tubing is recommended for the water supply line. Water supply tubing made of 14 inch plastic is not recommended to be used.
CONNECTING THE WATER SUPPLY 5 With steel clamp and screw, secure water supply line (copper tubing only} to rear panel of refrigerator as shown, 6 Coil excess water supply fine (copper tubing only), about 2'a turns, behind refrigerator as shown and arrange coils so they do not vibrate or wear against any other surface. 7 Churn ON water supply at shutoff valve and tighten any connections that leak.
CONTROLS User Interface {varies by model} RT REEL A RTI ptt JRC, JOR | g [J Fess a I ERIN options water cube crush Enlarged view of user interface display menu (varies by model) RCT i quick ice on off display on off refrigerator temp refrigerator temp a Py o freezer temp ALI i water filter good order air filter good order default settings
CONTROLS captions a exit content locked el Tight O nuk freeze Bn of quick ice on off distrait on off refrigerator temp freemen temp mode “Fel Bower bit water filter Used 10 enter aid ext the oti menu and make selecting Toggles the options and run dames, While in dhe locked stole will the abide in Change any Josefina on the Spleen hor dispense ie Ang winter The Cod Locked! cataract wil lash and an edible haring tore ie Bred “Toggles dispenser light On and Off.
CONTROLS Alarms Power Failure Freezer Temp Rash Food Temp Door Ajar Flapper i In the event of & power failure, the power fail alert will be inflated, Press alarm reset to acknowledge the alarm. Other modes may be turned off until the alarm is acknowledged. When the power fail alert is acknowledged, the refrigerator will resume normal operation. The high temp alarm may also be Illuminated until a safe operating range temperature has been reached.
Ab con To avoid personal injury or property damage, handle tempered glass shelves carefully, Shelves may break suddenly if nicked, scratched, or exposed to sudden temperature change. Allow the glass shelves to stabilize £0 room temperature before cleaning, Do nat wash in dishwasher. Cantilever Shelf Adjustment Refrigerator shelves are easily adjusted to sit individual needs, Before adjusting the shelves, remove ali fond. Cantilever shelves are supported at the back of the refrigerator.
STORAGE FEATURES Chill Drawer (some models) Some models are equipped with 3 Chi Drawer, Chill Drawer temperatures tan be adjusted by sliding the Rill Drawer Temperature Control in either direction. Use this pan for short term storage of bulk meat items.
AUTOMATIC ICE & WATER DISPENSER Priming the Water Supply System Ice Production: What to Expect Your refrigerator’s water supply system includes several tubing fines, an advanced water fighter, a distribution valve bank, and a reserve tank 0 ensure ample supply to the ice and water dispenser at all times, This system needs to be completely fled with water when first connected 1 an external supply line.
AUTOMATIC ICE & WATER DISPENSER Turning the REAR MOUNTED Ice Maker On and Off Tee production Is controlled by the ice maker's ON/OFF power switch, To gain access to the ice maker, pull the ice cream shelf out.
AUTOMATIC ICE & WATER DISPENSER Cleaning the Ice Maker Clean the ice maker and ice bin at regular intervals, particularly before you take a vacation or move, To clean the ice maker: 1 Turn Off the ice maker. 2 Remove the Ice bin by lifting up and out, 3 Empty and carefully clean the ice bin with mild detergent. Rinse with clear water, Do nat use harsh or abrasive cleaners.
CHANGING THE FILTER Locating the Filter Your refrigerator is equipped with a water filtering system. The water filter system filters all dispensed drinking water, as well as the water used to produce ice. Air Filter {some models) The air filter is located at the top of the fresh food compartment next to the water filter.
More about your Advanced Water Filter The Pu Resource Ultra™ ice NSE, / and water filter system is tested and certified to TRANSFUSE Standards 42 and 53 for the reduction of claims specified on the performance data sheet, Do not use with water that is micro biologically unsafe or of unknown quality without adequate disinfection before or after the system.
NORMAL OPERATING SOUNDS AND SIGHTS Understanding the Sounds you may Hear Your new, high-efficiency refrigerator may introduce unfamiliar sounds, These sounds normally indicate your refrigerator is aerating correctly.
CARE BR CLEANING Protecting your investment Keeping your refrigerator clean maintains appearance and prevents odor build-up, Wipe up any spills immediately and clean the freezer and fresh food compartments at least twice a year, Withe cleaning, take the following precautions: + Never yse CHLORIDE or cleaners with bleach to clean stainless steel. = Do not wash any removable parts in a dishwasher « Always unplug the electrical power cord from the wall outlet before cleaning.
CARE & CLEANING Care and Cleaning Tips Part Cleaning Agents flock and Precautions Interior * Soap and water + Use two tablespoons of baking soda in one quart & Door + Baking soda and of warm water, Liners water = Be sure to wring excess water out of sponge or cloth before cleaning around controls, light bulb or any electrical part. Door » Shone cite ins gaskets win 6 con Soft clad Gaskets Drawers & + Soap and water = Use a soft cloth to clean drawer runners and Bins tracks.
CARER CLEANING Ice Chute Extension (some models) Installing the Ive Chute The ice chute extension is designed to better Extension direct ice flow Into containers. 1 Turn the refrigerator off using the Mutton on the control panel {refer to the “Controls” section of this Manual), Pl ibe 2 Align the extension with the ice chute so ¥ that the snap clips are just inside the front edge of the chute, 3 Push upward until the extension snaps into place.
CARE & CLEANING Replacing LED Lights (select models) The fresh food compartments of your refrigerator may have LED lights. Always use Frigidaire parts for replacement. To replace LED Lights: 1 Unplug your refrigerators power cord. 2 Remove lens cover. 3 Remove LED board, 4 Replace LED board and snap in place assuring the fight is facing In toward the unit {inside fresh food).
Replacing ght bulbs (select models) Both the freezer and fresh food compartments of your refrigerator include fight bulbs that will need replacing from time to time. Some lights have covers that you will need to remove before replacing the bibs. Always use bulbs that are designed for appliance lighting, Tao replace light bulbs: 1 Unplug your refrigerator’s power cord, 4b caution Wear gloves when replacing light bulbs to avoid feting cut, 2 Wear gloves as protection against possible broken glass.
BEFORE YOU CALL 1-800-944-3044 (United States) 1-800-265-8352 (Canada) Visit our web site at www. frigidness CONCERN | CAUSE I SOLUTION AUTOMATIC ICE MAKER Pacemakers | » Ie maker is muted off. | + Turn on ioe maker, For the fresh food ice not making any ive. + Refrigerator is not water valve is not open. The water supply line is kinked. The water filter is not seated properly. The water filter may be clogged with foreign material.
BEFORE YOU CALL CONCERN _| CAUSE | SOLUTION AUTOMATIC ICE MAKER {Continued} Freezer ice Ice maker wire signal » Mace any item or frozen ice abuse that maker will not arm is being held down ray block the signet arm from being in the stop making bya package in the off or upward position, See Automatic foe ice {select freezer that has fallen Maker-Freezer section in manual, models). against ice maker.
BEFORE YOU CALL CONCERN _| CAUSE | SOLUTION DISPENSER (Ice & Water) (Continued) Water has an + Water has not been » Draw and discard 10-12 glasses of Weber «dd taste and/ dispensed for an w freshen the supply. or odor. extended period of time. + Unionist proper connected § «+ Connect unit to cold water fine that 10 cocci water fine.
BEFORE YOU CALL CONCERN | CAUSE SOLUTION RUNNING OF REFRIGERATOR (Continued Refrigerator » Room or outside «It's normal for the refrigerator to work reins too much weather. is hot, longer under these conditions, or toa ong, » Doors are pwned too. «Warm air entering the refrigerator causes it frequently or too long. to run more. Open doors less often » Fresh Food/frepzer door |» Ensure refrigerator. is label.
MAJOR APPLIANCE WARRANTY Your appliance is covered by a one year limited warranty. For one year from your original date of purchase, Electrolyte will pay all costs for repairing or replacing any parts of this appliance that prove to be defective in materials or workmanship when such appearance is installed, used and maintained in accordance with the provided instructions.