All about the Use & Care of your Refrigerator TA B L E O F C O N T E N T S Controls....................................................15 Features at a Glance....................................4 Optional Features......................................16 Installation.................................................5 Normal Operating Sounds and Sights..........19 Door Removal/Reversal Instructions (some models)..........................................7 Care & Cleaning................................
IMPORTANT SAFETY INSTRUCTIONS Installation Checklist WARNING Please read all instructions before using this refrigerator. For your Safety • DO NOT store or use gasoline, or other flammable liquids in the vicinity of this or any other appliance. Read product labels for warnings regarding flammability and other hazards. • DO NOT operate the refrigerator in the presence of explosive fumes. • Avoid contact with any moving parts of automatic ice maker. • Remove all staples from the carton.
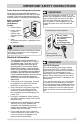
IMPORTANT SAFETY INSTRUCTIONS Proper Disposal of Refrigerators/Freezers We strongly encourage responsible appliance recycling/disposal methods. Check with your utility company or visit www.energystar.gov/recycle for more information on recycling your old refrigerator. Before you throw away your old refrigerator/ freezer: • Remove doors. • Leave shelves in place so children may not easily climb inside. • Have refrigerant removed by a qualified service technician.
FEATURES AT A GLANCE Features may vary according to model Ice Maker Ice Bucket Freezer Shelf Auxiliary Freezer Control Refrigerator Control Ice Tray Fixed Door Bin Door Rack Dairy Door Deli Drawer Cover Deli Drawer Upper Door Rack (Some Models) Full Shelf Deli Drawer Cover Fixed Door Bin Full Width Deli (Some Models) Crisper Cover Crisper Drawers Door Rack Toe Grille IMPORTANT Cleaning your Refrigerator Remove tape and glue residue from surfaces before turning on the refrigerator.
INSTALLATION This Use & Care Guide provides general operating instructions for your model. Use the refrigerator only as instructed in this Use & Care Guide. Before starting the refrigerator, follow these important first steps. Location • Choose a place that is near a grounded electrical outlet. Do Not use an extension cord or an adapter plug. • If possible, place the refrigerator out of direct sunlight and away from the range, dishwasher or other heat sources.
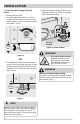
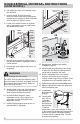
INSTALLATION To level the cabinet using the front rollers: 1 Remove the toe grille. 4 Some models are equipped with an antitip bracket (Figure 4). Lower it clockwise until it contacts the floor. 2 Use a flat-blade screwdriver or ⅜ inch socket wrench to raise or lower the front rollers (Figure 2). Do not raise the cabinet more than 9/16 inch. Raise Lower Anti-tip Bracket 9/16" (14 mm) Max Figure 4 (some models) Figure 2 OR 3 Use adjustable wrench to adjust leveling screws.
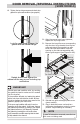
DOOR REMOVAL/REVERSAL INSTRUCTIONS (SOME MODELS) Tools Necessary: or PhillipsTM Head Adjustable Wrench Socket Wrench Set Top Hinge Cover Front Screw Top Hinge Cover Rear Screw or 3/8" (10mm) Fixed Wrench Top Hinge Screw Bottom Hinge Screw NOTE The direction in which your refrigerator doors open (door swing) can be reversed, from left to right or right to left, by moving the door hinges from one side to the other. Reversing the door swing should be performed by a qualified person.
DOOR REMOVAL/REVERSAL INSTRUCTIONS (SOME MODELS) 4. Lift refrigerator door off of bottom hinge and set aside. Door Stop Screw 5. Remove center hinge and shim by removing inside screw and loosening two outside screws enough to allow hinge and shim to slide out. Tighten screws. 6. Loosen two outside screws on opposite side of refrigerator, remove inside screw and install center hinge.
DOOR REMOVAL/REVERSAL INSTRUCTIONS (SOME MODELS) 19. Tighten the top hinge screws and check door gasket for open seal condition (see graphic). 20. After the screws have been tightened, replace the top hinge cover. Look for open areas between the gasket and the cabinet flange. 21.
HANDLE INSTALLATION CAUTION Wear gloves and use extreme CAUTION when installing these handles. The rounded end of the handles may be sharp. 3. Tighten the set screw on the rounded part of the handle until the handle is flush with the door, then tighten another ½ turn. Shoulder Screw IMPORTANT To ensure proper installation of handles, please review these instructions and illustrations thoroughly prior to installing the handles.
HANDLE INSTALLATION To reverse metal refrigerator/freezer handles: Handles may be easier to reverse while doors are off. Reverse freezer and refrigerator handles as shown. To attach plastic refrigerator handle: 1. With the door open, place the end of the handle on the dove tail mounting screw and pull down to secure in place. 2. Align handle base with holes in top of door. 3. Install screws packaged with the handle.
CONNECTING THE WATER SUPPLY WARNING To avoid electric shock, which can cause death or severe personal injury, disconnect the refrigerator from electrical power before connecting a water supply line to the refrigerator. CAUTION Before Installing The Water Supply Line, You Will Need: • Basic Tools: adjustable wrench, flat-blade screwdriver, and PhillipsTM screwdriver • Access to a household cold water line with water pressure between 30 and 100 psi. • A water supply line made of ¼ inch (6.
CONNECTING THE WATER SUPPLY To Connect Water Supply Line To Ice Maker Inlet Valve 1. Disconnect refrigerator from electric power source. Steel Clamp Brass Compression Nut Ferrule (Sleeve) Plastic Water Tubing to Ice Maker Fill Tube 2. Place end of water supply line into sink or bucket. Turn ON water supply and flush supply line until water is clear. Turn OFF water supply at shutoff valve. Copper water line 3. Remove plastic cap from water valve inlet and discard cap. 4.
ICE SERVICE If your refrigerator has an automatic ice maker, minimal ice will be produced during the first 24 hours of operation. Air in new plumbing lines may cause the ice maker to cycle two or three times before making a full tray of ice. With no usage, it will take approximately one to two days to fill the ice container. New plumbing connections may cause the first production of ice cubes to be discolored or have an odd flavor. Discard ice made during the first 24 hours.
CONTROLS Cool Down Period Temperature Adjustment To ensure safe food storage, allow the refrigerator to operate with the doors closed for at least 8 hours before loading it with food. Adjust temperature gradually: adjust the knob in small increments, allowing the temperature to stabilize. Refrigerator & Freezer Controls (some models) NOTE When first turning refrigerator on, adjust control to recommended. After 24 hours, adjust the controls as needed.
OPTIONAL FEATURES CAUTION Do not clean glass shelves or covers with warm water when they are cold. Shelves and covers may break if exposed to sudden temperature changes or impact, such as bumping. Tempered glass is designed to shatter into many small, pebble-size pieces. This is normal. Glass shelves and covers are heavy. Use both hands when removing them to avoid dropping. To adjust slide-under/flip shelf: 1.
OPTIONAL FEATURES Adjustable door bins Some models have adjustable door bins that can be moved to suit individual needs. To move door bin along a rail: 1. Tilt bin up so the back of the bin is off the door but the hook is still engaged. 2. Slide bin along rail to desired position. 3. Lower bin back into place.
OPTIONAL FEATURES Pantry Drawer (some models) Some models are equipped with a Pantry Drawer for storage of luncheon meats, spreads, cheeses, and other deli items. Please be sure to support glass when removing the drawer. 2. Apply pressure to drawer while supporting slide from below. Tab/clip passes through opening in drawer to locate. Ensure both sides are engaged. Apply Downward Pressure Tab Fits into Pocket Clip Passes Through Opening 3.
NORMAL OPERATING SOUNDS AND SIGHTS Understanding the sounds you may hear Your new, high-efficiency refrigerator may introduce unfamiliar sounds. These sounds normally indicate your refrigerator is operating correctly. Some surfaces on floors, walls, and kitchen cabinets may make these sounds more noticeable. Following is a list of major components in your refrigerator and the sounds they can cause: A Evaporator Refrigerant through the evaporator may create a boiling or gurgling sound.
CARE & CLEANING Protecting your investment Keeping your refrigerator clean maintains appearance and prevents odor build-up. Wipe up any spills immediately and clean the freezer and refrigerator compartments at least twice a year. When cleaning, take the following precautions: • Never use CHLORIDE or cleaners with bleach to clean stainless steel. • Do not wash any removable parts in a dishwasher. • Always unplug the electrical power cord from the wall outlet before cleaning.
CARE & CLEANING Part Care & Cleaning Tips What To Use Tips and Precautions Interior & Door Liners • Soap and water • Baking soda and water Use 2 tablespoons of baking soda in 1 quart of warm water. Be sure to wring excess water out of sponge or cloth before cleaning around controls, light bulb or any electrical part. Door Gaskets • Soap and water Wipe gaskets with a clean soft cloth. Drawers & Bins • Soap and water Use a soft cloth to clean drawer runners and tracks.
BEFORE YOU CALL 1-800-944-9044 (United States) 1-800-265-8352 (Canada) Visit our web site at www.frigidaire.com. Common Occurrences Before calling for service, review this list. It may save you time and expense. This list includes common occurrences that are not the result of defective workmanship or materials in this appliance. Refrigerator does not run. • Ensure plug is tightly pushed into electrical outlet. • Check/replace fuse with a 15 amp time-delay fuse. Reset circuit breaker.
MAJOR APPLIANCE WARRANTY Your appliance is covered by a one year limited warranty. For one year from your original date of purchase, Electrolux will pay all costs for repairing or replacing any parts of this appliance that prove to be defective in materials or workmanship when such appliance is installed, used and maintained in accordance with the provided instructions. Exclusions This warranty does not cover the following: 1.