
Complete Owner's Guide


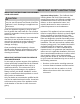


Table Of Contents
- Table of contents
- Questions?
- Product Record and Registration
- Important Safety Instructions
- Before Setting Surface Controls
- Cooktop Controls
- 1
- 1. Lock: Lock the cooktop controls to prevent accidental activation of cooking zones.
- 2. Power: Press to turn on or turn off the cooktop.
- 3. Cooking Zone Power Boil Indicator: Lights when the Power Boil feature is in use on the cooking zone.
- 4. Cooking Zone Setting Indicator: Shows the setting of the Cooking Zone when it is running. Flashes when the Cooking Zone does not detect proper cookware. Shows a Hot Cooktop message (H) when the Cooking Zone is off but still hot.
- 5. Cooking Zone On/Off: Activates the cooking zone when the cooktop is on.
- 6. Cooking Zone Minimum (1): Sets the cooking zone to the minimum power level.
- 7. Cooking Zone Set: Press or slide your finger on the wedge to select the desired cooking zone setting.
- 8. Cooking Zone Maximum (P): Sets the cooking zone to Power Boil.
- 9. Timer Indicator: Shows the time currently left on the timer.
- 10. Reduce Time (-): Reduce the amount of time on the timer.
- 11. Timer On/Off: Turn the countdown timer on or off.
- 12. Increase Time (+): Increase the amount of time on the timer.
- Figure 12: Induction cooking zone control
- 1. Place correctly sized cookware on the cooking zone.
- 2. Activate the cooking zone.
- 3. Set the cooking zone to the desired level (refer to the “Suggested induction cooking zone settings” in Table 1).
- 4. When cooking is complete, turn the induction cooking zone OFF by pressing its On/Off key or the Main Power key before removing the cookware. If all of the zones are off, the cooktop will automatically power off in 20 seconds.
- Suggested induction cooking zone settings
- Frigidaire Induction Recommendations
- Low
- 1
- Keep foods warm
- Medium
- Low
- 2-4
- Continue cooking, poach, stew
- Medium
- 5-6
- Maintain a slow boil, thicken sauces and gravies, steaming, cooking
- Medium
- High
- 7-8
- Continue a rapid boil, fry, or deep fry
- High
- 9
- Start most foods, maintain water at a boil, pan frying, searing
- Power
- Boil
- P
- Start heating pans that contain large amounts of food or to bring pots of water to boil
- Table 1: Suggested induction cooking zone settings
- Moving Cookware on a Smooth Cooktop
- Power Management
- Setting the Timer
- Lock or Unlock the Cooktop
- 1. Set the cooking zones to the desired settings.
- 2. Press the Lock key.
- 1. Press the Power key to turn the cooktop on.
- 2. Press the Lock key and hold it for 4 seconds. The lock will activate, and L will display in all of the cook zone setting indicators.
- 3. Press the Power key to turn the cooktop off.
- 1. Press the Power key to turn the cooktop on.
- 2. Press the Lock key and hold it for 4 seconds. The lock will deactivate.
- 3. Press the Power key to turn the cooktop off.
- 1. Press the Power key to turn the cooktop on.
- 2. Hold the lock key for 4 seconds.
- 3. Set the cooking zones.
- 4. When the cooking process is finished and the cooktop is turned off, the Lock function will be still active.
- Key-Stuck Function
- Home Canning
- Setting Surface Controls
- Care and Cleaning
- Before You Call

10
BEFORE SETTING SURFACE CONTROLS
Pan Sensing
Figure 6 shows conditions that can generate a flashing
message.
Figure 6: Pan sensing conditions
Minimum and Maximum Pan Size
Induction cooking zones require pans of proper size in order
to activate. The cooktop graphics are guides to minimum
and maximum pan size for each cooking zone.
Figure 7: Good cookware size
The inner ring on each cooking zone indicates the smallest
pan size for the zone (
Figure 8). If cookware is too small,
the display will flash and the pan will not heat. Select a
larger pan or use a different cooking zone.
The outer ring on the cooktop graphic indicates the largest
pan size for that zone (
Figure 9). Do not use pans with
bottoms that extend beyond the outer circle of a cooking
zone, as doing so may cause food to heat unevenly.
Correcting Pan Sensing Errors
It is recommended that you lower the requested power level
setting before correcting a pan sensing error, then reset the
zone to the desired power level.
If conditions preventing operation are not corrected, the
cooking zone will automatically turn off after two minutes.
Sensors beneath the cooktop surface
require that certain cookware conditions
be met before an induction cooking zone
will operate. If a cooking zone is turned on
and conditions are wrong, the setting in
the zone display will flash.
Figure 5: Flashing indicator
• Cookware centered correctly
on cooking zone.
• Flat pan bottom and straight
sides.
• Pan rests completely and is
level on the cooktop
surface.
• Pan is properly balanced.
• Pan bottom rests on cooktop
edge.
• Cookware not centered on
cooking zone.
• Curved or warped pan bottoms
or sides.
• Heavy handle tilts pan.
• Cookware base material has
good magnetic characteristics.
• Cookware base material is
non-magnetic.
Magnet
Sticks
Magnet
Falls
Figure 8: Cookware
too small
Figure 9: Cookware
too large