
Complete Owner's Guide


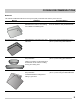
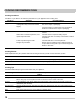
Table Of Contents
- Table of contents
- Questions?
- Product Record and Registration
- Important Safety Instructions
- Cooking Recommendations
- What is Electromagnetic Induction?
- Induction Features
- Preparation
- Sounds
- Using Proper Cookware
- Cookware Selection
- Pan Sensing
- Induction Cooking
- Cook Zone Setting Display
- Hot Surface Indicator
- Before Setting Surface Controls
- Cooktop Display Windows
- Figure 11: Power Boost
- Figure 12: Low setting
- Figure 13: Error message
- Figure 14: High setting
- Figure 15: Increment setting
- Figure 16: Increment setting
- Figure 17: Cooktop lockout
- Figure 18: Induction cooking zone control
- 1. Place correctly sized cookware on the cooking zone.
- 2. Press the On-Off key of the cooking zone until it beeps. A - (dash) will appear in the display.
- 3. Press the + or - key for the cooking zone (Figure 18) until you reach the desired setting (refer to the Recommended Induction zone settings in the table on this page).
- 4. When cooking is complete, turn the induction cooking zone OFF by pressing its on-off key before removing the cookware.
- Frigidaire Induction Recommendations
- Low
- Low
- Melt, keep foods warm
- Medium
- Low
- 2-4
- Continue cooking, poach, stew
- Medium
- 5-6
- Maintain a slow boil, thicken sauces and gravies, steaming
- Medium
- High
- 7-8
- Continue a rapid boil, fry, or deep fry
- High
- 9
- Start most foods, maintain water at a boil, pan frying, searing
- Power
- Boost
- P
- Start heating pans that contain large amounts of food or to bring pots of water to boil
- Cooktop Display Windows
- Setting Surface Controls
- Before Setting Oven Controls
- Oven Control Features
- 1. Bake - Use to enter normal baking temperatures for recipes that call for regular baking.
- 2. Broil - Use broil function for direct heat cooking.
- 3. Conv Bake - Circulates the oven heat evenly and continuously for faster cooking of some foods.
- 4. Conv Roast - Uses a convection fan to gently brown meats and poultry and seal in the juices.
- 5. Conv Convert - Converts standard bake temperatures to convection temperature in convection bake.
- 6. Quick Preheat - Best used for single rack baking with packaged convenience foods, and foods made from scratch.
- 7. Air Fry - Uses hot air for great tasting crispy results without all the oil.
- 8. Set Clock - Use to set the time of day
- 9. Oven Lock - Use to lock out oven controls.
- 10. 0 through 9 keys - Use to set temperature and time
- 11. Timer On-Off - Use to set or cancel the minute timer. The minute timer does not start or stop any cooking function.
- 12. Oven Light - Use to turn on internal light. Will turn on when the oven door is opened.
- 13. OK/START - Use to set cooking functions and when setting the clock.
- 14. OFF - Use to turn off all cooking functions.
- 15. Add 1 Minute - Use to add additional minutes to the timer.
- 16. Self Clean - Use to set self-clean cycle between 2 and 4hrs.
- 17. Steam Clean - Use as a time saving method for cleaning light soils.
- 18. Keep Warm - Use to keep cooked foods at serving temperature.
- 19. Delay Start - Add to Quick Preheat, Bake, Conv Bake, Conv Roast, and Self Clean to program a Delay Start.
- 30 mins
- Setting the Clock
- Setting Timer
- Add 1 Min
- Press Add 1 Min twice.
- Setting 12 Hour or 24 Hour display mode
- Changing between continuous bake setting or 12 hour energy saving
- Changing temperature display from Fahrenheit to Celsius
- Setting Silent or Audible Control mode
- Setting Oven Lockout
- 1. Be sure oven door is completely closed.
- 2. Press and hold the lock key for 3 seconds. The motor driven door latch mechanism will begin locking the oven door automatically. Do not open the oven door. Allow about 15 seconds for the oven door to completely lock. Once door is locked, the word ...
- 1. Press and hold the lock key for 3 seconds. The motor door latch will begin unlocking the oven door automatically. Do not open the oven door. Allow about 15 seconds for the oven door to completely unlock.
- 2. When the word DOOR with a lock icon no longer displays, the oven door may be opened, and the oven control keypad will be available for use.
- Operating Oven Lights
- Quick Preheat
- Quick Preheat is available for single rack baking with packaged, convenience foods and foods made from scratch and can be programmed for temperatures between 170°F and 550°F.
- 1. Arrange the interior oven racks.
- 2. Press Quick Preheat. 350 will appear in the display.
- 3. Press OK/START.
- 4. 350 and PREHEAT will be displayed while the oven is preheating.
- 5. Press OFF when baking is complete or to cancel the preheat feature.
- 1. Press Quick Preheat. 350 will appear in the display.
- 2. Enter the new preheat temperature. Press 4 2 5.
- 3. Press OK/START. 425 will show in the display.
- 4. When baking is complete, press OFF.
- Figure 26: Single rack baking for convenience foods
- Figure 27: Oven rack positions
- Setting Bake
- Convection Bake
- Setting Convection Convert
- Setting Delay Start
- Setting Broil
- 1. Arrange the oven racks when cool. For optimum browning results, preheat oven for 2 minutes before adding food.
- 2. Press Broil. Broil with oven door closed.
- 3. Position bakeware in oven.
- 4. Press OK/START. To adjust the broil temperature, press Broil again and then enter the new temperature using the number keys. Press OK/START.
- 5. Broil on one side until food is browned; turn and broil other side until done to your satisfaction.
- 6. When finished broiling, press OFF.
- Figure 31: Broil pan with insert(L) Rack positions (R)
- Table 1: Broil Suggestions
- 6th**
- 550°F (288°C)
- 5
- 4
- 140ºF (60ºC)
- Rare*
- 5th or 6th**
- 550°F (288°C)
- 6
- 5
- 145ºF (63ºC)
- Medium
- 5th or 6th**
- 550°F (288°C)
- 7
- 6
- 170°F (77ºC)
- Well
- 5th
- 550°F (288°C)
- 12
- 10
- 170°F (77ºC)
- Well
- 4th
- 450°F (232°C)
- 20
- 10
- 170°F (77ºC)
- Well
- 5th
- 450°F (232°C)
- 8
- 6
- 170°F (77ºC)
- Well
- 5th
- 550°F (288°C)
- as directed
- as directed
- 170°F (77ºC)
- Well
- 4th
- 550°F (288°C)
- 170°F (77ºC)
- Well
- 4th**
- 550°F (288°C)
- 6
- 5
- 145ºF (63ºC)
- Medium
- 4th
- 550°F (288°C)
- 7
- 6
- 170°F (77ºC)
- Well
- Convection Roast
- 1. Place the insert on broiler pan. Place meat (fat side up) on insert.
- 2. Make sure the insert is securely seated on top of the broiler pan. Do not use the broiler pan without the insert.
- 3. Place prepared food on oven rack and slide into oven.
- 4. Close the oven door.
- 5. Press Conv Roast.
- 6. Enter desired temperature using numeric keys.
- 7. Press OK/START.
- 8. When cooking is completed or to cancel convection roast press OFF.
- Figure 32: Convection roasting
- Table 2: Convection roasting temperature and time recommendations
- Convection Roast
- 4 to 6 lb.
- 350°F (177ºC)
- *160ºF (71ºC)
- 25-30
- 4 to 6 lb.
- 350°F (177ºC)
- *160ºF (71ºC)
- 25-30
- 2 to 3 lb.
- 400°F (204ºC)
- *160ºF (71ºC)
- 15-25
- 12 to 16 lb.
- 325°F (163ºC)
- 170°F (77ºC)
- 8-10
- 16 to 20 lb
- 325°F (163ºC)
- 170°F (77ºC)
- 10-15
- 20 to 24 lb.
- 325°F (163ºC)
- 170°F (77ºC)
- 12-16
- 3 to 4 lb.
- 350°F-375°F (177ºC-191ºC)*
- 170°F (77ºC)
- 12-16
- 4 to 6 lb.
- 325°F (163ºC)
- 160°F (71ºC)
- 30-40
- 4 to 6 lb.
- 325°F (163ºC)
- 160°F (71ºC)
- 20-30
- 3 to 4 lb.
- 325°F (163ºC)
- 160°F (71ºC)
- 20-25
- 5 to 7 lb.
- 325°F (163ºC)
- 160°F (71ºC)
- 30-40
- Air Fry
- 1. Arrange food on rack as suggested.
- 2. Press Air Fry. Enter the suggested temperature for particular food.
- 3. Press OK/START.
- 4. When preheat tone sounds place the tray on rack position 4.
- 5. When cooking is complete press OFF.
- Figure 33: Optional Frigidaire Air Fry Tray. Use rack position 4 with tray or dark pan with low or no sides for best results.
- Table 3: Suggested Air Fry Settings
- Air Fry
- Food
- Quantity (oz.)
- Temperature
- Cook Time (mins)
- 50 (Full Tray)
- 450 °F - 232°C
- 29-33
- 43 (Full Tray)
- 425°F - 218°C
- 25-35
- 43
- 425°F - 218°C
- 20-25
- 32
- 400°F - 205°C
- 11-13
- 25
- 400°F - 205°C
- 18-20
- 42
- 450 °F -232°C
- 18-25
- 42
- 375°F -190°C
- 60-65
- 42
- 425°F - 218°C
- 30-40
- 24
- 425°F - 218°C
- 30-40
- Setting the Sabbath Feature (for use on the Jewish Sabbath and Holidays)
- 1. Be sure the clock is set with the correct time of day.
- 2. Arrange oven racks, place bakeware in oven, and close oven door. Press Bake.
- 3. Note: If Delay Start is desired enter the timeat this point. See “Setting Delay Start” on page 26 for detailed instructions.
- 4. Press OK/START.
- 5. Press and hold Self Clean and Steam Clean simultaneously for about 3 seconds to set the Sabbath feature. Once the feature is set, SAb will appear in the display indicating the oven is properly set for the Sabbath feature (Figure 34).
- Figure 34: Oven set for Sabbath baking
- Figure 35: Display showing Sabbath failure
- Keep Warm
- Self Clean
- Setting Self Clean
- 1. Be sure the oven is empty and all oven racks are removed. Remove all items from the oven. Be sure oven door is completely closed.
- 2. Press Self Clean. The default 3 hour clean time will appear in the display. You may accept the 3 hour clean time or choose a different clean duration by entering any time between 2 and 4 hours clean time by entering the time using the numeric keys.
- 3. Press OK/START. The warning to REMOVE RACKS will flash in the display to remind you that oven racks should be removed before a self clean.
- 4. Press OK/START to activate self clean.
- 5. The warning will end and the motor door lock will begin locking the oven door and Self Clean will start.
- 1. CLEAN message will turn off, and Hot will appear in display window.
- 2. Once the oven has cooled down (about 1 hour) and Hot is no longer displayed, the oven door may be opened.
- 3. When the oven interior has completely cooled, wipe away any residue or powdered ash with a damp cloth or paper towel.
- Setting Delay Start Self Clean
- Steam Clean
- 1. Remove all racks and oven accessories.
- 2. Scrape or wipe loose debris and grease from the oven bottom.
- 3. Pour 1 cup of tap water onto the oven bottom. (Figure 37) Close oven door.
- Figure 37: Add 1 cup of tap water
- 4. Press Steam Clean.
- 5. Press OK/START. St Cn will appear in the display.
- 6. To see the time remaining in the Steam Clean cycle press the Steam Clean key once. Do not open the door during this time. If door is open while in Steam Clean for more than 4 minutes an open door alarm will sound.
- 7. When the steam clean cycle is complete an alert will sound and the END message will show in the display. Press OFF to return to the clock.
- 8. Take care opening the door when the steam clean is finished. Stand to the side of the oven out of the way of escaping vapor.
- 9. Wipe oven cavity and bottom. Do not clean oven door gasket (Figure 38). Avoid leaning or resting on the oven door glass while cleaning cavity.
- 10. To cancel Steam Clean at any time press OFF.
- Figure 38: Clean around the oven door gasket
- Restoring Factory Default Settings
- Adjusting Oven Temperatures
- 1. Press and hold Bake until the control produces an audible tone (about 6 seconds). The factory offset temperature of 0 (zero) should appear in the display.
- 2. Enter 2 0 using numeric keypad.
- 3. To offset the oven by -20°F, press self clean to toggle between + and -.
- 4. Press OK/START to accept change.
- Setting the Sabbath Feature (for use on the Jewish Sabbath and Holidays)
- Setting Oven Controls
- Figure 39: Use cleaners with caution
- Cooktop Maintenance
- Cooktop Cleaning
- Replacing the Oven Light
- 1. Turn electrical power off at the main source or unplug the appliance.
- 2. Remove the interior oven light shield after removing the wire holder by carefully moving the wire to the side of the glass shield. The tension from the wire holds the glass shield in place.
- 3. Pull the shield straight out. Do not twist or turn.
- 4. Replace the bulb with a new appliance bulb.
- 5. Replace the glass oven light shield. Replace wire holder.
- 6. Turn the power back on again at the main source (or plug the appliance back in).
- 7. Be sure to reset the time of day on the clock.
- Figure 41: Oven light protected by glass shield
- Remove and replace storage drawer
- 1. Open the drawer to the fully opened position.
- 2. Locate the latches on both sides of the drawer.
- 3. Pull up on the left glide latch and push down on the right glide latch.
- 4. Pull the drawer away from the range.
- 1. Align the glide latches on both sides of the drawer with the slots on the drawer.
- 2. Push the drawer back into the range.
- Removing and Replacing the Oven Door
- 1. Open oven door completely, horizontal with floor.
- 2. Pull up the lock located on each hinge support toward front of the oven until the lock stops. You may have to apply a little upward pressure on the lock to pull it up (Figure 43 and Figure 44).
- 3. Grasp the door by the sides, and close the door until the door frame makes contact with the unlocked hinges.
- 4. Pull the bottom of the door toward you while rotating the top of the door toward the appliance to completely disengage the hinge levers (Figure 45).
- 1. Firmly grasp both sides of oven door along the door sides. Do not use the oven door handle (Figure 45).
- 2. Hold the oven door at the same angle as the removal position. Carefully insert the hinge levers into the oven frame until you feel the hinge levers are seated into the hinge notches. The hinge arms must be fully seated into the hinge notches befor...
- 3. Fully open the oven door, horizontal with floor (Figure 42).
- 4. Push the door hinge locks up toward and into the oven frame on both left and right oven door hinges to the locked position (Figures 44 and 45).
- 5. Close the oven door.
- Figure 42: Door hinge location
- Figure 43: Door hinge locks
- Figure 44: Unlocking door hinge
- Figure 45: Replacement and location of hinge arm and roller pin
- Care and Cleaning
- Oven Control Features
- Before You Call

8
IMPORTANT SAFETY INSTRUCTIONS
Save these instructions for future use.
IMPORTANT INSTRUCTIONS FOR SELF
CLEANING OVENS
Do not clean the oven door gasket. The door
gasket is essential for a good seal. Care should
be taken not to rub, damage, or move the gasket.
Do not use oven cleaners. No commercial oven
cleaner or oven liner protective coating of any
kind should be used in or around any part of the
appliance.
Use the self clean cycle to clean only the parts
listed in this manual.
Some birds are extremely sensitive to the fumes
given off during the self clean cycle of any oven.
Move birds to another well-ventilated room.
IMPORTANT INSTRUCTIONS FOR SERVICE
AND MAINTENANCE
Do not repair or replace any part of the appliance
unless specifically recommended in the manuals.
All other servicing should be done only by a
qualified technician. This reduces the risk of
personal injury and damage to the appliance.
Always contact your dealer, distributor, service
agent, or manufacturer about problems or condi-
tions you do not understand.
Ask your dealer to recommend a qualified techni-
cian and an authorized repair service. Know how
to disconnect the power to the appliance at the
circuit breaker or fuse box in case of an emer-
gency.
Remove the oven door from any unused oven if it
is to be stored or discarded.
Do not touch a hot oven light bulb with a damp
cloth. Doing so could cause the bulb to break.
Handle halogen lights (if equipped) with paper
towels or soft gloves. Disconnect the appliance or
shut off the power to the appliance before
removing and replacing the bulb.
Important: This appliance has been tested and
found to comply with the limits for a class B digital
device, pursuant to Part 18 of the FCC rules
(United States) and ICES-001 (Canada). These
limits are designed to provide reasonable protec-
tion against harmful interference in a residential
installation. This unit uses and can radiate radio
frequency energy and, if not installed and used in
accordance with the instructions, may cause
harmful interference to radio communications.
However there is no guarantee that interference
will not occur in a particular installation. If this unit
does cause harmful interference to radio or televi-
sion reception, which can be determined by
turning the unit off and on, the user is encouraged
to try to correct the interference by one or more of
the following measures:
• Reorient or relocate the receiving antennae.
• Increase distance between unit and receiver.
• Connect the unit into an outlet or a circuit
different from that to which the receiver is
connected.
Before using self clean, remove the broiler pan,
any food, utensils, and cookware from the oven,
storage drawer or warming drawer (if
equipped). Remove oven racks unless
otherwise instructed.
CAUTION
California Residents: for cancer and reproductive
harm information, visit www.P65Warnings.ca.gov
WARNING