
Use and Care Guide

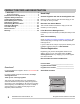

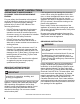


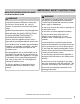


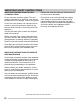
Table Of Contents
- Product Record and Registration
- Important Safety Instructions
- Cooking Recommendations
- Before Setting Oven Controls
- Setting Oven Controls
- About Your Microwave Oven
- Radio or TV Interference
- About Microwave Cooking
- About Foods
- About Utensils and Coverings
- Accessories
- About Children and the Microwave
- About Food Safety
- Preparing Food for Microwave Cooking
- Before Using Microwave Oven
- Microwave Features
- Display
- Before Operating the Microwave
- Control Panel
- Figure 3: Microwave Control Pad
- 1. Lock: Use to lock the controls to prevent accidental use.
- 2. Settings / User Preferences
- 3. Presets
- 4. Melt/Soften
- 5. Auto Cook
- 6. Sensor Cook
- 7. Power level (10 power levels available)
- 8. Timer On-Off
- 9. Number Keys
- 10. START/+30Sec.
- 11. STOP/Cancel: Clears all previous settings if pressed before cooking starts. During cooking, press once to pause (and START to resume); press twice to stop and clear all entries.
- Figure 3: Microwave Control Pad
- Quick Start
- Timed Heating
- Timer
- Setting Power Level
- 1. Use the number pad to enter the time in minutes and seconds. For example, to heat for 5 minutes and 30 seconds, enter 5 3 0.
- 2. Press the Power Level pad until the desired level displays. For example, press once for high power (PL- HI). Press Power Level four times to change to 70% power (PL-70). The selected power level appears in the display.
- 3. Press START.
- Multi-Stage Cooking
- Add Cook Time (+30 Sec)
- Defrost
- Popcorn
- Potato
- Veggies
- Beverage
- Melt / Soften
- Auto Cook
- Sensor Cook
- Reheat
- Keypad Lock
- Set Clock
- Audible Signal Elimination
- 1. Press the Settings pad twice.
- 2. “VOLUME” shows in the display. “LOW”, “MED”, and “HIGH” will show in a cycle.
- 3. Press START when the desired volume is shown in the display.
- 1. Press the Settings pad 3 times. “Lb / KG” shows in the display.
- 2. Press START to change the setting. “KG” or “LB” will briefly display to show the new setting.
- Setting the Microwave
- Care and Cleaning
- Before You Call
- Warranty

3
Read all instructions before using this appliance.
This manual contains important safety symbols
and instructions. Please pay attention to these
symbols and follow all instructions given.
Do not attempt to install or operate your appliance
until you have read the safety precautions in this
manual. Safety items throughout this manual are
labeled with a WARNING or CAUTION statement
based on the risk type.
Warnings and important instructions appearing in
this guide are not meant to cover all possible
conditions and situations that may occur.
Common sense, caution, and care must be
exercised with installing, maintaining, or operating
your appliance.
DEFINITIONS
This is the safety alert symbol. It is used to alert
you to potential personal injury hazards. Obey all
safety messages that follow this symbol to avoid
possible injury or death.
Indicates a potentially hazardous situation
which, if not avoided, may result in death or
serious injury.
Indicates a potentially hazardous situation
which, if not avoided, may result in minor or
moderate injury.
Indicates installation, operation, maintenance,
or valuable information that is not hazard
related.
WARNING
CAUTION
IMPORTANT
Indicates a short, informal reference-something
written down to assist the memory or for future
reference.
Save these instructions for future reference.
NOTE
WARNING
Tip Over Hazard
• A child or adult can tip the
oven and be killed.
• Install the anti-tip device to
oven and/or structure per
installation instructions.
• Ensure the anti-tip device is re-engaged when
the oven is moved.
• Do not operate the oven without the anti-tip
device in place and engaged.
• Failure to follow these instructions can result in
death or serious burns to children and adults.
Refer to the installation
instructions supplied with your
appliance for proper installa-
tion.
Check for proper installation
with a visual check that the
anti-tip screws are present.
Test the installation with light
downward pressure on the
open oven door. The oven
should not tip forward.
Anti-tip mounting holes
IMPORTANT
IMPORTANT SAFETY INSTRUCTIONS