All about the Use & Care of your Wine Cooler TA B L E O F C O N T E N T S Features.....................................................8 Installation.................................................4 Proper Use of Wine Cooler...........................9 Door Reversal Instructions...........................5 Care and Cleaning.....................................10 Energy Saving Tips......................................6 Before you Call..........................................
SERIAL/MODEL #’S - IMPORTANT SAFETY INSTRUCTIONS Read and Save These Instructions This Owner’s Guide provides specific operating instructions for your model. Use your Wine Cooler only as instructed in this guide. These instructions are not meant to cover every possible condition and situation that may occur. Common sense and caution must be practiced when installing, operating, and maintaining any appliance.
IMPORTANT SAFETY INSTRUCTIONS WARNING WARNING Electrical Information Child Safety • The wine cooler must be plugged into its own dedicated 115 Volt, 60 Hz., 15 Amp, AC only electrical outlet. The power cord of the appliance is equipped with a threeprong grounding plug for your protection against electrical shock hazards. It must be plugged directly into a properly grounded three prong receptacle. The receptacle must be installed in accordance with local codes and ordinances.
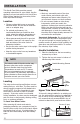
INSTALLATION This Use & Care Guide provides general operating instructions for your model. Use the appliance only as instructed in this Use & Care Guide. Before starting the wine cooler, follow these important first steps. Location • Choose a place that is near a grounded electrical outlet. Do Not use an extension cord or an adapter plug. • For optimal performance, it is recommended that you install the wine cooler where the ambient temperature is between 70 and 78 degrees fahrenheit.
DOOR REVERSAL INSTRUCTIONS Reversing the door swing Upper Right Hinge The glass door can be opened from left to right and vice versa. Should you desire to change the opening direction, please follow these instructions. Bottom Right Hinge NOTE Door reversal is not available for a unit with control panel on door. The following operation is only for a unit with control panel inside the cabinet. Figure 2 Remarks: These instructions are based on a unit with right hinge installed already.
ENERGY SAVING TIPS • Install the wine cooler in the coolest part of a dry and ventilated room, out of direct sunlight and away from heating ducts or registers. Do not place the wine cooler next to heat-producing appliances such as a range, oven or dishwasher. • Level the wine cooler so the door close tightly. • Do not over crowd the wine cooler or block cold air vents. Doing so causes the wine cooler to run longer and use more energy.
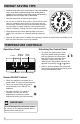
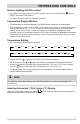
TEMPERATURE CONTROLS Interior Lighting ON/OFF control • No matter if the control panel is locked or unlocked, touching the light button ON/OFF the interior LED lighting. will turn • The light will stay on until it is manually turned off. Temperature Display Window • The temperature is displayed digitally. The digital display shows the set temperature.
FEATURES Names of Components Handle Control Panel Top Convertible Shelf Glass Door Bottom Shelf Toe Grille Adjustment Leg Height Adjustable 820-850mm 32 5/16" (820mm) 7 " 23 /16 ) 5mm (59 >2 (57 2 7/16" 0m m) 5 8" 2 3 / mm) 0 ~ 61 0 0 (6 22 7 (57 /16" 0m m) 32 5/16" (820mm) 315/16" ) m (100m IMPORTANT Your model and features may vary slightly from illustrations shown here.
PROPER USE OF WINE COOLER The arrangement of Bottle 4. Bottom Shelf • Do not let bottles touch the rear panel in order to maintain good air circulation in the cooler. • The amount of bottle storage listed will vary depending on bottle shape and size. • The capacity for bottle storage in the wine cooler is based on the following marked bottle size. Oversized bottles may impact the number of bottles that can be stored on some of the shelves.
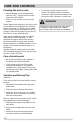
CARE AND CLEANING Cleaning the wine cooler • Before cleaning, turn the temperature control to OFF, unplug the wine cooler and remove the bottles. • Clean your wine cooler once every two months. Inside: Wash inside surfaces of the wine cooler with a solution of two tablespoons of baking soda in one quart (1.136 liters) warm water. Rinse and dry. Wring excess water out of the sponge or cloth when cleaning in the area of the controls, or any electrical parts.
BEFORE YOU CALL 1-800-944-9044 (United States) 1-800-265-8352 (Canada) PROBLEM CAUSE Visit our web site at www.frigidaire.com CORRECTION WINE COOLER OPERATION Wine Cooler does not run. Wine Cooler runs too much or too long. Interior Wine Cooler temperature is too cold. • Wine cooler is plugged into a circuit that has a ground fault interrupt. • Use another circuit. If you are unsure about the outlet, have it checked by a certified technician. • Temperature control is in the OFF position.
BEFORE YOU CALL (continued) PROBLEM CAUSE CORRECTION WINE COOLER OPERATION (cont’d) Interior Wine Cooler temperature is too warm. • Temperature control is set too warm. • Turn control to a colder setting. Allow several hours for the temperature to stabilize. • Door is opened too frequently or too long. • Warm air entering the Wine Cooler causes it to run more. Open doors less often. • Door may not be seating properly. • See “DOOR PROBLEMS” section.
BEFORE YOU CALL (continued) PROBLEM CAUSE CORRECTION WATER/MOISTURE/FROST INSIDE WINE COOLER Moisture forms on inside of Wine Cooler walls. • Weather is hot and humid. • This is normal. • Door may not be seating properly. • See “DOOR PROBLEMS” section. • Door is kept open too long, or opened too frequently. • Open the door less often. WATER/MOISTURE/FROST OUTSIDE WINE COOLER Moisture forms on outside of Wine Cooler.
MAJOR APPLIANCE WARRANTY Your appliance is covered by a one year limited warranty. For one year from your original date of purchase, Electrolux will pay all costs for repairing or replacing any parts of this appliance that prove to be defective in materials or workmanship when such appliance is installed, used and maintained in accordance with the provided instructions. Exclusions This warranty does not cover the following: 1.