
Complete Owner's Guide


23
INSTALLATION
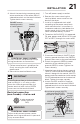
Connecting the exhaust
1. Remove the two screws securing the
dryer front access panel to the dryer
cabinet. Lift the panel until the tabs
can be disengaged from the cabinet,
remove the panel and set aside.
Screws
2. Connect the exhaust duct to the
outside exhaust system. Use of a 4”
(10.2 cm) clamp is recommended to
connect the dryer to the exhaust vent
system. Use metal foil tape to seal all
other joints.
3. Reinstall the dryer front access panel.
Clamp
WARNING
ELECTRIC SHOCK HAZARD
Certain internal parts are intentionally
not grounded and may present a risk
of electrical shock if contacted during
installation. Do not contact the following
parts while the appliance is energized:
• Pump
• Drive Motor
• Electronic control boards
• Water valve
4. Carefully slide the laundry center to
its final position. Recheck for level and
rock corners for stability.
Connecting the drain
Insert Less
Than 8.5"
(21.5 cm)
Cable Tie
1. Form a “U” shape on the end of the
drain hose with the hose pointed
toward the drain.
2. Place the formed end in a laundry
tub or a standpipe and secure the drain
hose with the cable tie (provided in the
enclosure package) to the standpipe, inlet
hose, laundry tub, etc. so the hose does
not pull out from the force of the water.
NOTE
The standpipe inside diameter must be
1-1/4” (3.2 cm) minimum. There must be
an air gap around the drain hose in the
standpipe. A snug hose fit can cause a
siphoning action.