F¸ _ Visit the Frigidaire __ Web Site at: http://www.frigidaire.com Counter-Top Microwave with Oven Convenience Pad Welcome .......................................... Important Safety Instructions Features and Specifications Before Operating .... 2 ..... 3-6 .......... 7 ............................ 8 j Manual Operation Convenience Cooking ..................... Operation Charts Care & Cleaning 9-12 ......... 13-15 ...................... 16-17 ...........................
We I c om e & C on g rat ula tio n s Congratulations on your purchase of a new microwave! At Electrolux Home Products, we are very proud of our product and are completely committed to providing you with the best service possible, Your satisfaction is our number one priority, We know you'll enjoy your new microwave and Thank You for choosing our product, We hope you consider us for future purchases. PLEASE Product Be sure to register your product.
What You Need to Know About Safety Instructions To avoid personal injury or property damage, observe the following: 1. Do not deep fat fry in oven. Fat could overheat and be hazardous to handle. Warning and Important Safety Instructions appearing in the Use & Care Guide are not meant to cover al possible conditions and situations that may occur. Common sense. caution, and care must be exercised when installing, maintaing or operating a microwave 2.
Importan t Safe ty Instru ctions To avoid risk of electrical Shock or death, this oven must begrouoded aod p,ug must no, beo,tered Grounding Instructions Grounding reduces risk of electric shock by providing an escape wire I__ grounded. forven the MUST electricbecurrent if an electrical J short occurs. This oven is equipped with a cord having a grounding wire with a grounding plug. The plug must be plugged into an outlet that is properly installed and grounded. See Installation instructions.
Precautions Possible to Avoid Exposure Excessive to Microwave Energy Adhere to the following precautions: DO NOT attempt to operate this oven with the door open since open door operation can result in harmful exposure Lomicrowave energy. It is important not to defeat or Lampler with the safety interlock switches • DO NOT place any object between the oven front face and the door or allow soil or cleaner residue to accumulate on sealing surfaces.
When using electrical appliances, basic safety precautions should be followed to reduce the risk of burns, electric shocks, fire or injury to persons or exposure to excessive microvave energy. • READ ALLinstructions • Baby food jars shall be open when heated and contents stirred orshaken before consumption ;n orderto avoid burns. before using oven. DO NOT use this oven for commercial purposes. It is made for household use only.
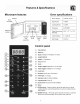
Microwave features Oven specifications Window Power Supply 120VAC, 60 Hz Input Power 1,450W Cooking Power 1,000W Frequency 2,450 MHz OuterDimensions (WxHxD) 20.5"x 17.1"x 13.2" CavityVolume 1.1 cubic ft. Net Weight 33.5 Ibs. Door assembly system \ Turntable Turntable Turntable Control ring assembly Shaft glass tray panel Control panel (1) time defrost (2) popcorn (3) pizza (setting for reheating 1-3 slices) (4) weight defrost (5) potato (1-3 potatoes) (6) soup (reheat)
Before Operating Learn more about your microwave oven Setting the clock Example: setting clock display for 9:00: 1. Touch clock pad once. ¢{o_k " To avoid risk of personal injury Or property damage, do not operate the microwave oven empty. 2. Enter time using number pads. ,, To avoid risk of personal injury or property damag e, do not use stonewarel aluminum foil, metal utensils, or metal trimmed utensils in the microwave oven. 3. Touch clock 0900 pad again.
Setting the timer Heating with high power level Example: setting timer for 5 minutes: Example: to heat for 5 minutes at 100% power: 1. Touch timerpad 1, Press cook time pad. once. _ook time 2, Enter desired time using number pads, 3, Touch START/+30sec pad. 500 2, Use the number pads to enter desired heating time (cook time may be set up to 99 minutes and 99 seconds), 500 SI£1Tf When the timer has reached the end of set time, you will hear beep alerts indicating the timer has run out. 3.
Heating with multiple cooking stages Setting weight defrost For best results, some microwave recipes call for different power levels or different lengths of time for cooking. Your microwave may be set to change from one stage to another automatically (2 stages maximum). Example: to defrost lib. of food with the default 30% power level with cook time determined automatically: 1.
Defrosting tips • When using the defrost weight feature, the weight entered should always be pounds (valid entries are from 0,3 to 6.3 pounds). The shape of the package will alter the defrosting time. Shallow rectangular food packets defrost more quickly than a deep frozen block of food, Use both defrost weight and defrost time features for raw food items only. Defrosting gives best results when food to be thawed is a minimum of 0°F (taken directly from a true freezer).
Suggested power levels for cooking Suggestions for getting the best results The 10 power levels available with this microwave will help you to adjust to the power output best suited for the food type you are preparing. As with any food prepartion in the microwave, it is best to follow the microwave instructions that are printed on food packaging.
Popcorn - Potato The potato feature cooks 1,2 or 3 (cooking times based on 8 to 24 oz.) potatoes automatically. Use the table below to determine the setting to use. DO NOT leave micowave oven unattended while popping c0rn. Amount The popcorn feature lets you pop 3 different commercially packaged microwave popcorn sized bags. Use the table below to determine the setting to use. 3.0 oz.
Frozen veggie Beverage The frozen veggie feature cooks 1,2, 3 or 4 servings of frozen vegetables automatically. Use the table below to determine the setting to use. The beverage feature heats 1,2 or 3 cups of beverage. Use the table below to determine the setting to use, 1 cup ( about 8 oz.) 1 serving - 4 oz.default setting 2 servings - 8 oz. serving 2 times 3 servings - 12 oz. serving 3 times 4 servings - 16 oz, serving 4 times 2 cups (about 16 oz.) 2 times 3 cups (about 24 oz.
Recalling a favorite setting Example: to recall the last stored favorite setting: 1. Press favorite pad once (1, 2 or 3 times to recall up to 3 different favorites), f_,_i_ 2, Press START/+30sec pad once to recall the favorite setting. The microwave will start with the favorite settings automatically. +30 se< Note: Storing a new favorite setting will over-write the previous favorite setting, Convenience cooking suggestions Convenience category Amount Suggestions Popcorn 1,75-3,5 oz.
Cooking meat in your microwave Be sure to place prepared meats on a microwave-safe roasting rack in a microwave-safe dish. Start cooking the meat fat side down and if necessary, use narrow strips of aluminum foil to shield any bone tips or thin meat areas, After cooking, check the temperature in several places before letting the meat stand the recommended time, Please note that the temperatures in the following charts are temperatures at removal time; the temperature will rise during the standing period.
Cooking vegetables in your microwave Vegetables should be washed just before cooking. Rarely is extra water needed.
Care&Cleaning Cleaning suggestions For best performance and for safety reasons, keep the oven clean inside and outside, Take special care to keep the inner door panel and oven fron frame free of food and grease build-up, • If steam accumulates inside or outside the oven door, wipe with a soft cloth. Steam can accumulate when operating the oven in high humidity and in no way indicates microwave leakage, Never use rough scouring powder or pads on the microwave.
Solutions Troubleshooting to Common guide If you have a problem you cannot solve, please do not hesitate to call our service line: Before you call a repair person for your microwave, check the list below for possible easy solutions to some common problems. Neither the microwave's Problems display or oven operates - • Properly insert the plug into a grounded power outlet.
Yourappliance is coveredbya oneyearlimited warranty. For one year from your original date of purchase, Electrolux will pay costs, except as set forth below, associated with replacing any parts of this appliance that prove to be defective in materials or workmanship when such appliance is installed, used, and maintained in accordance with the provided instructions, Exclusions This warranty does not cover the following: 1.