& Components Grill .... 3°4 Assembly Built-In Instructions ........... Gas Requirements Leak Testing ................. Using 5-12 13-15 the Grill Rotisserie/Side Burner Usage ........... 16-19 Lighting the Grill ................. 17 Care & Maintenance 20 ............. Befere You CaJm Trouble Visit the Frigidaire Web Site at: Shooting Warranty .......................... http://www.ftigidaire.com READ AND SAVE THESE INSTRUCTIONS ............. = MADE IN THE U.S.A.
i aS¸¸¸¸¸¸U /; Congratulations on your purchase of a new gas grill! At Electrolux Home Products, we are very proud of our product and are completely committed to providing you with the best service possible. Your satisfaction is our number We know you'll enjoy your new gas grill and Thank hope you consider us for future purchases.
IMPORTANT SAFETY INFORMATION - Read this manual carefully before using your grill to reduce the risk of fire, burn hazard or other injury. - Extreme cam should be used because of the high temperatures produced by this appliance. CHILDREN UNATTENDED IN AN AREA WHERE THE GRILL IS BEING OPERATED. SHOULD NOT BE LEFT - This appliance must be kept clear from combustible materials, gasoline or other flammable vapors and flammable materials to come in contact with grate, burner or hot surfaces. liquids.
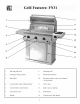
9 13 14 10 5 12 11 fi . Roll top grill hood . Warming shelf 9. Infrared back burner 10. Electronic ignitor: lnam, rear infrared & side burner 11. Cart w/door Control knobs: main burners 12. Ignitor access opening 6. Convection 13. Side Burner 7. ttandle 14. Control 2. Grilling/Cooking 3. Side Shelf 4. Control .
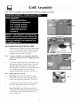
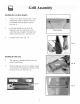
Note: Prior to assembly remove protective film from stainless steel parts Fig. 1 Wheel Channel Fig. 2 Cart Assemblw 1. Door Stops & Door Pivot Bolts Attach the two L-shaped sides to the back portion of the cart, making sure the two holes face up & the key holes are on the top, using the (4) self tapping hex head screws. (See Fig. 1) Note: A power screwdriver is required to install the screws-be cautious not to over-tighten and strip the screws. Fig. 3 .
Attaching 1. Grill While Head keeping to Cart the Grill on the foam base lean it onto its back. hood shut when on its back, bottom . doing loosen this.) on the but do not Fig. 5 Fig. 5) Using 2 self, tapping hex head screws, attach the magnetic door catch in the 2 holes in the bottom of'the grill. (See Fig. 6) ttave someone help you pick up the grill and set it on the top of the cart, of" the grill above the door sure the 4 bolt heads opening bolts are resting Make the large slots.
Installing . the Cart Using a 5/32" through . Handles allen wrench the inside a bar handle (See Door insert 1 screw of the door front end and tighten into securely. Fig. 9) Insert Bar tlandle into the End Cap attached to the door and then into the Backside of door: 2 screw locations other End Cap and tighten End Cap with allen wrench and screw. (See Fig. 10) 3. Complete Door. (See. Fig. 11) Screw Holes Fig. 9 Installing .
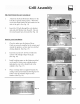
Side Shelf/Rotis . Attach Bracket the shelf Attachment and Rotisserie Bracket to the left side of grill by lining up the 7 bolt holes on the side shelf bracket & rotis bracket to the side of the grill. . (See Fig. Fig. 13 13) Insert the (7) bolts through the rotis bracket and side shelf bracket into the grill. Be sure the rotis bracket faces fbrward (See Fig. 14) Fig. 14 Interior . parts installation Check to make Grids . are correctly around the ignitors, during shipment.
. Attach the Side Burner inserting the shelf to the grill by hooks into the slots on the side of the grill and pushing assembly (See . until level on the shelf Fig. 19 Fig. 19) Lock the Side Burner (2) hex head screws of side burner. Note: down with the grill in place by re-inserting in the front (See & rear edge Fig. 20) A power screwdriver insert screw. extension is needed to Fig. 20 . Attach the Flex Line coming the grill to the fitting Side Burner. .
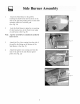
SIDE 1. BURNER PARTS ASSEMBLY Install burner into side burner tray lining the three cutouts on the underside of the up Fig. 22a burner. (See 2. Install burner 3. Install grate LEAK TESTING Fig. 22a) cap onto burner over burner (See Fig. 22b) (See Fig. 23) Fig. 22b Make sure all burners are turned Turn on the gas at the cylinder to "OFF". (LP models) or main valve (Natural models). DO NOT turn on the side burner. Perform a leak test at all connections and fittings soap.
Planning and Design Start by identifying the number and size of components you want to include: Grill, side burner, access doors for storage or other items you may wish to furnish such as: refrigerator, sink, warming drawer. Countertops must be constructed with non-combustible, outdoor-safe materials. Consider outdoor lighting to illuminate after-dark Grilling. For assistance in designing and building your outdoor cooking center, contact a landscape architect or general contractor.
GFI Electrical for rotisserie outlet c motor (6.5 amp rain.) Floor Support area for grill B f 35 V="Max.
General Information Verify the type of gas supply marking plate Note: Never For Natural on the back attach an unregulated Gas installations, All installer Electrical to be used, (located supplied Code, parts must sealants must on flare fittings. All gas connections and ordinances. Code, ANSI kits have the model testing This Grill must during be isolated codes, be made Propane (L.P).
L.P. Gas Frigidaire Installation Gas Grills assembly. (Note: replacement grill. Only use the pressure pressure to connect Attach that are set to operate directly assembly securely regulator and hose to a standard the gas hose Tighten regulator with L.R gas come and hose assemblies with a high capacity assembly specified hose and regulator supplied with the grill or a by Frigidaire). This assembly is designed 20 lb. L.P. cylinder.
General Information Although all gas connections tightness check excessive immediately Before must pressure on the grill are leaked be pertbrlned at the installation unknowingly check being if the smell tested applied at the factory prior site due to possible to the unit. Periodically to shipment, mishandling check a complete in shipment, the whole system gas or {'or leaks, or of gas is detected. Testing Do Not smoke while leak testing.
Grill Location Do not use the grill in garages, areas as this could a level surface. Note: The Clearance moving grill will operate to combustible Clearance and below construction of an outdoor removed from General Rules Do Not leave sheds monoxide best which - A minimum surface construction is required area. could Never result operate in injury the grill in enclosed or death. Place directly into the wind.
Before Lighting Warning: Check Important! the gas supply Always keep your face grill as possible Grill Burner Lighting when Before Lighting... line ibr cuts, wear and body or abrasion. as fhr away from the lighting. Lighting the Grill with electronic ignitor Always open the lid betbre attempting lighting. Push and turn one of the control knobs counter clockwise to the "ttlGH" position and immediately press the electronic ignitor button. You'll hear a snapping sound.
The grill rotisserie is an infrared this intense Once system is designed type which provides heat is magnificent lit, the rotisserie burner will reach 5 minutes. The rotisserie of food. The motor is mounted Attaching The motor f:acing the back With the rotisserie motor outlet installing rotis rod handle, it is now ready facing Push the rod through the center meat Center push the meat nuts. secure Once to operate.
Rotisserie Open Lighting the lid. clockwise Then You'll Push and turn the control to the "ttlGtt" press position. Wait and hold the electronic ignitor hear a snapping light in 4 seconds, wait 5 minutes control knob knob sound. trying to the desired does is turned counter button. does not to OFF and Once setting. not function, a lit match knob again. lit, turn the (See Fig. 27) the burner to the burner clockwise counter 5 seconds.
Drip Tray The drip tray of debris. located Note: the drip tray to cool before Allow Cooking grates Wear a barbecue cleaning can be cleaned mitt and scrub the grates Stainless the cart, should attempting be cleaned periodically to prevent heavy buildup to clean. immediately the cooking will be easier after cooking grates if removed is completed with a damp cloth. and after turning If the grill is allowed from the grill and cleaned with a mild off the flame.
General Trouble You should The The The Shooting inspect the burners at least once a year or immediately if any of the following smell of gas in conjunction with the burner flames appearing yellow. Grill does not reach temperature. burners make a popping noise. conditions occur: The Grill heats unevenly. Before calling customer service If the Grill does not function properly, use the following checklist.
Problem Solution Check gas connection. Flame is erratic Fuel level may be low. Grill may be in need of cleaning. Check flavor grids and cooking excess build-up. Flare-Ups grates for Ensure Grill is not placed directly wind. in path of Be sure the drip tray is clean. (do not use aluminum foil in drip tray) Check the burner inlet for obstructions. Burner flame is yellow or orange, in conjunction with the odor of gas. Grill may be in a windy area. windy area if possible.
LIMITED Frigidaire Grills have a Lifetime LIFETIME Warranty and a 5 year warranty on all other IMPORTANT: We recommend be contacted The return warranty LIMITED WARRANTY on all stainless steel panels, 15 years on stainless burners parts. you return the warranty with any questions of the warranty registration of safety registration card so that you can arise that could affect card is not a condition you. tbr coverage.