User Manual FNGB60JGR CONTENTS Safety information.......................................2 Safety instructions...................................... 3 Product description.....................................7 Before first use........................................... 9 Hob - Daily use......................................... 10 Hob - Hints and tips.................................. 12 Hob - Care and cleaning...........................13 Oven - Daily use ......................................
SAFETY INFORMATION Before the installation and use of the appliance, carefully read the supplied instructions. The manufacturer is not responsible if an incorrect installation and use causes injuries and damages. Always keep the instructions with the appliance for future reference. Children and vulnerable people safety WARNING! Risk of suffocation, injury or permanent disability.
SAFETY INFORMATION • • • • • • • Metallic objects such as knives, forks, spoons and lids should not be placed on the hob surface since they can get hot. Remove any spillage from the lid before opening. Let the hob surface cool down before closing the lid. Internally the appliance becomes hot when in operation. Do not touch the heating elements that are in the appliance. Always use oven gloves to remove or put in accessories or ovenware. Before maintenance cut the power supply.
SAFETY INSTRUCTIONS This appliance is suitable for the following markets: BH KW OM QA SA AE Installation WARNING! Only a qualified person must install this appliance. • Remove all the packaging. • Do not install or use a damaged appliance. • Obey the installation instruction supplied with the appliance. • Always be careful when you move the appliance because it is heavy. Always wear safety gloves. • Do not pull the appliance by the handle. • The kitchen cabinet and the recess must have suitable dimensions.
SAFETY INSTRUCTIONS combustion. Make sure to connect the appliance according to current installation regulations. Pay attention to requirements regarding adequate ventilation. Use WARNING! Risk of injury and burns. Risk of electrical shock. • Use this appliance in a household only. • Do not change the specification of this appliance. • Make sure that the ventilation openings are not blocked. • Do not let the appliance stay unattended during operation. • Deactivate the appliance after each use.
SAFETY INSTRUCTIONS • Make sure the flame does not go out when you quickly turn the knob from the maximum to the minimum position. • Use only the accessories supplied with the appliance. • Do not install a flame diffuser on the burner. • This appliance is for cooking purposes only. It must not be used for other purposes, for example room heating. • Do not open the lid, when there are spills on the surface. • Before you close the lid turn all burners off.
SAFETY INSTRUCTIONS Disposal WARNING! Risk of injury or suffocation. • Contact your municipal authority for information on how to discard the appliance correctly. • Disconnect the appliance from the mains supply. • Cut off the mains cable and discard it. • Remove the door catch to prevent children and pets to get closed in the appliance. • Flat the external gas pipes. Service • To repair the appliance contact an Authorised Service Centre. • Use original spare parts only.
PRODUCT DESCRIPTION Cooker specification FNGB60JGRSO 943006199 FNGB60JGRWO 943006198 Check the table to see your appliance's detailed specification.
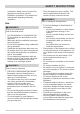
PRODUCT DESCRIPTION General overview 1 2 3 4 5 6 7 8 11 5 4 3 2 1 9 10 1 2 3 4 5 6 7 8 9 10 11 Button for the turnspit Button for the spark generator Knob for the Minute Minder Knob for the grill Knob for the oven functions Button for the lamp Knobs for the hob Grill Lamp Turnspit hole Shelf positions Cooking surface layout 1 5 2 3 1 Auxiliary burner 2 Steam outlet - number and position depend on the model 3 Semi-rapid burner 4 Semi-rapid burner 5 Rapid burner 4 Accessories • Wire shelf For
BEFORE FIRST USE WARNING! Refer to Safety chapters. Initial Cleaning Remove all accessories from the appliance. Refer to "Care and cleaning" chapter. Clean the appliance before first use. Put the accessories back to their initial position. Preheating Preheat the empty appliance to burn off the remaining grease. 1. Set the maximum temperature. 2. Let the appliance operate for approximately 1 hour. WARNING! Accessories can become hotter than usual. The appliance can emit an odour and smoke. This is normal.
HOB - DAILY USE WARNING! Refer to Safety chapters. Ignition of the hob burner Always light the burner before you put on the cookware. WARNING! Be very careful when you use open fire in the kitchen environment. The manufacturer declines any responsibility in case of the flame misuse. The spark generator can start automatically when you switch on the mains, after installation or a power cut. It is normal. Adjust the flame after it is regular. WARNING! Do not keep the knob pushed for more than 15 seconds.
HOB - DAILY USE Turning the burner off To put the flame out, turn the knob to the off position . WARNING! Always turn the flame down or switch it off before you remove the pans from the burner.
HOB - HINTS AND TIPS WARNING! Refer to Safety chapters. Cookware WARNING! Do not put the same pan on two burners. WARNING! Do not put unstable or damaged pots on the burners to prevent from spill and injury. CAUTION! Make sure that pot handles are not above the front edge of the cooktop. CAUTION! Make sure that the pots are placed centrally on the burners in order to get maximum stability and to get lower gas consumption.
HOB - CARE AND CLEANING WARNING! Refer to Safety chapters. General information • Clean the hob after each use. • Always use cookware with clean bottom. • Scratches or dark stains on the surface have no effect on how the hob operates. • Use a special cleaner applicable for the surface of the hob. • Wash stainless steel parts with water, and then dry them with a soft cloth. Cleaning the hob • Remove immediately: melted plastic, plastic foil, and food with sugar. If not, the dirt can cause damage to the hob.
OVEN - DAILY USE WARNING! Refer to Safety chapters. Oven Functions OVEN FUNCTION 1-8 APPLICATION Off position The appliance is off. Heat settings Range of temperature levels adjustment for the oven.1) Grilling To grill flat food in the middle of the grill. To make toast. Oven lamp To illuminate the oven interior. To use this function, press the button for the lamp. Turnspit To spit roasting meat.
OVEN - DAILY USE Using the grill CAUTION! Always keep the appliance door closed when the grill operates. 3. At the same time push the knob for the oven functions and turn it counterclockwise to the maximum gas flow position. 4. When the flame comes on, keep the knob for the oven functions pushed on the maximum gas flow position for 15 seconds or less to let the thermocouple warm up. Do not keep the knob for the oven functions pushed for more than 15 seconds.
OVEN - DAILY USE If there is temporarily no power supply open the oven door hold a flame near the grill burner holes and turn the lnob for the gas to the flame position. Turning off the grill burner To put out the flame, turn the knob to the off position .
OVEN - USING THE ACCESSORIES WARNING! Using the turnspit WARNING! Refer to Safety chapters. Inserting the accessories Wire shelf: Be careful when you use the turnspit. The forks and the spit are sharp. There is a risk of injury. WARNING! Use oven gloves when you remove the turnspit. The turnspit and the grill are hot. There is a risk of burns. CAUTION! The maximum weight permitted on the turnspit is 4.5 kg. Put the shelf on the correct shelf position.
OVEN - USING THE ACCESSORIES A 5. Install the first fork on the spit, then put the meat on the turnspit and install the second fork. Make sure that the meat is in the middle of the spit. 6. Use the screws to tighten the forks. 7. Put the tip of the spit into the turnspit hole. Refer to "Product description" chapter. 8. Put the front part of the spit on the support hook. 9. Remove the turnspit handle. 10. Light the grill. Refer to "Oven - Daily use" chapter. 11. Press the turnspit button . 12.
OVEN - HINTS AND TIPS WARNING! Refer to Safety chapters. The temperature and baking times in the tables are guidelines only. They depend on the recipes and the quality and quantity of the ingredients used. General information • The appliance has five shelf positions. Count the shelf positions from the bottom of the appliance floor. • Moisture can condense in the appliance or on the door glass panels. This is normal. Always stand back from the appliance when you open the appliance door while cooking.
OVEN - HINTS AND TIPS Cooking tables Casseroles FOOD TOTAL THERGRILLING PREPARA- SHELF QUANTITY MOSTAT TIME GRILL POTIME TION POSI(KG) POSI- (MIN) SITION (MIN) TIME TION TION (MIN) Lasagna1) 1.5 - 2.5 5 35 - 40 min. 35 - 40 35 - 40 2 Cannello- 1.5 - 2.5 ni 5 35 - 40 min. 35 - 40 35 - 40 2 1.5 - 2.5 3 65 - 70 min. 10 - 15 65 - 70 2 1.5 - 2.5 5 35 - 40 min. 35 - 40 35 - 40 2 1.5 - 2.5 5 30 - 35 max.
OVEN - HINTS AND TIPS Fish FOOD TOTAL THERGRILLING PREPARA- SHELF QUANTITY MOSTAT TIME GRILL POTIME TION POSI(KG) POSI- (MIN) SITION (MIN) TIME TION TION (MIN) Pike 0.8 - 1.5 4 60 - 80 min. 60 - 80 60 - 80 2 Dorade 0.4 - 0.7 4 40 - 60 min. 40 - 60 40 - 60 2 Trout 0.5 - 1.0 4 25 - 30 min. 25 - 30 25 - 30 2 Pizza FOOD Thin TOTAL THERGRILLING PREPARA- SHELF QUANTITY MOSTAT TIME GRILL POTIME TION POSI(KG) POSI(MIN) SITION (MIN) TIME TION TION (MIN) 1.0 - 1.2 8 20 - 25 min.
OVEN - HINTS AND TIPS FOOD Salty cake TOTAL THERGRILLING PREPARA- SHELF QUANTI- MOSTAT TIME GRILL POTIME TION POSITY (KG) POSI(MIN) SITION (MIN) TIME TION TION (MIN) 1.0 - 1.2 5 50 - 60 - - 50 - 60 2 Yeast cake 1.0 - 1.5 5 45 - 50 min. 5 - 10 45 - 50 2 GRILL POSITION TIME (MIN) 1) 1) 1) Preheat the oven for 10 minutes. Grilling FOOD QUANTITY (KG) SHELF POSITION Sheep chops1) 0.7 - 1.2 half 20 - 25 3 Ribs1) 1.0 - 1.2 half 45 - 60 3 Burgers1) 2.0 - 2.5 max.
OVEN - CARE AND CLEANING WARNING! Refer to Safety chapters. Do not lose the screws. Notes on cleaning 1. Open the door fully and hold the two door hinges. • Clean the front of the appliance with a soft cloth with warm water and a cleaning agent. • To clean metal surfaces, use a usual cleaning agent. • Clean the appliance interior after each use. Fat accumulation or other food remains may result in a fire. • Clean stubborn dirt with a special oven cleaner.
OVEN - CARE AND CLEANING 3 2 2 4. Put the door on a soft cloth on a stable surface. 5. Use a screwdriver to remove 2 screws from bottom edge of door. 7. Clean the oven door with water and soap. Clean inner side of the door. Dry the oven door carefully. When the cleaning is completed, install the glass panels and the oven door. To install the oven door, do the above steps in the opposite sequence. 4 4 6 1 1 5 5 6. Use a spatula made of wood or plastic or equivalent to open the inner door.
OVEN - CARE AND CLEANING WARNING! Danger of electrocution! Disconnect the fuse before you replace the lamp. The lamp and the lamp glass cover can be hot. 1. Deactivate the appliance. 2. Remove the fuses from the fuse box or deactivate the circuit breaker. The back lamp 1. Turn the lamp glass cover counterclockwise to remove it. 2. Clean the glass cover. 3. Replace the lamp with a suitable 300 °C heat-resistant lamp. 4. Install the glass cover.
TROUBLESHOOTING WARNING! Refer to Safety chapters. What to do if... PROBLEM POSSIBLE CAUSE REMEDY There is no spark when you try to activate the spark generator. The hob is not connected to an electrical supply or it is connected incorrectly. Check if the hob is correctly connected to the electrical supply. Refer to the connection diagram. There is no spark when you try to activate the spark generator. The fuse is released. Make sure that the fuse is the cause of the malfunction.
TROUBLESHOOTING PROBLEM The oven does not heat up. POSSIBLE CAUSE The necessary settings are not set. REMEDY Make sure that the settings are correct. The turnspit does not rotate. The turnspit is not correctly installed into the turnspit hole. Refer to "Using the turnspit". It takes too long to cook the The temperature is too low dishes or they cook too or too high. quickly. Adjust the temperature if necessary. Follow the advice in the user manual.
INSTALLATION Minimum distances WARNING! DIMENSION Refer to Safety chapters. Location of the appliance You can install your freestanding appliance with cabinets on one or two sides and in the corner. Keep a distance of about 1 cm between the appliance and the back wall to make sure that the lid opens. For minimal distances for fitting check the table.
INSTALLATION BURNER Ø BYPASS 1/100 MM Grill 59 Gas burners for NATURAL GAS G20 20 mbar NORMAL POWER KW REDUCED POWER KW INJECTOR MARK 1/100 MM Rapid 3.0 0.75 119 Semi-rapid 2.0 0.45 96 Auxiliary 1.0 0.35 70 Oven 2.25 1.0 108 Grill 2.0 1.5 108 NORMAL POWER KW REDUCED POWER KW INJECTOR MARK 1/100 MM Rapid 3.0 0.72 88 Semi-rapid 2.0 0.43 71 Auxiliary 1.0 0.35 50 Oven 2.25 1.0 71 Grill 2.0 1.
INSTALLATION Flexible nonmetal pipes connection Adjustment to different types of gas If you have an easy access to the connection, you can use a flexible pipe. The flexible pipe must be tightly attached by clamps. Let only an authorized person do the adjustment to different types of gas. In installation always use the pipe holder and the gasket.
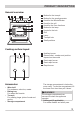
INSTALLATION A B C You can find this plate in the bag supplied with the appliance. If the supply gas pressure is not constant or it is different from the necessary pressure, install an applicable pressure adjuster on the gas supply pipe. Adjusting the minimum gas level on the hob burner A) Gas connection end B) Natural Gas pipe holder C) LPG pipe holder Hob injectors replacement Replace the injectors when you change the gas type. 1. Remove the pan supports. 2. Remove the caps and crowns of the burner.
INSTALLATION WARNING! Put the mains plug into the mains socket only if all parts are back into their initial position. There is a risk of injury. 4. Light the burner. Refer to "Hob - Daily use" chapter. 5. Turn the knob for the hob to the minimum position. 6. Remove the knob for the hob again. 7. Screw on slowly the bypass screw till the flame becomes minimum and stable. 8. Put the knob for the hob back on. Oven injector replacement 3. Unscrew the screw and slowly pull out the burner. 1 2 4.
INSTALLATION A 9. Set the maximum gas flow position on the knob for the oven functions and let the oven heat for at least 10 minutes. 10. Quickly turn the knob for the oven functions from maximum to the minimum gas flow position. Control the flame. Make sure the flame does not go out when you turn the knob to the minimum gas flow position. There must be a small regular flame on the oven burner crown. If the flame goes out adjust the oven burner again.
INSTALLATION appliance to set a stable position for the appliance. Levelling CAUTION! Remove all the accessories from the oven. 1. Open the lid of the appliance and disassemble the lid, the pan supports and all the burner assemblies. To install all the accessories, do the first step in an opposite sequence. Electrical installation WARNING! The manufacturer is not responsible if you do not follow the safety precautions from Safety chapters. 2.
ENVIRONMENT CONCERNS dispose appliances marked with the symbol with the household waste. Return the product to your local recycling facility or contact your municipal office. Recycle the materials with the symbol . Put the packaging in applicable containers to recycle it. Help protect the environment and human health and to recycle waste of electrical and electronic appliances.
867306845-C-062015