
User manual


WARNING!
Refer to Safety chapters.
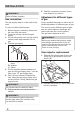
Gas connection
The gas supply ramp is on the back of the
oven.
Do not use rubber flexible pipes.
1. Before the gas connection, disconnect
the oven from the mains.
2. Close the primary valve of the gas
supply.
3. Do not fully put the oven into the built-in
cabinet, leave approximately 30 cm
gap.
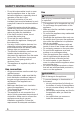
4. Connect gas supply.
A B C
A. Gas supply ramp, end of shaft with
ramp
B. Washer
C. Elbow
5. Put the supplied gasket between the
pipe and the gas supply ramp. Turn the
pipe to the 1/2" gas supply ramp.
6. Use a 22 mm spanner to tighten the
nuts. Keep the gas supply ramp in the
correct position. Gently handle the gas
supply circuit.
WARNING!
Do not use flame to check for leaks.
7. Fully move the oven into the built-in
cabinet.
WARNING!
Do not squeeze the gas supply ramp
and the pipe when you move the oven
into the built-in cabinet.
8. Seal the connection correctly. Use a
leak detection to control it.
Adjustment to different types
of gas
Only a qualified technician is authorized to
handle adjustment of different types of gas.
The oven is set for different types of gas,
you can switch between liquid gas and
natural gas with the correct injectors.
The gas rate is adjusted to suit.
WARNING!
Before you replace the injectors, make
sure that the gas knobs are in the off
position. Disconnect the oven from the
mains. Wait until the oven is cold.
There is a risk of injury.
Oven injector replacement
1. Remove the bottom plate of the oven
cavity (A) to get access to the oven
burner (B).
AB
2. Release the screw (C), which keeps the
burner in position.
8
INSTALLATION