
User manual


C
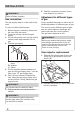
3. Carefully move the burner off the
injector support (D).
D
E
F
4. Slowly move it to the left side. Do not
apply force to the wire of the spark plug
connector (F) and to the thermocouple
conductor (E).
5. Release the burner injector (D) with a 7
mm socket spanner and replace it with
a different one, which is necessary for
the type of gas you use.
Refer to “Technical data” chapter.
6. Assemble the burner in a reverse
sequence.
Replace the gas type sticker near the gas
supply ramp with the one related to the new
gas type.
The gas oven burner does not need any
primary gas regulation.
Make sure that the gas supply
pressure of the appliance is in line with
the recommended values.
If the supply gas pressure is
changeable or different than the
necessary pressure, you must fit an
applicable pressure adjuster on the
gas supply pipe.
Minimum level adjustment of
the oven burner
1. Disconnect the oven from the mains.
2. Turn the knob for the gas control to the
minimum position and remove it.
3. Adjust the adjustment screw (A) with a
thin-bladed screwdriver.
A
CHANGE OF
THE TYPE OF
GAS
ADJUSTMENT
OF THE AD-
JUSTMENT
SCREW
From natural
gas to liquid
gas
Fully tighten
the adjustment
screw in.
From liquid
gas to natural
gas
Release the
adjustment
screw approxi-
mately 1/3 of
a turn.
4. Attach the knob for the gas control.
5. Connect the oven to the mains.
9
INSTALLATION