All about the Use & Care of your Cooktop TA B L E O F C O N T E N T S Welcome & Congratulations....................................2 Setting Induction Surface Controls.........................10 Important Safety Instructions..................................3 Care & Cleaning...................................................15 Cooktop Features...................................................7 Before You Call ...................................................17 Before Using the Cooktop...........
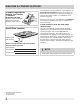
WELCOME & CONGRATULATIONS Product Registration Register Your Product The PRODUCT REGISTRATION CARD should be filled in completely, signed and returned to Electrolux Home Products. Serial Plate Location Cooktop Serial Plate Location Please record your model and serial numbers below for future reference.
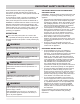
IMPORTANT SAFETY INSTRUCTIONS Read all instructions before using this appliance. This manual contains important safety symbols and instructions. Pay attention to these symbols and follow all instructions given. Do not attempt to install or operate your appliance until you have read the safety precautions in this manual. Safety items throughout this manual are labeled with a WARNING or CAUTION statement based on the risk type.
IMPORTANT SAFETY INSTRUCTIONS WARNING • Avoid fire hazard or electrical shock. Failure to follow this warning may cause serious injury, fire, or death. • Avoid fire hazard or electrical shock. Do not use an adapter plug, use an extension cord, or remove grounding prong from the power cord. Failure to follow this warning may cause serious injury, fire, or death.
IMPORTANT SAFETY INSTRUCTIONS CAUTION Do not attempt to operate the appliance during a power failure. If the power fails, always turn off the appliance. If the appliance is not turned off and the power resumes, electric surface elements may resume operation when power is restored. Once the power resumes, reset the clock and the oven function.
IMPORTANT SAFETY INSTRUCTIONS IMPORTANT INSTRUCTIONS FOR SERVICE AND MAINTENANCE • Do not repair or replace any part of the appliance unless specifically recommended in the manuals. All other servicing should be done only by a qualified technician. This reduces the risk of personal injury and damage to the appliance. • Always contact your dealer, distributor, service agent, or manufacturer about problems or conditions you do not understand.
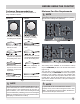
COOKTOP FEATURES Read these instructions carefully before using the cooktop 1. 2. 3. 4. Left Rear Induction Element Left Front Induction Element Center Front Induction Element (36” model only) Center Rear (30” model only) or Right Rear Induction Element (36” model only) 5. Right Front Induction Element 6. Left Front Element Control Knob & Indicator 7. Left Rear Element Control Knob & Indicator 8. Center Front Element Control Knob & Indicator (36” model only) 9.
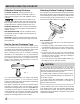
BEFORE USING THE COOKTOP Induction Cooktop Features Selecting Surface Cooking Cookware A COOLER COOKTOP- A unique feature of the Induction Cooktop is whether turned ON or OFF, the cooktop surface remains cooler than standard ceramic cooktops. The cookware used with the Induction Cooktop should have flat bottoms that make good contact with the entire surface of the Cooking Zone. Check for flatness by rotating a ruler across the bottom of the cookware (See Fig. 2).
BEFORE USING THE COOKTOP Cookware Recommendations Be sure to follow the following recommendations for using cookware as shown: INCORRECT CORRECT Minimum Pan Size Requirements NOTE Pan bottoms should not extend more than ½” (13mm) beyond outer Cooking Zone (Induction). 100mm 145mm 3 7/8” Min. 5 3/4” Min. 230mm 9 1/16” Min. 145mm 5 3/4” Min. • Cookware not centered on Cooking Zone surface. • Cookware centered correctly on Cooking Zone surface. Fig. 2 • Curved or warped pan bottoms or sides.
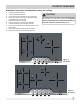
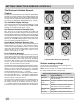
SETTING INDUCTION SURFACE CONTROLS The Electronic Surface Element Control The Electronic Surface Element Control includes digital display windows. The control provides a numeric digital setting for the surface element positions on the cooktop. These settings work the same way as normal knob setting indicators work except the settings are displayed in digital windows (Figs. 1 thru 8). The available Display Settings The control provides various heat levels from Hi (Fig. 2) to Lo (Fig. 4) and OFF (Fig. 1).
SETTING INDUCTION SURFACE CONTROLS Operating the Single Induction Surface Elements The cooktop is equipped with 3 (or 4) single induction surface elements: the RIGHT FRONT, CENTER and REAR positions (Figure 1 and 2). To Operate the Induction Surface Elements 1. Place the correctly sized cookware of the proper material on the induction surface element. 2. Push in and turn the surface control knob in either direction to the desired setting (Figure 3).
SETTING INDUCTION SURFACE CONTROLS Bridge Induction Surface Radiant Element The cooktop features with a "BRIDGE" induction element on the left side. (See Figures 1 & 2) positions. The bridge can be used with rectangular or oval shaped cookware such as a griddle. The bridge feature maintains an even temperature setting across both elements. The “bridge” mark on the knob indicates that both front and rear portions will heat (Fig. 4).
SETTING INDUCTION SURFACE CONTROLS To Operate the Bridge Induction Element: 1. Place the correctly sized cookware on the induction bridge surface element. 2. Push in and turn the control knob as shown in Figure 4 for larger or rectangular shaped cookware. The “bridge” mark on the knob indicates that both front and rear portions will heat. 3. Turn the knob to adjust the setting if needed. Start most cooking operations on a higher setting and then turn to a lower setting to finish cooking.
SETTING INDUCTION SURFACE CONTROLS Power Management Preheat Recommendations In order to give you more flexibility, your induction cooktop is equipped with more cooking zones than the number of induction generators. Each of those generators is assigned to power a specific cooking zone. One or two cooking zones are assigned to each generator. If you use more than one cooking zone at high power on the same generator, the generator may need to manage its power to both cooking zones.
CARE & CLEANING Cleaning Various Parts of Your Cooktop Before cleaning any part of the cooktop, be sure all controls are turned OFF and the cooktop is COOL. REMOVE SPILLOVERS AND HEAVY SOILING AS SOON AS POSSIBLE. REGULAR CLEANINGS NOW WILL REDUCE THE DIFFICULTY AND EXTENT OF A MAJOR CLEANING LATER. Surfaces How to Clean Stainless Steel Decorative Trim Cooktop, Control Knobs, Control Panel Wipe the control panel clean after each use.
CARE & CLEANING Cleaning Recommendations for the Ceramic Glass Cooktop CAUTION Before cleaning the cooktop, be sure the controls are turned to OFF and the cooktop is COOL. WARNING DO NOT use a cooktop cleaner on a hot cooktop. The fumes can be hazardous to your health, and can chemically damage the ceramic glass surface. For light to moderate soil: Apply a few drops of cleaning creme directly to the cooktop.
BEFORE YOU CALL (Solutions to Common Problems) IMPORTANT Before you call for service, review this list. It may save you time and expense. The list includes common occurrences that are not the result of defective workmanship or materials in this appliance. OCCURRENCE POSSIBLE CAUSE/SOLUTION Entire cooktop does not operate. House fuse has blown or circuit breaker has tripped. Check/reset breaker or replace fuse. If the problem is a circuit overload, have this situation corrected by a qualified electrician.
BEFORE YOU CALL (Solutions to Common Problems) OCCURRENCE POSSIBLE CAUSE/SOLUTION Cooking Zone LED continuously flashes. Induction Cooktop pan detection sensors do not see the correct cookware. Test with a magnet to be sure cookware is made with Induction compatible material. Cookware has been removed from the Cooking Zone without turning the Cooking Zone OFF. Place cookware back on to the Cooking Zone or if finished cooking turn off the affected Cooking Zone.
MAJOR APPLIANCE WARRANTY Your appliance is covered by a one year limited warranty. For one year from your original date of purchase, Electrolux will pay all costs for repairing or replacing any parts of this appliance that prove to be defective in materials or workmanship when such appliance is installed, used and maintained in accordance with the provided instructions.