
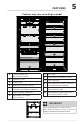
Owner Manual

7
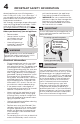
NOTE
If your appliance is placed with the door
hinge side against a wall, you may have
to allow additional space for the handle
so the door can be opened wider.
This Use & Care Guide provides general
operating instructions for your model. Use
the appliance only as instructed in this
Use & Care Guide. Before starting the ap-
pliance, follow these important first steps.
Installation
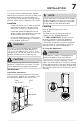
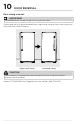
Installation clearances
Allow the following clearances for ease
of installation, proper air circulation, and
plumbing and electrical connections:
Sides 3/16"
Top & Back 1"
WARNING
DO NOT install the appliance where
the temperature will drop below 55°F
(13°C) or rise above 110°F (43°C). The
compressor will not be able to maintain
proper temperatures inside the unit.
Location
• Choose a place that is near a ground-
ed electrical outlet. Do Not use an
extension cord or an adapter plug.
• If possible, place the appliance out of
direct sunlight and away from the range,
dishwasher or other heat sources.
• Install the appliance on a floor that is
level and strong enough to support a
fully loaded appliance.
Refrigerator
3/16˝
(5 mm)
3/16˝
(5 mm)
1˝
(25 mm)
1˝ (25 mm)
INSTALLATION
CAUTION
Do not block the lower front of your ap-
pliance. Sucient air circulation is essen-
tial to operate your appliance properly.
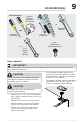
Leveling
Rest all bottom feet firmly on a
solid floor.
The floor must be strong enough to
support a fully loaded appliance.
It is VERY IMPORTANT for your unit to
be level in order to function properly.
If the appliance is not leveled during
installation, the door may be misaligned
and not close or seal properly, causing
cooling, frost or moisture problems.
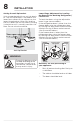
To Level the Appliance:
Level the unit using a carpenter’s level.
Adjust the leveling feet at the front making
minor adjustments to the rear leveling feet
as needed. Level the unit front to back and
side to side. Make sure all 4 feet fully touch
the floor.
CAUTION
The cabinet is heavy. Two people are
recommended to level the cabinet.
x2
x2