
Installation Instructions

6
Installation Instructions
NOTE:
Dimension for depth depends on wall thickness and type of molding
(FIG.21).
Do not block louvers in air conditioner cabinet.
8VHƎFPRUWKLFNHUOXPEHUIRUZRRGIUDPH
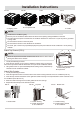
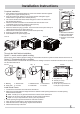
Install Cabinet into Wood Frame:
,QVHUWFDELQHWLQWRWKHIUDPHGZDOORSHQLQJ7KHWRSRIWKHFDELQHWVKRXOGH[WHQGƎPPLQWRWKHURRP,I
WKHUHLVWULPWKHFDELQHWVKRXOGH[WHQGƎPPSDVWWULP),*
2. Use a level to check that cabinet is level side to side (FIG.23).
3. Check that air conditioner cabinet is tilted to the outside so that water could run to the outside. The cabinet should
slop at least half-a-bubble towards the rear.
4. Reuse the insulation to seal opening between cabinet and frame.
8VHH[LVWLQJKROHVLQVLGHVDQGWRSRIFDELQHWDQGVHYHQ;ƎZRRGVFUHZVQRWSURYLGHGWRDWWDFKFDELQHWWR
frame.
6. Caulk all outside wall openings around cabinet.
$ƎPPH[WHQGLQJLQWRURRP
B. Trim
A
B
NOTE:
Do not overtighten screws or the cabinet will distort and provide a poor air seal between cabinet and air
conditioner.
A
A. level
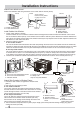
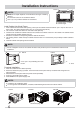
Complete Installation:
1. Insert air conditioner into cabinet (FIG.24).
2. Reconnect electronics plug if present. Insert front tabs of front panel into top of cabinet and swing front into
SODFH),*$
$WWDFKERWWRPIURQWRISDQHOZLWKIURQWSDQHOVFUHZV),*%
4. Plug into a grounded 3 prong outlet.
3UHVV5(6(7RQWKHSRZHUVXSSO\FRUG
NOTE:
Handle the air conditioner gently .
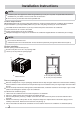
For through-the-wall installations, if needed, install molding around the room side of cabinet.
A
B
C
A. Outside width
B. Outside height
C. Depth
FIG.21
FIG.22 FIG.23
FIG.24 ),*$ ),*%
electronics plug