All about the Use &Care of your Room Air Conditioner TA B L E O F C O N T E N T S Important Safety Instructions ............................... 2-3 Operating Instructions ......................................... 5-11 Product Registration ............................................. 4 Care and Cleaning .............................................. 11 Packaging ........................................................... 4 Energy Saving Ideas ...........................................
Important Safety Instructions NOTE: This USE & CARE MANUAL provides specific operating instructions for your model. Use the room air conditioner only as instructed in this USE & CARE MANUAL. These instructions are not meant to cover every possible condition and situation that may occur. Common sense and caution must be practiced when installing, operating, and maintaining any appliance.
Important Safety Instructions SAFETY PRECAUTIONS CAUTION! Avoid Injury or damage to the unit or other property Provide occasional ventilation during use. Do not direct airflow at fireplaces or other heat related sources as this could cause flare ups or make units run excessively. Do not climb on or place objects on outdoor part of the unit. Do not hang objects off the unit. Do not place containers with liquids on the unit.
Product Registration, Packaging & Normal Sounds Product Registration Record Your Model and Serial Numbers Record in the space provided below the model and serial numbers. On all models, the serial plate is located on the outside of the cabinet. Model No. Serial No. Register Your Product The self-addressed PRODUCT REGISTRATION CARD should be filled in completely, signed and returned to the Frigidaire Company.
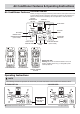
Air Conditioner Features & Operating Instructions Air Conditioner Features ELECTRONIC CONTROL Before you begin, thoroughly familiarize yourself with the control panel and remote as shown below and all its functions, then follow the symbol for the functions you desire. The unit can be controlled by the touch pad alone or with the remote.
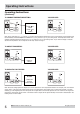
Operating Instructions Operating Instructions (continued) TO CHANGE TEMPERATURE SETTlNG: YOU WILL SEE: DO THIS: PRESS TO RAISE PRESS TO LOWER Note: Tap or hold either up ( ) or down ( ) button until the desired temperature is seen on the display. This temperature will be automatically maintained anywhere between 60 °F (16 °C) and 90 °F (32 °C) for cooling mode. The temperature will be automatically maintained anywhere between 55 °F (13 °C) and 80 °F (27 °C) for heating mode.
Operating Instructions Operating Instructions (continued) TO OPERATE ON FAN ONLY: YOU WILL SEE: DO THIS: PRESS MODE BUTTON CHOOSE FAN ONLY Note: Use this function only when cooling is not desired, such as for room air circulation or to exhaust stale air on some models. (Remember to open the vent during this function, but keep it closed during cooling for maximum cooling efficiency.) You can choose any fan speed you prefer. (Except “Auto Fan”).
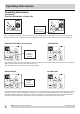
Operating Instructions Operating Instructions (continued) CHECK FILTER FEATURE, YOU WILL SEE: DO THIS: PRESS FILTER RESET BUTTON Note: This feature is a reminder to clean the Air Filter (See Care and Cleaning) for more efficient operation. The LED (light) will illuminate after 250 hours of operation. To reset after cleaning the filter, press the "Filter Reset" button and the light will go off.
Operating Instructions Operating Instructions (continued) REMOTE SENSING FEATURE (on some models): LIGHT pulsing ( On & Off intermittently ). DO THIS: PRESS REMOTE SENSING START BUTTON NOTE: Unit display shows the set temperature NOTE: Remote display is actual temperature at remote control only Note: This feature can be activated from the remote control ONLY, the unit must be in a cooling mode.
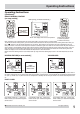
Operating Instructions Operating Instructions (continued) YOU WILL SEE: TO CHANGE TEMPERATURE DISPLAY: DO THIS: PRESS AND HOLD THE UP/DOWN BUTTONS TOGETHER FOR 3 SECONDS Note: The control is capable of displaying temperature in degrees Fahrenheit or degrees Celsius. TO TURN UNIT OFF: YOU WILL SEE: DO THIS: PRESS ON/OFF BUTTON Note: When unit is shut off in the Heat Mode, the fan will continue to run for a few seconds to dissipate residual heat within the unit.
Operating Instructions, Care and Cleaning & Energy Saving Ideas Operating Instructions (continued) The louvers will allow you to direct the air flow Up or Down and Left or Right throughout the room as needed. Rotate the Auger Wheel until the desired direction is obtained. (4-WAY) AUGER WHEEL Care and Cleaning Clean your air conditioner occasionally to keep it looking new. Be sure to unplug the unit before cleaning to prevent shock or fire hazards.
Before You Call Before calling for service, review this list. It may save you time and expense. This list includes common occurrences that are not the result of defective workmanship or materials in this appliance. OCCURRENCE SOLUTION Air conditioner will not operate. Wall plug disconnected. Push plug firmly into wall outlet. Plug Current Device Tripped. Press the RESET button. House fuse blown or circuit breaker tripped. Replace fuse with time delay type or reset circuit breaker. Control is OFF.
Major Appliance Limited Warranty Your appliance is covered by a limited two-year warranty and a limited 3-5 year warranty on the sealed system (the compressor, condenser, evaporator and tubing). For two years from your original date of purchase, Electrolux will pay all costs for repairing or replacing any parts of this appliance that prove to be defective in materials or workmanship when such appliance is installed, used and maintained in accordance with the provided instructions.