Use & Care Manual Freezer Product Registration 2 Energy Saving Ideas 2 Important Safety Instructions 3-4 First Steps Setting the Temperature Control 4 Freezer Optional Features 4-6 Care and Cleaning 7-8 Power Failure/Freezer Failure Avoid Service Checklist Warranty READ AND SAVE THESE INSTRUCTIONS 2-3 8 9 - 10 11 P/N 297079200 (Feb 2006)
Product Registration The information contained in this Use and Care Guide will instruct you on how to properly operate and care for your product. Please read through the information contained in your literature pack to learn more about your new freezer. Record your Model and Serial Numbers Record the model number and serial number of this freezer in the space provided below. Model No. Serial No.
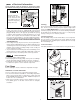
Electrical Information 3" AIR SPACE These guidelines must be followed to ensure that safety mechanisms in the design of this freezer will operate properly. 3" Avoid fire hazard or electric shock. Do not use an extension cord or an adapter plug. Do not remove any prong from power cord. 3" 3" 1" Installation Leveling • • • • The freezer must have all bottom corners resting firmly on a solid floor.
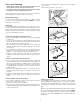
Door Removal (Upright Models) • Unplug the unit • Gently lay freezer on its back, on a rug or blanket. • Remove two base screws and base panel. Remove wire from clips on bottom of cabinet, if required. • Unplug connector, if required, by holding the cabinet connector in place and pulling the door connector out. • Remove the bottom hinge screws. • Remove the plastic top hinge cover. • Remove the screws from the top hinge. Electromechanical Control • Remove the top hinge from the cabinet.
Electromechanical Temperature Alarm (Audible Only or Slide-Out Basket (Some Upright Models) The slide-out basket, located at the bottom of the freezer provides Audible with Warning Light) separate storage space for items that are difficult to store on freezer shelves. To remove the basket, pull out and lift up. This feature is designed to provide a warning of a possible malfunction. If the temperature of the food rises to a level unsafe for long-term storage, the buzzer will sound.
Drop Front (Some Upright Models) Chest Divider (Some Chest Models) The drop front, located at the bottom of the freezer, provides a Use these clever dividers to custom-arrange a variety of differentseparate compartment for small irregular shaped items. Lift the sized storage bins in the bottom of your chest freezer. Use the front up and out to remove. peel-n-stick labels found in your literature packet to help remind you which items are stored where.
• Close the freezer door/lid. Frost should soften in about fifteen (15) minutes. • Damp objects stick to cold metal surfaces. DO NOT touch • Repeat this procedure is necessary. interior metal surfaces with wet or damp hands. • The freezer must be unplugged (to avoid electrical hazard) from power source when defrosting the unit. Care and Cleaning Drain Tube Some upright and chest freezers are frost free and defrost automatically, but should be cleaned occasionally.
Cleaning The Outside Wash the cabinet with warm water and mild liquid detergent. Rinse well and wipe dry with a clean soft cloth. Replace parts and food. Do not use razor blades or other sharp instruments, which can scratch the freezer surface when removing adhesive labels. Any glue left from the tape can be removed with a mixture of warm water and mild detergent, or touch the residue with the sticky side of the tape already removed. DO NOT REMOVE THE SERIAL PLATE.
AVOID SERVICE CHECKLIST Before calling for service, review this list. It may save you time and expense. This list includes common occurrences that are not the result of defective workmanship or materials in this appliance. CAUSE PROBLEM CORRECTION FREEZER DOES NOT RUN. Freezer does not run. * Freezer is plugged into a circuit that has a ground fault interrupt. * Temperature control is in the "OFF" position. * Freezer may not be plugged in, or plug may be loose.
PROBLEM CAUSE CORRECTION SOUND AND NOISE (Cont.) Bubbling or gurgling sound, * Refrigerant (used to cool freezer) is * This is normal. circulating throughout the system. Vibrating or rattling noise. * Freezer is not level. It rocks on the * Level the freezer by putting wood or metal shims floor when it is moved slightly. under part of the freezer. * Floor is uneven or weak. * Ensure floor can adequately support freezer. Level the freezer by putting wood or metal shims under part of the freezer.
Compact Appliance Warranty Information Your appliance is covered by a one year limited warranty. For one year from your original date of purchase, Electrolux will pay all costs for repairing or replacing any parts of this appliance that prove to be defective in materials or workmanship when such appliance is installed, used and maintained in accordance with the provided instructions. Exclusions This warranty does not cover the following: 1.