REFRIGERATOR use & care Important Safety Information.....................2 Storage Features............................................. 11 Features.............................................................. 4 Storing Food and Saving Energy............. 12 Installation..........................................................5 Care and Cleaning......................................... 13 Door Removal....................................................7 Troubleshooting............................
IMPORTANT SAFETY INFORMATION WARNING Please read all instructions before using this refrigerator. Definitions This is the safety alert symbol. It is used to alert you to potential personal injury hazards. Obey all safety messages that follow this symbol to avoid possible injury or death. DANGER DANGER indicates an imminently hazardous situation which, if not avoided, will result in death or serious injury.
IMPORTANT SAFETY INFORMATION Child Safety Destroy or recycle the carton, plastic bags, and any exterior wrapping material immediately after the refrigerator is unpacked. Children should NEVER use these items to play. Cartons covered with rugs, bedspreads, plastic sheets or stretch wrap may become airtight chambers, and can quickly cause suffocation. Proper Disposal of your Appliance Risk of child entrapment Child entrapment and suffocation are not problems of the past.
FEATURES G F E D C B A A Lower Drawer E Door Bin B Middle Drawer F Glass Shelf C Top Drawer G LED Lighting D Crisper IMPORTANT Features not purchased with your refrigerator can be purchased at Frigidaire.com or by calling 1-800-374-4432.
INSTALLATION This Use & Care Manual provides general installation and operating instructions for your model. Use the refrigerator only as instructed in this Use & Care Manual. Before starting the refrigerator, follow these important first steps. Location • Choose a place that is near a grounded, non-GFCI, electrical outlet. Do Not use an extension cord or an adapter plug. • If possible, place the refrigerator out of direct sunlight and away from the range, dishwasher, or other heat sources.
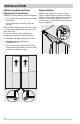
INSTALLATION Cabinet Leveling and Door Alignment (if necessary) Guidelines for final positioning of your refrigerator: • All 4 corners of the cabinet must rest firmly on the floor. • Doors should align with each other and be level. Flipper Mullion Adjust Flipper Mullion for proper connection with the mullion guide by ensuring the flipper mullion is folded and perpendicular to the fresh food door. If the mullion guide is not in the correct position, it could prevent the door from closing completely.
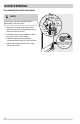
DOOR REMOVAL Getting through narrow spaces If your refrigerator will not fit through an entrance area, you can remove the doors. Check first by measuring the entrance. Tools Necessary: To remove the freezer door NOTE Fresh food door must be removed before removing Freezer door. 1 Use screwdriver to remove center hinge. 2 Lift freezer door off lower hinge to remove from unit. PhillipsTM Head Socket Wrench Set Screws WARNING Make sure unit is unplugged before beginning the door removal process.
DOOR REMOVAL To reinstall the fresh food door Hinge Screws Top Hinge Cover NOTE Freezer door must be reinstalled before reinstalling Fresh Food door. 1 Place door on center hinge. Make sure to guide hinge post into corresponding hole on bottom of Fresh Food door. Top Hinge Locator Tabs 2 Use locator tabs on top of cabinet to guide top hinge into its correct location. 3 Reattach hinge screws and electrical connections at top hinge of Fresh Food door.
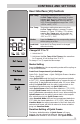
CONTROLS AND SETTINGS User Interface (UI) Controls Ref. Temp Temperature setting decreases every time the Ref. Temp indicator is pressed. It cycles between 44°F and 34°F. When 34°F is shown, pressing Ref. Temp again will loop back to 44°F. Control temperatures range from +34°F / +1°C to +44°F / +7°C Frz. Temp Temperature setting decreases every time the Frz. Temp indicator is pressed. It cycles between +7°F and -7°F. When -7°F is shown, pressing Frz. Temp again will loop back to +7°F.
CONTROLS AND SETTINGS mode is turned on, press and hold the Frz. Temp button for 3 seconds to view the selected time setting. Then again, press Frz. Temp to toggle between 6 and 48 hour settings. Once the correct time is selected, press and hold the Frz. Temp button for 3 seconds to confirm the setting. After 30 seconds of no interaction of the controls, the UI will confirm the time setting automatically and return to the main screen.
STORAGE FEATURES CAUTION To avoid personal injury or property damage, handle tempered glass shelves carefully. Shelves may break suddenly if nicked, scratched, or exposed to sudden temperature change. Allow the glass shelves to stabilize to room temperature before cleaning. Do not wash in dishwasher. You can easily adjust shelf positions in the fresh food compartments to suit your needs. Doors Storage bins The doors to your fresh food compartment use a system of modular storage bins.
STORING FOOD AND SAVING ENERGY Ideas for storing foods Fresh food storage • Keep the fresh food compartment between 34°F and 40°F with an optimum temperature of 37°F. • Avoid overcrowding the refrigerator shelves, which reduces air circulation and causes uneven cooling. • Avoid placing food in front of air ports. (See Controls Section for illustration.) Fruits and vegetables • Store fruits and vegetables in crisper drawers, where trapped moisture helps preserve food quality for longer time periods.
CARE AND CLEANING Protecting your investment Keeping your refrigerator clean maintains its appearance and prevents odor build-up. Wipe up any spills immediately and clean the freezer and fresh food compartments at least twice a year. NOTE Do not use abrasive cleaners such as window sprays, scouring cleansers, flammable fluids, cleaning waxes, concentrated detergents, bleaches, or cleansers containing petroleum products on plastic parts, interior doors, gaskets, or cabinet liners.
CARE AND CLEANING Part Interior & Door Liners Door Gaskets Drawers & Bins Glass Shelves Exterior Care & Cleaning Tips What To Use Tips and Precautions • Soap and water Use two tablespoons of baking soda in one • Baking soda and water quart of warm water. Be sure to wring excess water out of sponge or cloth before cleaning around controls, LED light or any electrical part. • Soap and water Wipe gaskets with a clean soft cloth. • Soap and water Use a soft cloth to clean drawer runners and tracks.
TROUBLESHOOTING 1-800-374-4432 (United States) 1-800-265-8352 (Canada) Visit our web site at Frigidaire.com Before calling for service, review this list. It may save you time and expense. This list includes common occurrences that are not the result of defective workmanship or materials in this appliance. Concern Potential Cause Common Solution Opening/Closing Of Doors/Drawers Door(s) will not close. • Door was closed too hard, causing other door to open slightly. • Close both doors gently.
TROUBLESHOOTING Concern Potential Cause Common Solution Water/Moisture/Frost Inside Refrigerator Moisture collects on inside of refrigerator walls. Water collects on bottom side of drawer cover. Water collects in bottom of drawer. • Weather is hot and humid. • The rate of frost buildup and internal sweating increases. • Vegetables contain and give off moisture. • It is not unusual to have moisture on the bottom side of the cover. • Washed vegetables and fruit drain while in the drawer.
LIMITED WARRANTY Your appliance is covered by a one year limited warranty. For one year from your original date of purchase, Electrolux will pay all costs for repairing or replacing any parts of this appliance that prove to be defective in materials or workmanship when such appliance is installed, used and maintained in accordance with the provided instructions. Exclusions This warranty does not cover the following: 1.
welcome home Our home is your home. Visit us if you need help with any of these things: owner support accessories service registration (See your registration card for more information.) Frigidaire.com 1-800-374-4432 Frigidaire.