All about the Use &Care of your Split Type Room Air Conditioner Refer to Page 2 for table of contents. www.frigidaire.com USA 1-866-942-1567 www.frigidaire.
Welcome to the world of simple handling and no worries Thank you for choosing Frigidaire. This manual contains all of the information required to guarantee your safety and the appropriate use of your air conditioner. Please read all of the instructions before using the air conditioner and keep this manual for future reference. We know you will enjoy your new air conditioner and thank you for choosing our product. We hope you will consider us for future purchase.
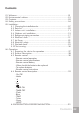
Contents 01. Welcome...........................................................................................01 02. Environmental advices..........................................................................01 03. Contents...............................................................................................02 04. Safety precautions.......................................................................04 05. Installation: 5.1 Choosing the installation site......................................
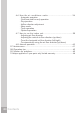
6.6 How the air conditioner works........................................ 34 - Automatic operation - Cool/heat and fan only operation - Dry operation - Airflow direction adjustment - Sleep mode - Timer operation - Optimal operation 6.7 How to use the indoor unit......................................................
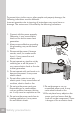
Safety precautions This appliance must be installed by a qualified licensed HVAC technician in accordance with all applicable codes. All electrical connections should be performed by a licensed electrician. DANGER! Avoid Serious Injury or Death 1. Do not attempt to install the split air conditioner by yourself. 2. This air conditioner contains no user-serviceable parts. Always call an authorized Electrolux servicer for repairs. 3.
To prevent injury to the user or other people and property damage, the following instructions must be followed. Incorrect operation due to ignoring of instructions may cause harm or damage. The seriousness is classified by the following indications. 1. Connect with the power properly. Otherwise, it may cause electric shock or fire due to excess heat generation. 2. Always ensure effective grounding. No grounding may cause electric shock. 3.
11.Do not open the unit during operation. It may cause electric shock or injury. 12.Do not drink water drained from air conditioner. It contains contaminants and could make you sick. 13.Do not disassemble or modify unit. It may cause failure of appliance and electric shock. 14.When the air filter is to be removed, do not touch the metal parts of the unit. It may cause an injury. 15.When the unit is to be cleaned, switch off, and turn off the circuit breaker.
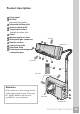
Product description 1 Front panel 2 Air filter 3 4 5 6 7 8 9 10 11 12 (beneath front panel ) Horizontal airflow grille Vertical airflow grille Temperature sensor (inside the indoor unit) Panel Infrared signal receiver Refrigerant gas connector Remote control Connecting cable 3 Detection valve Drain hose and refrigerant connecting pipe Air inlet 2 1 Indoor unit 4 Air outlet 7 6 5 9 12 Air inlet Attention All the pictures in this manual are for explanation purpose only.
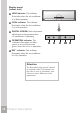
Display panel (indoor unit) 13 HEAT indicator: This indicator illuminates when the air conditioner is in Heat operation 14 COOL indicator: This indicator illuminates when the air conditioner is in cool operation 15 DIGITAL SCREEN: Show the present adjustments to temperature when air conditioner is operating. 16 OPERATION indicator: This indicator illuminates red after power is on and illuminates green when the unit is in operation.
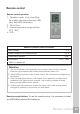
Remote control Remote control operation 1. Operation mode: Cool, Heat (Only for models with heating function), DRY, FAN, and AUTO (Automatic). 2. 24 hrs Timer. 3. Internal temperature range selection: 61ºF - 86ºF 4. LCD REMOTE CONTROL SPECIFICATIONS Rated voltage 3V Lowest voltage of CPU emiting signal 2.4 V Transmission distance 32.8'* Environment 23ºF ~ 140ºF * With 3 V, reaches 40' Attention 1.
When should the batteries be replaced 1. There is not a "beep" anymore from the indoor unit when using the control remote or the signal light indicator does not light. 2. The indoor unit does not respond to the remote control commands to activate the programs. To replace batteries 1. Slide out the battery compartment cover ( located at the back of the remote control). 2. Install two AAA batteries in the compartment (indicated in the drawing located inside the compartment). 3. Slide in the cover. 4.
Remote control description 1 ON/OFF: Press this button to start the unit operation. Push the button again to stop the unit operation. 2 MODE: Each time you press the button, a mode is selected in a sequence that goes from AUTO, COOL, DRY, FAN ,and HEAT*, as the following figure indicates: AUTO COOL DRY FAN Cooling and heating model HEAT* * Note: Only for models with heating function 1 2 4 3 5 6 9 7 the button to decrease the indoor temperature setting.
10 BLOW: When in cool or dry mode, press "BLOW" button to active or deactive blow function ,the icon will display and the indoor fan will continuely run for 10 minutes in order to dry the indoor unit even though you have turned off the unit. INTRODUCTION FOR SPECIAL FUNCTION 1.ABOUT LOCK Press "+ +" and "--" buttons simultaneously to lock or unlock the keypad.
How the air conditioner works Automatic operation When the Air Conditioner is ready for use, switch on the power and the OPERATION indicator lamp on the display panel of the indoor unit starts illuminating. 1. Use the MODE button to select AUTO. 2. Use the "MODE" button to select Auto. The unit will automatically select Cool, Fan and Heat operation depending on the difference ambient temperature and system difference temperature .When in Cool Operation the panel will display 77 ºF.
DRY operation Due to the difference between the set temperature of the unit and the actual indoor temperature, the Air Conditioner in DRY mode will automatically switch the operation modes between COOL and FAN ONLY many times. ng oli Co Fa no nly ng oli Co no nly . Fa 1. Press the MODE button to select DRY. +"/"--" button to set the 2. Press the "+ desired temperature from 61ºF to 86ºF. 3.
SLEEP mode(Only for >12000 Btu's) Press the sleep button to activate the sleep mode. To deactivate, press the button again. Set temperature 2 °F In heating mode (only for models with heating function): 7KH IDQ VSHHG ZLOO EH DXWRPDWLFDOO\ FRQWUROOHG Set temperature In cooling mode: 2 °F 7KH IDQ VSHHG ZLOO EH DXWRPDWLFDOO\ FRQWUROOHG 7 hours 1 hour 1 hour 7KH DLU FRQGLWLRQHU ZLOO DXWRPDWLFDOO\ LQFUHDVH ̧ SHU KRXU LQ D KRXU SHULRG SLEEP FUNCTION (Cooling mode)
To set the stopping time 1. Press the "TIMER OFF" button to activate the auto start timer function. 2. The method of setting is the same as above of "TIMER ON". Exemples: ON ON ON OFF ON ON OFF OFF 6h 6h 12h (Timer On) (Timer Off) (Timer Off) OFF OFF 14h (Timer On) 20h (Timer On) 23h (Timer Off) Optimal operation To achieve optimal performance, please note the following: 1. Adjust the air flow direction correctly so that it is not directed on people. 2.
How to use the indoor unit Adjusting air flow direction Adjust the air flow direction properly otherwise, it might cause discomfort or cause uneven room temperatures. Adjust the horizontal louver using the remote controller. Adjust the vertical louver manually.
Press to lock louver in desired position. The button will be disabled when the air conditioner is not in operation (including when the TIMER ON is set). Do not operate the air conditioner for long periods with the air flow direction set downward in cooling or dry mode. Otherwise, condensation may occur on the surface of the horizontal louver and drop on to the floor or on furnishings. Do not move the horizontal louver manually. Always use the button.
Manual operation (without remote control) Manual operation can be used temporarily in case you can not find the remote controller or its batteries are exhausted. 1. Open and lift the front panel up to an angle until it remains fixed with a clicking sound. 2. One press of the manual control button will lead to the forced AUTO operation. 3. Close the panel firmly to its original position.
Maintenance Cleaning the indoor unit and remote controller 1. It is necessary to stop the air conditioner and disconnect the power supply before cleaning. 2. Use a dry cloth to wipe the indoor unit and remote controller. 3. A cloth dampened with cold water may be used on the indoor unit if it is very dirty. 4. The front panel of the indoor unit can be removed and cleaned with water. Then wipe it with a dry cloth. 5. Do not use a chemically treated cloth or duster to clean the unit. 6.
for a couple of hours. 7. Insert the fresh air filter(if so equipped) in its original place. 8. Insert the upper part of the air filter (Fresh air filter if so equipped + support frame) back into the unit keeping in mind that the outside border (right and left) are lined up correctly, then place the whole filter in its initial position. Fresh air filter(if so equipped) Bracket Fresh air filter(if so equipped) Fig.1 Fig.2 Support frame Support frame Fresh air filter(if so equipped) Fig.
Operation tips The following events may occur during normal operation. Protection of the air conditioner. Compressor protection The compressor can't restart for 3 minutes after it stops. Anti-cold air (Only for models with heating function) The unit is designed not to blow cold air in HEAT mode, when the indoor heat exchanger is in one of the following three situations and the set temperature has not been reached. 1. When heating has just starting. 2. Defrosting. 3. Low temperature heating.
long time or during first use of the unit. A peculiar smell comes out from the indoor unit. This is because the indoor unit gives off smells permeated from building material, furniture or smoke. The air conditioner turns to FAN only mode from COOL or HEAT (Only for models with heating function) mode. When indoor temperature reaches the temperature setting on air conditioner, the compressor will stop automatically, and the air conditioner turns to FAN only mode.
Solutions for problems If your air conditioner malfunctions, check the following information to find solutions or probable causes of the failure. Do not try to repair the unit by yourself, if these solutions do not solve the failures, call your local service repair team. Poor Equipment performance 1. The air outlet or inlet of outdoor unit is obstructed. 2. The air outlet or inlet of indoor unit is obstructed. 3. The outdoor temperature is high due to direct sunlight or another heat source. 4.
Major Appliance 5 Year Parts Only Limited Warranty Your appliance is covered by a five year parts only limited warranty. For five years from your original date of purchase, Electrolux will pay for the cost of replacement parts used in the repair of the appliance if the original parts prove to be defective in materials or workmanship when such appliance is installed, used and maintained in accordance with the provided instructions. Exclusions This limited warranty does not cover the following: 1.
Major Appliance 5 Year Parts Only Limited Warranty DISCLAIMER OF IMPLIED WARRANTIES; LIMITATION OF REMEDIES CUSTOMER'S SOLE AND EXCLUSIVE REMEDY UNDER THIS LIMITED PARTS ONLY WARRANTY SHALL BE THE COST OF REPLACEMENT PARTS AS PROVIDED HEREIN. CLAIMS BASED ON IMPLIED WARRANTIES, INCLUDING WARRANTIES OF MERCHANTABILITY OR FITNESS FOR A PARTICULAR PURPOSE, ARE LIMITED TO ONE YEAR OR THE SHORTEST PERIOD ALLOWED BY LAW, BUT NOT LESS THAN ONE YEAR.