Loca_ Electrolu× Soludons Hodine (United States) 1°800°944°9044 1°800°668°4606 4 Resolve many service issues over the phone at your convenience! 4 mfwe can't resolve your service issue, we'H schedule a reputable _oca_ service technician for you! 4 E_ectro_ux Parts & Extended Warranty READ AND SAVE THESE INSTRUCTIONS hstructions ............. 2 hstaHation ............................................ 3 Connecting Water Supply .................... 4 ..................
electrical shock hazards. It must be plugged directiy into a properly grounded three prong receptacle. The receptacle must be installed in accordance with local codes and ordinances. Consult a quaiified eiectrician. Avoid connecting refrigerator to a Ground Fault Interruptor (GFb circuit. Do not use an extension cord or adapter plug, FOR YOUR SAFETY ,, , Do not store or use gasoline, or other flammable liquids in the vicinity of this or any other appliance.
ThisUse&CareManual provides general operating instructions foryourmode!. Usetherefrigerator onlyas instructed inthisUse&CareManual. Beforestartingthe refrigerator, followtheseimportant first steps, LOCATION o o Choose a place that is near a grounded electrical outlet, Do Not use an extension cord or an adapter plug. If possible, place the refrigerator out of direct sunlight and away from the range, dishwasher or other heat I SOUrCeS.
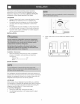
To Connect Water Supply Line To Ice Maker inlet Valve 1. 2. Disconnect refrigerator from electric power source. Place end of water supply line into sink or bucket. Turn ON water supply and flush supply line until water is clear. Turn OFF water suppiy at shutoff valve. 3. Unscrew plastic cap from water valve inlet and discard cap. 4. Slide brass compression nut, then ferrule (sleeve) onto water supply line, as shown. 5. Push water supply Iine into water valve inlet as far as it will go (X inch).
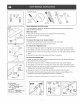
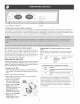
f Tools Necessary: 3/8" Fixed Wrench DOOR REMOVAL INSTRUCTIONS: tf it is necessary to move the refrigerator steps to remove the doors. Before you through narrow doorways, follow these start: 1 Make sure the electrical power cord is unplugged from the wall outlet. 2 Remove any food from the door shelves. 3 Close the doors. To remove the hinge cover: (some models) 1 Remove the three screws from the cover over the top door hinges. 2 Pull the cover forward about a half inch and lift it off.
COOLDOWNPERmOD Toensure safefoodstorage, allowtherefrigerator tooperate withthedoors closed foratleast8to12hours before loading itwith food. REFRIGERATOR & FREEZER CONTROLS TEMPERATURE ,, ,, o ADJUSTMENT After 24 hours, adjust the controls as needed. Adjust temperatures temperature to stabilize, For colder temperatures, turn the knob towards Comder. For warmer temperatures, turn the knob towards Cold.
TEMPERATURE ADJUSTMENT To adjust the temperature to a higher or lower setting, press the Up (Cold) or Down (Colder) button closest to the display. The first time you press the button, the display shows current setting you entered= Each press of the button after that changes the setting by one= The display shows your new setting momentarily, then changes back to the current temperature= IF TE[_.._PERATURE Numeric Display Freezer DISPLAYS FLASH...
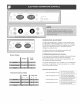
Indicator Cooling System On/Off Button TURNING THE COOLING SYSTEM ON AND OFF You can disable the cooting system in your refrigerator by pressing the On/Off button located on the left side of the temperature control panel. To ensure that you do not accidentally turn off the cooling system, the button does not work unless you press and hold it for three seconds. Once you disable the cooting system, aII refrigeration to the freezer and fresh food compartments stops.
AUTOMATIC raCE&WATER e Cube o Crush DmSPENSER OPERATING mNSTRUCTmONS Lighf _l_,R0,d o L0ck EXTREME FREEZE To freeze food at a faster rate to preserve freshness, push the Touch Pad O for 3-5 seconds to activate this feature. A green light will appear above the Touch Pad. Push the Touch Pad _gain for 3-5 seconds to deactivate. EXTRA iCE To increase ice production for special occasions, such as parties, push the Touch Pad @or 3-5 seconds to activate this feature.
AUTOMATmC mCE&WATER DmSPENSER OPERATmNG mNSTRUCTmONS Features Crush may vary Press the Crush HCE dispensing Cube according to model, Touch Pad O to get crushed ice. A red indicator asTar up as possible to catch all ice. paddle@ Press the Cube Tou_ch Pad @ to get cubed ice. A red indicator dispensing paddle _ as far up as possible to catch all ice. will appear will appear Light On Press the Light On Touch Pad @ to turn on dispenser light.
The ice maker freezer and container compartment. and has cooled making ice within After for several are located hours, 24 hours. is installed the ice maker Air in new ICE PRODUCTION: in the top of the the refrigerator plumbing properly can begin of new plumbing connections, ice cubes may be discolored ice made during TURMNG YOUR To begin DOWN when ice production, or ON position. the ice container YOUR production or have an odd flavor.
moving for example), change the filter before reinstalling the refrigerator. The dispenser system will also operate without filtration (with filter cartridge removed). PURESOURCE TM* iCE AND WATER FILTER (SOME MODELS} Order new fluter cartridges through the dealer where you bought the refrigerator, contact the E/ectrolux Solutions Hotl/ne at 1°800-944°9044, or go to our web site at www.ffigidaire.
PURESOURCE2 TM* iCE AND WATER FRONT FILTER Also, if the filter has been in a refrigerator that has not been in use for awhile (during moving for example), change the filter before reinstalling the refrigerator.
UNDERBTANDmNG THESOUNDSYOU MAYHEAR Yournewhigh-efficiency refrigerator maymakeunfamiliar sounds. Theseareallnormalsounds andsoonwillbecome familiar toyou.Theyalsoindicate yourrefrigerator isoperating asdesigned. Hardsurfaces, suchasvinylorwoodfloors,walls, andkitchen cabinets maymakesounds morenoticeable. Listed belowaredescriptions ofsomeofthemostcommon sounds youmayhear,andwhatiscausing them. D.
Keep your refrigerator and freezer clean to prevent odor build-up. Wipe up any spills immediately and clean both sections at least twice a year. Never use metallic scouring pads, brushes, abrasive cleaners or strong alkaline soIutions on any surface. Do not wash any removable parts in a dishwasher.
Your appliance is covered by a one year limited warranty. For one year from your original date of purchase, Electrolux will pay all costs for repairing or replacing any parts of this appliance that prove to be defective in materials or workmanship when such appliance is installed, used and maintained in accordance with the provided instructions. Exclusions This warranty does not cover with original the following: 1. Products serial numbers 2. Product that has been transferred Canada. 3.
1-800-944-9044 (United States) 1-800-688-4608 (Canada) PROBLEM RUNNING ] CAUSE OF REFRIGERA Compressor does not run. Compressor goes off and on frequently, ARE CORRECTION TOR • Freezer or "0". • Refrigerator Refrigerator runs too much or too long. TEMPERATURES Visit our web site at www.frigidaire.com. • control is set to "OF" is in defrost cycle. • Set freezer control. See Temperature Controls section. • This is normal for a fully automatic defrost refrigerator.
PROBLEM [ CAUSE [ CORRECTION TEMPERA TURES ARE TOO WARM Freezer/Fresh Food temperature is too warm. Doors are opened too frequently or too long. Door is slightly open. • Condenser • Clean condenser. See Care & Cleaning Chart in Care and Cleaning section. • is dirty. Warm air enters the refrigerator whenever the door is opened. Open the door less often. See PROBLEM section OPENING/CLOSING OF DOORS/DRAWERS. Freezer temperature is too warm. Fresh Food temperature is satisfactory.
PROBLEM AUTOMATIC CAUSE l CORRECTION ICE MAKER (CONTINUED) Ice maker is not making enough ice. • Ice maker is producing than you expect. less ice • Freezer is not cold enough. Household water line valve is • not completely open. Check to see if water • Side mounted ice maker should produce 4 to 4.5 pounds (approximately 4 quarts) of ice every 24 hours. A rear mounted ice maker should produce 3 to 4 pounds (approximately 3K2quarts) of ice every 24 hours.
PROBLEM WATER [ CAUSE • Household water line valve is not open. Freezer door is not closed. Ice & water filter cartridge is clogged. • • Water has an odd taste and/or odor. Water pressure extremely low. is ODORS IN REFRIGERA Interior is dirty. OPENING/CLOSING • Front filter not fully installed, if equipped • Water has been in the tank for a period of time. Draw and discard 10 - 12 glasses of water to freshen the supply and completely rinse out the tank.
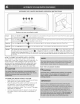
Features Freezer may vary according and Refrigerator Controms to model SpiHFroof_,, CAUTION: Do Not Remove net Behind Dairy Compartment Fixed -Door Bin Ice Container __ Dairy Compartment ........ Door Bin SpiBProof _" -- Sliding Shelf Shemf Door Wine Shemf Tilt Ogt Door Small -- Door Bin Basket --Meat and Timt Out Door Bin Keeper Cover ....