P/N 240400111 (0304)
Welcome & Congratulations Questions? Congratulations on your purchase of a new refrigerator! We here at Electrolux Home Products, Inc. are very proud of our product and we are completly committed to providing you with the best service possible. Your satisfaction is our #1 priority. 1-800-944-9044 (United States) 1-866-213-9397 Please read this Use & Care Manual very carefully. It contains valuable information on how to properly maintain your new refrigerator.
Important Safety Instructions WARNING: Please Read All Instructions Before Using This Refrigerator. FOR YOUR SAFETY • • • • PROPER DISPOSAL OF YOUR REFRIGERATOR OR FREEZER Do not store or use gasoline, or other flammable liquids in the vicinity of this or any other appliance. Read product labels for warnings regarding flammability and other hazards. Do not operate the refrigerator in the presense of explosive fumes. Avoid contact with any moving parts of automatic ice maker.
Installation LEVELING This Use & Care Manual provides specific operating instructions for your model. Use the refrigerator only as instructed in this Use & Care Manual. Before starting the refrigerator, follow these important first steps. All four corners of your refrigerator must rest firmly on a solid floor. Your refrigerator is equipped with adjustable front rollers to help level your unit. To Level Your Refrigerator: 1. Remove toe grille.
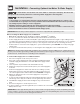
Installation - Connecting Optional Ice Maker To Water Supply To avoid electric shock, which can cause death or severe personal injury, disconnect the refrigerator from electrical power before connecting a water supply line to the refrigerator. To Avoid Property Damage: • • • Copper tubing is recommended for the water supply line. Water supply tubing made of ¼” plastic is not recommended since it greatly increases the potential for water leaks.
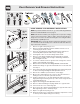
Door Removal and Reversal Instructions DOOR REMOVAL AND REVERSAL INSTRUCTIONS: NOTE: If you have stainless steel doors -- go to the Removing Stainless Steel Doors and Handles Section on page 9. NOTE: The direction in which your refrigerator doors open (door swing) can be reversed, from left to right or right to left, by moving the door hinges from one side to the other. Reversing the door swing should be performed by a qualified person.
Door Removal and Reversal Instructions (continued) NOTE: Some models have “pocket” handles, which are recessed into the sides of the door. On these models, only the hinges will need to be reversed. TO REMOVE FREEZER HANDLE: (Handles may be easier to reverse while doors are off.) 1. Remove two screws attaching handle to bottom of freezer door. 2. Remove short trim piece by sliding trim straight up and off of handle bracket. 3. Remove screw attaching top of handle to door. 4.
Door Removal and Reversal Instructions (continued) TRIM REMOVAL (FULL-LENGTH TRIM MODELS ONLY) In some models, the refrigerator door has a full length trim piece which continues from the bottom of the handle to the bottom of the door. The top of the trim attaches to the handle bracket (Figure 1) or fits around the base of the handle (Figure 2). An adhesive “trim lock” is positioned about halfway down.
Door Removal and Reversal Instructions (continued) TO REMOVE REFRIGERATOR HANDLE: (Handles may be easier to reverse while doors are off.) 1. 2. 3. 4. Remove two screws attaching handle to top of refrigerator door. Remove button plug using edge of putty knife. Remove screw on side of refrigerator door and remove handle. Reverse freezer and refrigerator handles as shown in figure 3. Refrigerator Door Without Trim TO ATTACH REFRIGERATOR HANDLE: 1. Secure side of handle to door and replace plug button. 2.
Features At A Glance Ice Maker Ice Tray Freezer Light Ice Bucket Fixed Door Bin Freezer Shelf Freezer Control Door Rack Refrigerator Control Dairy Door Deli Drawer Cover Tall Bottle Retainer Deli Drawer Half Shelf Snugger Wine Rack Door Bin Full Shelf Special Item Rack Fixed Door Bin Mid Level Light Door Rack Crisper Cover Crisper Drawers Toe Grille Features may vary according to model 10
Temperature Controls COOL DOWN PERIOD To ensure safe food storage, allow the refrigerator to operate with the doors closed for at least 8 to 12 hours before loading it with food. REFRIGERATOR & FREEZER CONTROLS NOTE: When changing control settings, wait 24 hours before making additional adjustments. TEMPERATURE ADJUSTMENT NOTE: When first turning refrigerator on, move refrigerator and freezer controls to ▼ which is the recommended initial setting. After 24 hours, adjust the controls as needed.
Looking Inside To avoid personal injury or property damage, handle tempered glass shelves carefully. Shelves may break suddenly if nicked, scratched, or exposed to sudden temperature change. SHELF ADJUSTMENT Refrigerator shelves are easily adjusted to suit individual needs. Before adjusting the shelves, remove all food. To adjust sliding shelves: 1 Remove shelf by pulling forward to stop position. 2 Lift front edge up and pull out. Replace the shelf on any pair of rails by reversing this procedure.
Looking Inside (continued) DOOR STORAGE TALL BOTTLE RETAINER (SOME MODELS) Door bins, shelves, and racks are provided for convenient storage of jars, bottles, and cans. Frequently used items can be quickly selected. The Tall Bottle Retainer keeps tall containers in the bin from falling forward when opening or closing the refrigerator door. To install, hold the retainer at the top, and slide it over the outside wall of the bin, as shown in the diagram.
Looking Inside - (continued) CRISPERS (SOME MODELS) DELI DRAWER (SOME MODELS) The crispers, located under the bottom refrigerator shelf, are designed for storing fruits, vegetables, and other fresh produce. Wash items in clear water and remove excess water before placing them in the crispers. Items with strong odors or high moisture content should be wrapped before storing. Some models are equipped with a Deli Drawer for storage of luncheon meats, spreads, cheeses, and other deli items.
Ice Service If your refrigerator has an automatic ice maker, it will provide a sufficient supply of ice for normal use. During the initial startup of your refrigerator, however, no ice will be produced during the first 24 hours of operation. Automatic ice makers are also optional accessories that may be installed in most models at any time. Call your local dealer for information. TURNING YOUR ICE MAKER ON After the plumbing connections have been completed, the water supply valve must be opened.
Food Storage & Energy Saving Ideas FOOD STORAGE IDEAS Fresh Food Storage • • The fresh food compartment should be kept between 34° F and 40° F with an optimum temperature of 37° F. Avoid overcrowding the refrigerator shelves. This reduces the circulation of air around the food and results in uneven cooling. Fruits and Vegetables • Storage in the crisper drawers traps moisture to help preserve the fruit and vegetable quality for longer time periods.
Normal Operating Sounds & Sights UNDERSTANDING THE SOUNDS YOU MAY HEAR Your new high-efficiency refrigerator may make unfamiliar sounds. These are all normal sounds and soon will become familiar to you. They also indicate your refrigerator is operating as designed. Hard surfaces, such as vinyl or wood floors, walls, and kitchen cabinets may make sounds more noticeable. Listed below are descriptions of some of the most common sounds you may hear, and what is causing them. A.
Care & Cleaning Keep your refrigerator and freezer clean to prevent odor build-up. Wipe up any spills immediately and clean both sections at least twice a year. Never use metallic scouring pads, brushes, abrasive cleaners or strong alkaline solutions on any surface. Do not wash any removable parts in a dishwasher. Always unplug the electrical power cord from the wall outlet before cleaning. • • • When moving the refrigerator, pull straight out.
Care & Cleaning NEVER CLEAN CONDENSER (SOME MODELS) If your refrigerator is equipped with a Never Clean condenser, there’s no need to clean the condenser under normal operating conditions. If the refrigerator is operated under particularly dusty or greasy conditions, or Defrost Water Pan (some models) if there is significant pet traffic in your home, it may be necessary to periodically clean the condenser for maximum efficiency. (continued) Avoid cuts when replacing light bulbs, wear gloves.
Warranty Information REFRIGERATOR WARRANTY Your refrigerator is protected by this warranty WARRANTY PERIOD THROUGH OUR AUTHORIZED SERVICERS, WE WILL: FULL ONE-YEAR WARRANTY One year from original purchase date Pay all costs for repairing or replacing any parts of this appliance which prove to be defective in materials or workmanship. Excludes original and replacement Ice & Water filter cartridges (if equipped). Original and replacement cartridges are warranted for 30 days (parts only).
ATTENTION To Properly Install Your Refrigerator See “Installation” Section On Pages 4-5 OR To Reverse The Doors See “Door Removal & Reversal” Section On Pages 6-9 Before You Call Common Occurrences Before calling for service, review this list. It may save you time and expense. This list includes common occurrences that are not the result of defective workmanship or materials in this appliance. • • Refrigerator does not run. • • Ensure plug is tightly pushed into electrical outlet.