User Manual FWF 71243W CONTENTS Safety information.......................................2 Safety instructions...................................... 4 Product description.....................................6 EASY START............................................. 7 Programme Chart....................................... 9 Consumption values................................. 12 Options..................................................... 13 Settings.....................................................
SAFETY INFORMATION Before the installation and use of the appliance, carefully read the supplied instructions. The manufacturer is not responsible for any injuries or damages that are the result of incorrect installation or usage. Always keep the instructions in a safe and accessible location for future reference.
SAFETY INFORMATION • • • • • • The appliance must be connected to the water mains using the new supplied hose sets, or other new hose sets supplied by the Authorised Service Centre. Old hose sets must not be reused. If the mains power supply cable is damaged, it must be replaced by the manufacturer, its Authorised Service Centre or similarly qualified persons to avoid an electrical hazard. Before any maintenance operation, deactivate the appliance and disconnect the mains plug from the socket.
SAFETY INSTRUCTIONS Installation • Remove all the packaging and the transit bolts. • Keep the transit bolts in a safe place. If the appliance is to be moved in future they must be reattached to lock the drum to prevent internal damage. • Always take care when moving the appliance as it is heavy. Always use safety gloves and enclosed footwear. • Do not install or use a damaged appliance. • Follow the installation instruction supplied with the appliance.
SAFETY INSTRUCTIONS • Disconnect the appliance from the mains electrical and water supplies. • Cut off the mains electrical cable close to the appliance and dispose of it. • Remove the door catch to prevent children or pets from becoming trapped in the drum. • Dispose of the appliance in accordance with local requirements for the disposal of Waste Electrical and Electronic Equipment (WEEE).
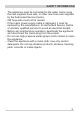
PRODUCT DESCRIPTION Appliance overview 1 2 1 2 3 4 5 6 3 4 5 6 Child safety This device prevents children or pets to be closed in the drum. • Turn the device clockwise, until the groove is horizontal. You cannot close the door. • To close the door, turn the device anticlockwise until the groove is vertical. Fixing plate kit (4055171146) Available from your authorised dealer. If you install the appliance on a plinth, secure the appliance in the fixing plates.
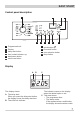
EASY START Control panel description 1 2 10 1 2 3 4 5 6 Programme knob Display delay start button door locked indicator start/pause button extra rinse button 9 8 7 6 3 4 5 7 quick button 8 rinse hold button 9 spin reduction button 10 temp button Display A B The display shows: A. The delay start . When you press the delay start button, the display shows the delay start time. B. The child lock indicator. C The indicator comes on the display when the related option is set. C.
EASY START Refer to the chapter 'Troubleshooting' . • The display shows the message for some seconds if: – You set a option that is not suitable for the programme. 8 – You change the programme while it operates.
PROGRAMME CHART PROGRAMME TEMPERATURE RANGE MAXIMUM LOAD MAXIMUM SPIN SPEED PROGRAMME DESCRIPTION (TYPE OF LOAD AND SOIL LEVEL) cotton 90°C - cold 7 kg 1200 rpm White cotton and coloured cotton. Normal soil and light soil. 60°C - 40°C 7 kg 1200 rpm White cotton and fast-coloured cotton. Normal soil. The energy consumption decreases and the time of the washing programme is extended. This programme at 60 °C is the reference programme for energy label data, in compliance with UAE. S 5010 2:2013.
PROGRAMME CHART PROGRAMME TEMPERATURE RANGE MAXIMUM LOAD MAXIMUM SPIN SPEED PROGRAMME DESCRIPTION (TYPE OF LOAD AND SOIL LEVEL) jeans 60°C - cold 3 kg 1200 rpm Items in denim and jersey. Normal soil. 30'@ 30° 30°C 3 kg 700 rpm A short cycle for synthetic and delicate items with light soil level or for items to freshen up. 1) During this cycle the drum rotates slowly to ensure a gentle wash. It can seem that the drum doesn't rotate or doesn't rotate properly, but this is normal for this programme.
jeans 30'@ 30° DELAY START EXTRA RINSE ■ 1) ■ QUICK RINSE HOLD PROGRAMME SPIN PROGRAMME CHART ■ ■ 1) When you set the quick option, we recommend that you decrease the quantity of the laundry. It is possible to keep the full load but the washing results can be unsatisfactory. Recommended load: cotton: 3,5 kg, synthetics and delicates: 1,5 kg.
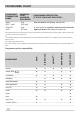
CONSUMPTION VALUES The data in this table are approximate. Different variables can affect the data: the quantity and type of laundry, the water and ambient temperature. At the start of the programme, the display shows the programme duration for the maximum load capacity. During the washing phase the programme duration is automatically calculated and can be greatly reduced if the laundry load is lower than the maximum load capacity (e.g.
OPTIONS temp door locked indicator With this option you can change the default temperature. The indicator shows when the door can be opened: • The indicator is on: the door cannot be opened. • The indicator flashes: the door is opening in some minutes. • The indicator is off: the door can be opened. Indicator = cold water. The indicator of the set temperature comes on. spin With this option you can change the default spin speed. The indicator of the set speed comes on.
SETTINGS Child Lock With this option you can prevent that the children play with the control panel. • To activate/deactivate this option, press temp and spin at the same time until the indicator comes on/goes off. You can activate this option: • After you press start/pause: the options and the programme knob are locked. • Before you press start/pause: the appliance cannot start. Acoustic signals The acoustic signals operate when: • The programme is completed. • The appliance has a malfunction.
DAILY USE WARNING! Using detergent and additives Refer to Safety chapters. Loading the laundry Open the water tap. Connect the mains plug to the mains socket. 1. Pull the door handle to open the appliance door. 2. Put the laundry in the drum, one item at a time. 3. Shake the items before you put them in the appliance. Make sure not to put too much laundry in the drum. Refer to max. loads indicated in "Programme chart". 4. Close the door. 1. Measure out the detergent and the fabric conditioner. 2.
DAILY USE Liquid or powder detergent B A 3. 1. 2. The default position of the flap is A (powder detergent). 2. Adjust the flap in position B. 3. Put back the drawer in the recess. When you use the liquid detergent: • Do not use gelatinous or thick liquid detergents. • Do not put more liquid then 120 ml. • Do not set the delay start. A To use liquid detergent: 1. Remove the drawer. Push the drawer edge in the place with the arrow (PUSH) to remove the drawer easily.
DAILY USE Setting a programme 1. Turn the programme knob to switch the appliance on and set the programme: • The indicator of the button start/ pause flashes. • The display shows the programme duration. 2. If necessary, change the temperature and the spin speed or add available options. When you activate an option, the indicator of the set option comes on. If you set something incorrect, the display shows the message . Starting a programme without the delay start Press the button start/pause.
DAILY USE Opening the door While a programme or the delay start operates, the appliance door is locked. The indicator is on. CAUTION! If the temperature and level of the water in the drum are too high and the drum still rotates, you cannot open the door. To open the door during the first minutes of the cycle or when the delay start operates: 1. Press the button start/pause to pause the appliance. 2. Wait until the indicator goes off. 3. You can open the door. 4.
HINTS AND TIPS The laundry load • Divide the laundry in: white, coloured, synthetics, delicates and wool. • Obey the washing instructions that are on the laundry care labels. • Do not wash white and coloured items together. • Some coloured items can discolour with the first wash. We recommend that you wash them separately for the first times. • Button up pillowcases, close zippers, hooks and poppers. Tie up belts. • Empty the pockets and unfold the items.
CARE AND CLEANING WARNING! Refer to Safety chapters. External cleaning Regularly examine the seal and remove all objects from the inner part. Cleaning the detergent dispenser Clean the appliance with soap and warm water only. Fully dry all the surfaces. CAUTION! Do not use alcohol, solvents or chemical products. Descaling If the water hardness in your area is high or moderate, we recommend that you use a water descaling product for washing machines. 1.
CARE AND CLEANING 4. 3. Cleaning the inlet hose and the valve filter 1. 45° 1 4. 20° Frost precautions 2 3 If the appliance is installed in an area where the temperature can be less than 0 °C, remove the remaining water from the inlet hose and the drain pump. Do this procedure also when you want to do the emergency drain. 2. 1. Disconnect the mains plug from the mains socket. 2. Remove the water inlet hose. 3. Remove the drain hose from the rear support and unhook it from sink or spigot. 4.
CARE AND CLEANING WARNING! Make sure that the temperature is more than 0°C before you use the appliance again. The manufacturer is not responsible for damages caused by low temperatures.
TROUBLESHOOTING • WARNING! Refer to Safety chapters. Introduction The appliance does not start or it stops during operation. First try to find a solution to the problem (refer to the table). If the problem persists, contact the Authorised Service Centre. With some problems, the acoustic signals operate and the display shows an alarm code: - The appliance does not fill with water properly. • - The appliance does not drain the water. • - The appliance door is open or not closed correctly.
TROUBLESHOOTING PROBLEM POSSIBLE SOLUTION The appliance does not drain the water. • • • • Make sure that the sink spigot is not clogged. Make sure that the drain hose has no kinks or bends. Make sure that the connection of the drain hose is correct. Set the drain programme if you set a programme without drain phase. • Set the drain programme if you set an option which ends with water in the drum.
TROUBLESHOOTING PROBLEM You cannot set an option. POSSIBLE SOLUTION • Make sure that you press only the wanted button(s). After the check, activate the appliance. The programme continues from the point of interruption. If the problem occurs again, contact the Authorised Service Centre. If the display shows other alarm codes. Deactivate and activate the appliance. If the problem continues, contact the Service. Service We recommend the use of original spare parts.
TECHNICAL DATA Dimension Width/ Height/ Depth/ Total depth 600 mm/ 850 mm/ 559 mm/ 578 mm Electrical connection Voltage Overall power Fuse Frequency 230-240 V 2200 W 13 A 50 Hz Level of protection against ingress of solid particles IPX4 and moisture ensured by the protective cover, except where the low voltage equipment has no protection against moisture Water supply pressure Water supply Minimum Maximum Cold water 1) Maximum Load Cotton Energy Efficiency Class Spin Speed 7 kg A+++ Maximum 1)
ENVIRONMENTAL CONCERNS dispose appliances marked with the symbol with the household waste. Return the product to your local recycling facility or contact your municipal office. Recycle the materials with the symbol . Put the packaging in applicable containers to recycle it. Help protect the environment and human health and to recycle waste of electrical and electronic appliances.
192947320-A-432016