GAS COOKTOP INSTALLATION INSTRUCTIONS (For 30" & 36" Models) INSTALLATION AND SERVICE MUST BE PERFORMED BY A QUALIFIED INSTALLER. IMPORTANT: SAVE FOR LOCAL ELECTRICAL INSPECTOR'S USE. READ AND SAVE THESE INSTRUCTIONS FOR FUTURE REFERENCE. If the information in this manual is not followed exactly, a fire or explosion may result causing property damage, personal injury or death.
GAS COOKTOP INSTALLATION INSTRUCTIONS (For 30" & 36" Models) Important Notes to the Installer This cooktop has been design certified by CSA International. As with any appliance using gas and generating heat, there are certain safety precautions you should follow. You will find them in the Use and Care Guide, read it carefully. 1. Read all instructions contained in these installation instructions before installing the cooktop. 2.
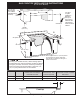
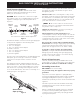
GAS COOKTOP INSTALLATION INSTRUCTIONS (For 30" & 36" Models) 13" (33 cm) Max. Depth For Cabinet Installed Above Cooktop. 34" (86.4 cm) Min. Clearance Between the Top of the Cooking Platform and Unprotected Wood or Metal Cabinet A Clearance 18" Min. (45.7 cm) B 25" (63.5 cm) C C 24" (61 cm) Allow a minimum of 6½" (16.5 cm) below the countertop for drawer. Make sure there will be no interference with gas or electrical connection.
GAS COOKTOP INSTALLATION INSTRUCTIONS (For 30" & 36" Models) Typical Under Counter Installation of an Electric Built-in Oven with a Cooktop Mounted Above All mounting hardware must be used to secure the built-in oven to the cabinets. Refer to the built-in oven installation instructions. Junction box must be located approx. 3" (7,6 cm) to the left of the built-in oven cutout. Side filler panels are necessary to isolate the unit from adjoining cabinets.
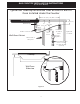
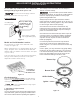
GAS COOKTOP INSTALLATION INSTRUCTIONS (For 30" & 36" Models) Typical Gas Cooktop Installation Over an Electric Built-in Oven Installed Under the Counter 18" (45,7 cm) Max. GAS COOKTOP Manifold Pipe 4" (10,2 cm) 6½" 5" (16,5 cm) (12,7 cm) Min.
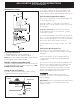
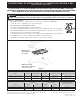
GAS COOKTOP INSTALLATION INSTRUCTIONS (For 30" & 36" Models) Wall Outlet Location To clamp down, insert an angle bracket into the slot on each side of the unit as shown. Run thumb screw up through the bracket, up against the bottom of the counter. Tighten until the unit draws down and is secure. Provide an Adequate Gas Supply This cooktop is designed to operate on natural gas at 4" of manifold pressure only.
GAS COOKTOP INSTALLATION INSTRUCTIONS (For 30" & 36" Models) Install Pressure Regulator Once regulator is in place, open the shutoff valve in the gas supply line. Wait a few minutes for gas to move through the gas line. Install the pressure regulator with the arrow on the regulator pointing up toward the unit in a position where you can reach the access cap. Check for leaks. After connecting the cooktop to the gas supply, check the system for leaks with a manometer.
GAS COOKTOP INSTALLATION INSTRUCTIONS (For 30" & 36" Models) Do not, under any circumstances, cut or remove the third (ground) prong from the power cord. The cooktop is not removeable. Do not attempt to remove or lift the cooktop. Disconnect electrical supply cord from wall receptacle before servicing cooktop. To prevent flare-ups and avoid creation of harmful by-products, do not use the cooktop without all burner caps properly installed to insure proper ignition and gas flame size.
GAS COOKTOP INSTALLATION INSTRUCTIONS (For 30" & 36" Models) 4. Adjust the "LOW" Setting of Surface Burner Valves (linear flow) Test to verify if LOW setting should be adjusted: a. Push in and turn control to LITE until burner ignites. b. Push in and quickly turn knob to lowest position. c. If burner goes out, reset control to OFF. d. Remove the surface burner control knob. e. Insert a thin-bladed screwdriver into the hollow valve stem and engage the slotted screw inside.
INSTRUCCIONES DE INSTALACIÓN DE LA CUBIERTA DE COCCIÓN A GAS (para los modelos de 30” y 36”) LA INSTALACIÓN Y EL SERVICIO DEBEN SER REALIZADOS POR UN INSTALADOR CALIFICADO. IMPORTANTE: CONSERVE ESTAS INSTRUCCIONES PARA USO DEL INSPECTOR LOCAL DE ELECTRICIDAD. LEA Y CONSERVE ESTAS INSTRUCCIONES PARA CUALQUIER REFERENCIA FUTURA.
INSTRUCCIONES DE INSTALACIÓN DE LA CUBIERTA DE COCCIÓN A GAS (para los modelos de 30” y 36”) Notas importantes para el instalador 1. 2. 3. 4. 5. Esta cubierta de cocción ha sido diseñada y certificada por CSA International. Al igual que con todo artefacto que utiliza gas y que genera calor, existen ciertas precauciones de seguridad que debe seguir. Podrá consultarlas en la Guía de uso y cuidado; léalas cuidadosamente.
INSTRUCCIONES DE INSTALACIÓN DE LA CUBIERTA DE COCCIÓN A GAS (para los modelos de 30” y 36”) Profundidad máx. de 13" (33 cm) del gabinete instalado sobre la cubierta de cocción Espacio mín. de 34" (86.4 cm) entre la parte superior de la plataforma de la cubierta de cocción y el gabinete de madera o metal sin protección A Espacio Mín. 18" (45.7 cm) B 25" (63.5 cm) C C 24" (61 cm) Deje un espacio mínimo de 6½” (16.5 cm) debajo de la encimera para el cajón.
INSTRUCCIONES DE INSTALACIÓN DE LA CUBIERTA DE COCCIÓN A GAS (para los modelos de 30” y 36”) Instalación típica debajo de la encimera de un horno eléctrico empotrable con una cubierta de cocción instalada arriba ADVERTENCIA Se deben usar todos los accesorios de instalación para asegurar el horno empotrable en los gabinetes. Consulte las instrucciones de instalación del horno empotrable. Esta cubierta de cocción se puede instalar sobre ciertos modelos de hornos eléctricos empotrables.
INSTRUCCIONES DE INSTALACIÓN DE LA CUBIERTA DE COCCIÓN A GAS (para los modelos de 30” y 36”) Instalación típica de una cubierta de cocción a gas sobre un horno eléctrico empotrable instalado debajo de la encimera Máx. 18" (45.7 cm) CUBIERTA DE COCCIÓN A GAS 4" (10.2 cm) Mín. 5" 6½" (12.7 cm) (16.
INSTRUCCIONES DE INSTALACIÓN DE LA CUBIERTA DE COCCIÓN A GAS (para los modelos de 30” y 36”) Ubicación del tomacorriente de pared Para sujetarla, inserte una escuadra de ángulo en la ranura a cada lado de la unidad como se muestra en la figura. Pase el tornillo mariposa a través de la escuadra hasta la parte inferior de la encimera. Ajuste el tornillo hasta que la unidad baje y esté segura. 12” (30.5 cm) 8” (20.
INSTRUCCIONES DE INSTALACIÓN DE LA CUBIERTA DE COCCIÓN A GAS (para los modelos de 30” y 36”) Instalación del regulador de presión Una vez que el regulador esté colocado, abra la válvula de cierre de la línea de suministro de gas. Espere unos minutos a que el gas fluya a través de la línea de suministro de gas. Instale el regulador de presión con la flecha del regulador apuntando hacia arriba a la unidad en una posición donde una persona pueda alcanzar la tapa de acceso.
INSTRUCCIONES DE INSTALACIÓN DE LA CUBIERTA DE COCCIÓN A GAS (para los modelos de 30” y 36”) Bajo ninguna circunstancia corte ni remueva la tercera clavija (tierra) del cable de alimentación. ADVERTENCIA Para evitar llamaradas y la generación de vapores nocivos, no use la cubierta sin todas las tapas de los quemadores debidamente instaladas. Si están todas instaladas correctamente, asegurará el encendido adecuado y el tamaño correcto de las llamas.
INSTRUCCIONES DE INSTALACIÓN DE LA CUBIERTA DE COCCIÓN A GAS (para los modelos de 30” y 36”) 2. Conecte la energía eléctrica y abra la válvula de gas de cierre principal d. Pruebe cada perilla de control superior por separado hasta que se hayan verificado todas las válvulas. Cada ubicación de quemador cuenta con un electrodo aparte. 3.
INSTRUCTIONS D'INSTALLATION POUR TABLE DE CUISSON AU GAZ Modèles de 30 po (76,2 cm) et 36 po (91,4 cm) L'INSTALLATION ET L'ENTRETIEN DOIVENT ÊTRE RÉALISÉS PAR UN INSTALLATEUR QUALIFIÉ. IMPORTANT : CONSERVEZ CES INSTRUCTIONS EN PRÉVISION D'UN USAGE ÉVENTUEL PAR L'INSPECTEUR EN ÉLECTRICITÉ DE VOTRE LOCALITÉ. VEUILLEZ LIRE ET CONSERVER CES INSTRUCTIONS POUR VOUS Y REPORTER ULTÉRIEUREMENT.
INSTRUCTIONS D'INSTALLATION POUR TABLE DE CUISSON AU GAZ Modèles de 30 po (76,2 cm) et 36 po (91,4 cm) Remarques importantes pour l'installateur 1. 2. 3. 4. 5. La conception de cette table de cuisson a été approuvée par CSA International. Comme dans le cas de tous les appareils fonctionnant au gaz et produisant de la chaleur, il est nécessaire de suivre certaines règles de sécurité. Vous les trouverez dans le Guide d'utilisation et d'entretien. Lisez-les attentivement.
INSTRUCTIONS D'INSTALLATION POUR TABLE DE CUISSON AU GAZ Modèles de 30 po (76,2 cm) et 36 po (91,4 cm) Profondeur maximale de 33 cm (13 po) pour l'armoire installée au‑dessus de la table de cuisson. A Dégagement Dégagement minimum de 86,4 cm (34 po) entre le haut de la plate-forme de cuisson et l'armoire en bois ou en métal non protégée Minimum de 45,7 cm (18 po) B 63,5 cm (25 po) C C 61 cm (24 po) Laissez un espace minimum 16,5 cm (6 1/2 po) sous le comptoir pour le tiroir.
INSTRUCTIONS D'INSTALLATION POUR TABLE DE CUISSON AU GAZ Modèles de 30 po (76,2 cm) et 36 po (91,4 cm) Installation sous le comptoir typique d'un four électrique encastré avec une table de cuisson installée au-dessus Les panneaux complémentaires latéraux sont nécessaires pour isoler l'appareil des armoires adjacentes. La hauteur du panneau doit permettre l'installation de modèles de table de cuisson approuvés.
INSTRUCTIONS D'INSTALLATION POUR TABLE DE CUISSON AU GAZ Modèles de 30 po (76,2 cm) et 36 po (91,4 cm) Installation typique d'une table de cuisson au gaz sur un four encastré électrique installé sous le comptoir 45,7 cm (18 po) max.
INSTRUCTIONS D'INSTALLATION POUR TABLE DE CUISSON AU GAZ Modèles de 30 po (76,2 cm) et 36 po (91,4 cm) Emplacement de la prise murale Pour fixer l'appareil, insérez un angle de support dans la fente de chaque côté de l'unité comme illustré. Faites passer la vis à oreilles à travers le support, contre le bas du comptoir. Serrez jusqu'à ce que l'unité s'abaisse et soit sécurisée.
INSTRUCTIONS D'INSTALLATION POUR TABLE DE CUISSON AU GAZ Modèles de 30 po (76,2 cm) et 36 po (91,4 cm) Installer le détendeur Vérifiez s’il y a des fuites. Après avoir connecté la table de cuisson à l'alimentation en gaz, utilisez un manomètre pour vous assurer que le système ne fuit pas. Si un manomètre n'est pas disponible, ouvrez l'alimentation en gaz et utilisez un détecteur de fuite de liquide (ou du savon et de l'eau) à tous les joints et raccordements pour rechercher des fuites.
INSTRUCTIONS D'INSTALLATION POUR TABLE DE CUISSON AU GAZ Modèles de 30 po (76,2 cm) et 36 po (91,4 cm) Ne coupez jamais, en aucune circonstance, la troisième broche (mise à la terre) du cordon d'alimentation. Pour éviter les flammèches et la création de sous-produits dangereux, n'utilisez pas la surface de cuisson si les chapeaux des brûleurs ne sont pas bien installés, ceci afin d'assurer un allumage adéquat et une bonne dimension de la flamme.
INSTRUCTIONS D'INSTALLATION POUR TABLE DE CUISSON AU GAZ Modèles de 30 po (76,2 cm) et 36 po (91,4 cm) 2. Allumez l'alimentation électrique et ouvrez le robinet d'arrêt principal de gaz. 4. Réglez les soupapes des brûleurs de surface à la position LOW (bas) (débit linéaire). Vérifiez si le réglage faible « LOW » doit être ajusté : a. Appuyez sur le bouton de commande et tournez-le à la position « LITE » (allumage) jusqu'à ce que le brûleur s'allume. b.