
Use and Care Guide
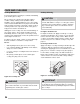
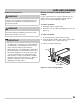
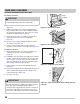
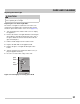
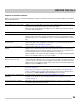
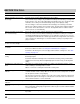
Table Of Contents
- Table of contents
- Questions?
- Product Record and Registration
- Important Safety Instructions
- Cooking Recommendations
- What is Electromagnetic Induction?
- Induction Features
- Preparation
- Sounds
- Using Proper Cookware
- Cookware Selection
- The Magnet Test
- Pan Sensing
- Induction Controls
- Cooking zone Setting Display
- Hot Surface Indicator
- Before Setting Surface Controls
- Cooktop Display Windows
- Induction surface cooking zones
- Figure 17: Induction cooking zone control
- 1. Place correctly sized cookware on the cooking zone.
- 2. Activate the cooking zone.
- 3. Press the + or - key for the cooking zone (Figure 17) until you reach the desired setting (refer to the Recommended Indiction settings on this page.
- 4. When cooking is complete, turn the induction cooking zone OFF by pressing its on-off key or the main power on-off key before removing the cookware.
- Figure 17: Induction cooking zone control
- Frigidaire Induction Recommendations
- Low
- Low
- Keep foods warm
- Medium
- Low
- 2-4
- Start most foods, maintain water at a boil, pan frying, searing
- Medium
- 5-6
- Continue cooking, poach, stew
- Medium
- High
- 7-8
- Continue a rapid boil, fry, or deep fry
- High
- 9
- Start most foods, maintain water at a boil, pan frying, searing
- Continue cooking, poach, stew
- Power
- Boost
- P
- Start heating pans that contain large amounts of food or to bring pots of water to boil
- Setting Surface Controls
- Before Setting Oven Controls
- Oven Control Features
- 1. Bake - Use to select bake feature.
- 2. Quick Bake - Quick Bake uses a fan to circulate the oven's heat uniformly and continuously around the oven.
- 3. Broil - Use to set Broil feature.
- 4. Oven Light - Use to turn on internal light when checking on food. Also will turn on when the oven door is open.
- 5. Self Clean - Use to with arrow keys to set self clean cycle of 2 or 3 hours.
- 6. Set Clock - Use with arrow keys to set the time of day.
- 7. Oven on indicator light - The oven light will glow each time the oven turns on to maintain the set oven temperature.
- 8. Preheat light - The preheat light will glow when the oven is preheating or if the desired temperature is reset higher than the actual oven temperature.
- 9. Door locked - The door locked light will flash when the oven door locks and unlocks, when the oven door lockout is active, or when the self clean cycle feature is active.
- 10. Up and Down arrows - Use with the feature or function keys to set oven temperature, bake time, start time, clean time, and setting or adjusting the clock and minute timer.
- 11. Timer on-off - Use to set or cancel the minute timer. The minute timer does not start or stop any cooking function. Timer on-off is used to set the continuous bake function.
- 12. Bake Time - Enters the length of baking time desired.
- 13. OFF - Use to clear any feature except the time of day and minute timer and to activate oven lockout feature.
- 14. Start Time - Used with Bake, Quick Bake, and Self Clean to set a delayed starting time
- Table 1: Minimum/Maximum Times/Temperatures
- Setting the Clock
- Temperature display (Fahrenheit/Celsius)
- Changing between continuous bake setting or 12- hour energy saving feature
- 1. Press and hold Timer on-off for 6 seconds until a tone sounds. — — hr will appear in the display for continuous cooking. The current time of day will return to the display.
- 2. To cancel the continuous bake setting, press Timer on- off and hold for 6 seconds until a tone sounds. 12 hr will appear in display indicating that the control has returned to the 12-hour energy saving feature.
- Setting a silent control panel
- Setting oven lockout
- 1. Press OFF and hold for 6 seconds. Loc will appear in display, the door locked indicator light will flash, and the motor driven door lock will begin to close. Allow about 15 seconds for the oven door to lock. Once the oven door is locked, the curre...
- 2. To cancel the Oven Lockout feature, press OFF and hold for 6 seconds. The control will unlock the oven door and resume normal operation.
- Operating oven light
- Setting the minute timer
- 1. Press Timer on-off.
- 2. Press to increase time in one-minute increments. Press and hold to increase time in 10-minute increments. The timer can be set for any amount of time from 1 minute to 11 hours and 59 minutes.
- 3. When the set time ends, the timer will beep three times and will continue to beep three times every minute until Timer on-off is pressed.
- Setting Bake
- Figure 21: Pan positions two rack baking
- 1. Press Bake. — — — appears in the display.
- 2. Within 5 seconds, press or. The display will show 350°F (177°C). The temperature can then be adjusted in 5°F (1°C) increments.
- 3. When a key is released, the oven will begin heating to the selected temperature. When the oven reaches the set temperature, the preheat indicator light will turn off and the control will beep three times.
- 4. To cancel the baking function, press OFF.
- 1. Press Bake.
- 2. Press or to increase or decrease to a new temperature. The oven indicator light on the electronic display will turn on and off when using the bake feature and during preheat. This is normal and indicates that the oven is cycling to maintain the se...
- Figure 22: Rack positions
- Figure 21: Pan positions two rack baking
- Setting Quick Bake
- Figure 23: Pan spacing and oven rack positions
- 1. Press Quick Bake. — — — ° appears in the display.
- 2. Within 5 seconds, press or . The display will show 350°F (177°C). The temperature can then be adjusted in 5°F (1°C) increments using the up or down arrow keys.
- 3. When a key is released, the oven will begin heating to the selected temperature.
- 4. When the oven reaches the set temperature, the preheat indicator light will turn off and the control will beep three times.
- 5. To cancel Quick Bake, press OFF.
- 1. Press Quick Bake.
- 2. Press or to increase or decrease to a new temperature. The oven indicator light on the electronic display will turn on and off when using the bake feature and during preheat. This is normal and indicates that the oven is cycling to maintain the se...
- 3. To cancel baking press OFF.
- Figure 23: Pan spacing and oven rack positions
- Setting Bake Time
- 1. Be sure the clock is set to the correct time of day.
- 2. Place the food in the oven.
- 3. Press Bake. — — — ° appears in the display.
- 4. Within 5 seconds, press or . The display will show 350°F (177°C). The temperature can then be adjusted in 5°F (1°C) increments,
- 5. Press Bake Time.0:00 will appear in the display.
- 6. Press or until the desired baking time appears in the display.
- 7. The oven will turn on and begin heating.
- 1. End will appear in the display, and the oven will shut off automatically.
- 2. The control will beep three times every 60 seconds as a reminder until OFF is pressed.
- Setting Start Time (delayed start)
- 1. Be sure that the clock displays the correct time of day.
- 2. Place food in the oven.
- 3. Press Bake. — — — ° appears in the display. Within 5 seconds, press or . The display will show 350°F (177°C). The temperature can then be adjusted in 5°F (1°C) increments.
- 4. Press Bake Time. 0:00 will appear in the display.
- 5. Press or until desired baking time appears.
- 6. Press Start Time. The time of day will appear in the display.
- 7. Press or until the desired start time appears in the display.
- 8. Once the controls are set, the control calculates the time when baking will stop. The oven will turn on at the delayed start time and begin heating.
- 1. Press the function you want to change.
- 2. Press or to adjust the setting.
- Setting Broil
- Figure 24: Rack positions
- 1. Arrange the oven rack while oven is still cool.
- 2. Press Broil. — — will appear in display.
- 3. Press for HI broil or for LO broil. Most foods may be broiled at the HI broil setting. Select the LO broil setting to avoid excess browning or drying of foods that should be cooked to the well-done stage.
- 4. For optimum results, preheat broil for 2-to-5 minutes before adding food.
- 5. Place the insert on the broil pan (if equipped), then place the food on the broil pan insert (if using a broiler pan and insert).
- 6. Place the broiler pan and insert on the oven rack. Broil with the oven door open to broil stop position (Figure 25).
- 7. Broil on one side until food is browned. Turn and broil food on other side.
- 8. When broiling is finished press OFF.
- Figure 25: Broil pan and insert (L) Door in position when broiling (R).
- Table 2: Broil recommendations
- Figure 24: Rack positions
- Rack Position
- Temp
- 5 or 6
- HI(550°F)
- 6:00
- 5:00
- 5or 6
- HI(550°F)
- 7:00
- 5:00
- 5or 6
- HI(550°F)
- 8:00
- 7:00
- 5
- HI(550°F)
- 8:00
- 6:00
- 4
- LO(400°F)
- 20:00
- 10:00
- 5
- LO(400°F)
- 8:00
- 6:00
- 5
- HI(550°F)
- 13:00
- --
- 4
- HI(550°F)
- 5:00
- --
- 6
- HI(550°F)
- 6:00
- 5:00
- 6
- HI(550°F)
- 9:00
- 7:00
- 5
- HI(550°F)
- 10:00
- 8:00
- Setting the Sabbath Feature for the Jewish Sabbath and Holidays (some models)
- 1. Be sure the clock is set with correct time of day and place food in oven.
- 2. Press Bake. — — — appears in the display.
- 3. Within 5 seconds press or. The display will show 350°F (177°C). By holding the up or down arrow key the temperature can be adjusted in 5° increments (1°C).
- 4. If a bake time is desired enter the time at this point. See “Setting Bake Time” on page 25 for detailed instructions. If not, skip this step.
- 5. Press and hold the Bake Time key and Set Clock key simultaneously for about 3 seconds. SAb will appear in the display indicating the oven is properly set for the Sabbath feature (Figure 26).
- Figure 26: Oven set for Sabbath baking
- Figure 27: Display showing Sabbath failure
- Self Clean
- To set a self clean cycle:
- 1. Press Self Clean. --- appears in the display.
- 2. Press until 3:00 appears in the display for a 3 hour self clean process, or push until 2:00 appears in the display for a 2 hour self clean process.
- 3. As soon as the controls are set, the motor driven lock will begin to close automatically and the door locked indicator light will flash. Do not open the oven door while the light is flashing (allow about 15 seconds for the oven door to lock).
- 4. CLn will appear in the display during the self clean cycle, and the door locked light will glow until the self cleaning cycle is complete or cancelled and the oven temperature has cooled.
- To stop or interrupt a self clean cycle (once it has been activated):
- 1. Press OFF.
- 2. Once the oven has cooled down for about 1 hour and the door locked light has turned off, the oven door can be opened.
- 3. Restart the self clean cycle once all conditions have been corrected.
- 1. Press Start Time and to 9 0 0 and release key.
- 2. Press Self Clean. --- appears in the display.
- 3. Press until 3:00 appears in the display for a 3 hour self clean process, or push until 2:00 appears in the display for a 2 hour self clean process.
- 4. The motor driven lock will begin to close automatically and the door locked indicator light will flash. Do not open the oven door while the light is flashing (allow about 15 seconds for the oven door to lock).
- 5. CLn will appear in the display during the self clean cycle, and the door locked light will glow until the self cleaning cycle is complete or cancelled and the oven temperature has cooled.
- Adjusting the oven temperature
- 1. Press Bake.
- 2. Set the temperature to 550°F (287°C) by pressing and holding .
- 3. Within 3 seconds, press and hold Bake until numeric digit(s) appear. Release Bake key. The display now indicates the amount of degrees offset between the original factory temperature setting and the current temperature setting. If the oven control...
- 4. The temperature can now be adjusted up or down 35°F (19°C), in 5°F (1°C) increments. Press and hold to adjust the temperature higher until the desired amount of offset appears in the display. When lowering the oven temperature using , a minus ...
- 5. When you have made the desired adjustment, press OFF to go back to the time of day display.
- Setting the Sabbath Feature for the Jewish Sabbath and Holidays (some models)
- Setting Oven Controls
- Figure 29: Use cleaners with caution
- Cooktop Maintenance
- Cooktop Cleaning
- Remove and replace storage drawer (some models)
- 1. Pull empty drawer out until it stops.
- 2. Tilt up the front of the drawer up and pull it out over the glide stop.
- 1. Insert the back of the drawer into the opening.
- 2. Lift up the drawer and line up the drawer supports with the rails. Make sure to clear the glide stop.
- 3. Push in the drawer until it stops.
- Figure 32: Parts of storage drawer
- Removing and Replacing the Oven Door
- 1. Open oven door completely, horizontal with floor (See Figure 33).
- 2. Pull the door hinge locks on both left and right door hinges down from the oven frame completely towards the oven door (See Figure 34). A tool such as a small flat-blade screwdriver may be required.
- 3. Firmly grasp both sides of oven door along the door sides. Do not use the oven door handle (See Figure 35).
- 4. Close the door to approximately 10 degrees from the door frame (See Figure 35).
- 5. Lift the oven door hinge arms over the roller pins located on each side of the oven frame (See Figure 36).
- 1. Firmly grasp both sides of oven door along the door sides. Do not use the oven door handle (See Figure 35).
- 2. Holding the oven door at the same angle as the removal position, seat the hook of the hinge arm over the roller pins located on each side of the oven door frame (See Figure 35 and Figure 36). The hook of the hinge arms must be fully seated onto th...
- 3. Fully open the oven door, horizontal with floor (See Figure 33).
- 4. Push the door hinge locks up towards and into the oven frame on both left and right oven door hinges to the locked position (See Figure 34).
- 5. Close the oven door.
- Figure 33: Door hinge location
- Figure 34: Door hinge locks
- Figure 35: Holding door for removal
- Figure 36: Replacement and location of hinge arm and roller pin
- Replacing the Oven Light
- 1. Turn electrical power off at the main source or unplug the appliance.
- 2. Remove the interior oven light shield after removing the wire holder by carefully moving the wire to the side of the glass shield. The tension from the wire holds the glass shield in place.
- 3. Pull the shield straight out. Do not twist or turn.
- 4. Replace the bulb with a new appliance bulb.
- 5. Replace the glass oven light shield. Replace wire holder.
- 6. Turn the power back on again at the main source (or plug the appliance back in).
- 7. Be sure to reset the time of day on the clock.
- Figure 37: Oven light protected by glass shield
- Care and Cleaning
- Before You Call
- Warranty
- Oven Control Features

31
SETTING OVEN CONTROLS
To set a self clean cycle:
1. Press Self Clean. --- appears in the display.
2. Press until 3:00 appears in the display for a 3
hour self clean process, or push until 2:00
appears in the display for a 2 hour self clean process.
3. As soon as the controls are set, the motor driven lock
will begin to close automatically and the door locked
indicator light will flash. Do not open the oven door
while the light is flashing (allow about 15 seconds for
the oven door to lock).
4. CLn will appear in the display during the self clean
cycle, and the door locked light will glow until the self
cleaning cycle is complete or cancelled and the oven
temperature has cooled.
When the self clean cycle has completed:
• The time of day will appear in the display window, and
the Clean key and door locked light will continue to
glow.
• Once the oven has cooled down for about 1 hour and
the door locked light has gone out, the oven door may
be opened.
• To avoid possible burns, use care when opening the
oven door after the self cleaning cycle. Stand to the side
of the oven when opening the door to allow hot air or
steam to escape.
To stop or interrupt a self clean cycle (once it has been
activated):
1. Press OFF.
2. Once the oven has cooled down for about 1 hour and
the door locked light has turned off, the oven door can
be opened.
3. Restart the self clean cycle once all conditions have
been corrected.
Setting Delay Start Self Clean
To start a delay self clean with default clean time of 3 hours
and a start time of 9:00 o’clock: Be sure the clock is set with
the correct time of day, the oven is empty, and all oven
racks are removed. Be sure oven door is completely closed.
1. Press Start Time and to 9 0 0 and release key.
2. Press Self Clean. --- appears in the display.
3. Press until 3:00 appears in the display for a 3
hour self clean process, or push until 2:00
appears in the display for a 2 hour self clean process.
4. The motor driven lock will begin to close automatically
and the door locked indicator light will flash. Do not
open the oven door while the light is flashing (allow
about 15 seconds for the oven door to lock).
5. CLn will appear in the display during the self clean
cycle, and the door locked light will glow until the self
cleaning cycle is complete or cancelled and the oven
temperature has cooled.
Adjusting the oven temperature
Your appliance has been factory calibrated and tested to
ensure an accurate baking temperature. For the first few
uses, follow your recipe times and temperature recommen
-
dations carefully. If you think the oven is cooking too hot or
too cool for your recipe times, you can adjust the control so
the oven cooks hotter or cooler than the temperature
displayed.
To adjust oven temperature:
1. Press Bake.
2. Set the temperature to 550°F (287°C) by pressing and
holding
.
3. Within 3 seconds, press and hold Bake until numeric
digit(s) appear. Release Bake key. The display now
indicates the amount of degrees offset between the
original factory temperature setting and the current
temperature setting. If the oven control has the original
factory calibration, the display will read 00.
4. The temperature can now be adjusted up or down 35°F
(19°C), in 5°F (1°C) increments. Press and hold
to adjust the temperature higher until the desired
amount of offset appears in the display. When lowering
the oven temperature using
, a minus sign (-) will
appear before the number to indicate that the oven will
be cooler by the displayed amount of degrees.
5. When you have made the desired adjustment, press
OFF to go back to the time of day display.
Do not use oven thermometers such as those found in
grocery stores to check the temperature settings inside
your oven. These oven thermometers may vary as much
as 20 to 40 degrees from actual temperatures.
NOTE