
Installation Guide


3
GAS WALL OVEN INSTALLATION INSTRUCTIONS
1. Connect Electricity to Gas Wall
Oven
For personal safety, these appliances must be
properly grounded.
This appliance is equipped with a
three-prong grounding plug for your protection
against shock hazard and must be plugged directly
into a properly grounded receptacle. Do not cut or
remove grounding prong from this plug.
120 volt, 60 Hertz, properly grounded dedicated
circuit protected by a 15 amp circuit breaker or time
delay fuse.
Do not use an extension cord with this range.
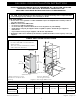
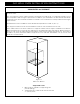
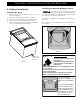
The wall receptacle should be located in the cabinet
beneath the installation cutout. The receptacle
should be easily accessible for service and removal
of power from appliance (see Figure 2).
The wall receptacle and circuit should be checked
by a qualified electrician to make sure the receptacle
is properly grounded.
Where a standard 2-prong wall receptacle is
installed, it is the personal responsibility and
obligation of the consumer to have it replaced by a
properly grounded 3-prong wall receptacle.
Do not, under any circumstances, cut or remove the
third (ground) prong from the power cord.
Figure 2
10" Min
(25.4 cm
Min)
27 ½" Max
(69.9 cm
Max)
If an external electrical source is used, the appliance,
when installed, must be electrically grounded in
accordance with local codes or in their absence of
local codes with the National Electric Code ANSI/
NFPA No. 70-1987 or latest edition.
Check all code rules and regulations for connecting
the wall oven to be certain the installation conforms
with all local, municipal and state codes as well as
local utility regulations.
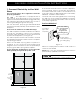
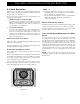
Preferred Method
Do not, under
any circumstances,
cut, remove,
or bypass the
grounding prong.
Grounding
type wall
receptacle
Power supply
cord with 3-prong
grounding plug
Figure 3
Failure to comply with the above could result in a
serious shock hazard.
NOTE: All hook-ups and adjustments shall be
performed by qualified technicians.
Disconnect electrical supply cord
from wall receptacle before servicing wall oven.