
Installation Guide


7
GAS WALL OVEN INSTALLATION INSTRUCTIONS
5. LP/Propane Gas Conversion
A. Pressure Regulator Conversion
NOTE: Do not remove the Pressure Regulator.
These models have an electric broiler element. No
adjustments are required to this element during fuel
type conversion.
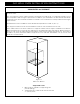
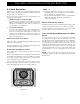
Convert the Pressure Regulator for use with LP Gas
(see Figure 10).
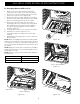
Open storage compartment door.
Locate pressure regulator on lower back wall and
convert as shown in Figure 10.
1. Remove the cap from the pressure regulator.
2. Remove the plunger.
3. Turn the plunger upside down with the
enlarged end TOWARDS regulator.
4. Replace the plunger inside the cap. The
letters LP or 10" W.C. should be visible on the
exposed end of the plunger.
5. Replace the cap on the pressure regulator.
NOTE: The type of gas pressure the regulator is set
for is indicated on the top of the plunger.
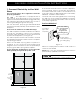
Figure 9a
Figure 9b
Figure 9c
Figure 10
Pressure
Regulator
Spring
DO NOT
REMOVE
Plastic
Conversion
Plug
Gasket
Cap
Place hollow
end towards
regulator for
NATURAL GAS.
Place solid
end towards
regulator for
LP/Propane
NOTE: For conversion of the pressure regulator
from LP to Natural Gas, turn the hollow end of the
plunger towards the regulator (refer to figure 10).
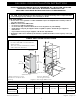
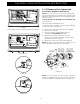
Valve Location
Gas Line
Figure 9
Tuck the gas inlet hose down the knock-out hole