
Installation Guide


8
GAS WALL OVEN INSTALLATION INSTRUCTIONS
B. Changing Burner Orifice to LP
1. Remove the oven door. Refer to Care and
Cleaning section of the User and Care Guide.
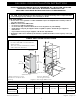
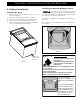
2. Remove one screw from the burner cover then
remove the burner cover (Figure 11a).
3. Remove the three screws (A,B and C) holding
the burner assembly and remove the assembly
from the mounting plate out of the cavity.
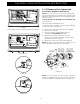
4. Remove the three screws from the burner
mounting plate then rotate the mounting plate
90˚ towards the oven opening and rotate to
the right, resting it against the oven wall as
shown in figure 11c.
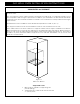
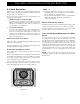
5. Using 9/32" (7 mm) socket, remove the orifice.
6. Install the LP version orifice. Do not
overtighten. Refer to Table A for orifice part
number.
7. Install all the removed parts in reverse order of
dissassembly.
NOTE: While re-installing the burner mounting Plate,
make sure to install it in the right position (below
the cavity), from where it was removed, failure to
do so would cause misalignment of the burner and
the orifice.
NOTE: Allign the screw holes on the burner (A & B in
figure 11b) with holes on the mounting plate before
installing the screws.
NOTE: Save the orifices removed from the appliance
for future use.
Burner Cover
Burner assembly
Oven Cavity
Figure 11a
Oven Cavity
Burner
Mounting
Plate
Figure 11b
Oven Cavity
Orifice
Figure 11d
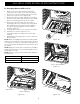
Burner Mounting plate
Burner assembly
Oven Cavity
Figure 11c
A
B
Gas Type Part Number
LP/Propane 082
Natural Gas 150
Table A
C