
Instruction Manual

5
ELECTRIC WALL OVEN INSTALLATION INSTRUCTIONS
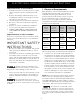
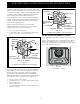
Model and Serial Number Location
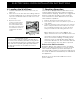
The serial plate is visible when the door is opened.
When ordering parts for, or making inquires about
your oven, always be sure to include the model
and serial numbers and a lot number or letter from
the serial plate on your oven.
NOTE TO ELECTRICIAN: The armored cable leads
supplied with the appliance are UL-recognized for
connection to larger gauge household wiring. The
insulation of the leads is rated at temperatures
much higher than temperature rating of
household wiring. The current carrying capacity
of the conductor is governed by the temperature
rating of the insulation around the wire, rather
than the wire gauge alone.
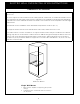
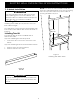
Where local codes permit connecting the
appliancegrounding conductor to the neutral
(white) wire (US Only) (see Figure 3):
Figure 3
3-WIRE GROUNDED JUNCTION BOX
Cable from Power Supply
Black
Wires
Junction
Box
Cable from appliance
Ground Wire
(Bare or Green Wire)
White Wire
(Neutral)
U.L.-Listed Conduit
Connector (or CSA
listed)
Red
Wires
White Wire
(Neutral)
Figure 5
Serial Plate Location
1. Disconnect the power supply.
2. In the junction box: connect appliance and power
supply cable wires as shown in Figure 3.
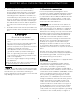
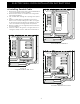
If oven is used in a new branch circuit installation
(1996 NEC), mobile home, recreational vehicle, or
where local codes DO NOT permit grounding
through the neutral (white) wire, the appliance
frame MUST NOT be connected to the neutral wire
of the 4-wire electrical system (see Figure 4):
1. Disconnect the power supply.
2. Separate the green (or bare copper) and white ap-
pliance cable wires.
3. In the junction box:
connect appliance and power supply cable wires as
shown in Figure 4.
Figure 4
4-WIRE GROUNDED JUNCTION BOX
Cable from Power Supply
White Wire
Junction Box
Cable from appliance
White Wire
Black
Wires
Red
Wires
Ground Wire
Ground Wire
(Bare or Green
Wire)
U.L.-Listed
Conduit Connector
(or CSA listed)