Dishwasher use & care Introduction........................................................2 Care and Cleaning......................................... 19 Important Safety information.....................3 Saving Energy................................................. 21 Features...............................................................5 Normal Operating Sounds ........................ 22 Controls and Settings.....................................6 Troubleshooting.................................
INTRODUCTION Welcome to our family Thank you for bringing Frigidaire into your home! We see your purchase as the beginning of a long relationship together. This manual is your resource for the use and care of your product. Please read it before using your appliance. Keep it handy for quick reference. If something doesn’t seem right, the troubleshooting section will help you with common issues. FAQs, helpful tips and videos, cleaning products, and kitchen and home accessories are available at www.
IMPORTANT SAFETY INFORMATION WARNING • Store dishwasher detergent and rinse agents out of the reach of children. • If the dishwasher drains into a food disposer, make sure disposer is completely empty before running dishwasher. • Do not wash plastic items unless marked: “Dishwasher Safe” or equivalent. Check with manufacturer for recommendations, if not marked. Items that are not marked dishwasher safe may melt and create a potential fire hazard.
IMPORTANT SAFETY INFORMATION WARNING To reduce the risk of fire, electrical shock or injury when using your dishwasher, follow the previous basic precautions . WARNING Please read all instructions before using this appliance. Child Safety Destroy or recycle the carton, plastic bags, and any exterior wrapping material immediately after the dishwasher is unpacked. Children should NEVER use these items to play.
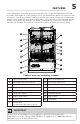
FEATURES 5 Your dishwasher cleans by spraying a mixture of hot water and detergent through the spray arms against soiled surfaces. First, the dishwasher drains for a few seconds to remove soils dropped while loading, then fills with water covering the filter area. Water is then pumped through the spray arms. Soil particles go through and across the filter and down the drain as the water is pumped out. This series of steps are repeated as needed. The number of water fills varies with the cycle being used.
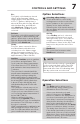
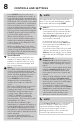
CONTROLS AND SETTINGS 1 2 1 3 2 4 5 3 6 7 4 Wash Cycle and Options Cycle times are approximate and vary by options selected. Hot water is necessary to activate dishwasher detergent and melt fatty food soils. The Smart Sensor checks the soil level on your dishes in the NORMAL, ECO, SANITIZE, and HEAVY cycles. Cycle time and water usage varies based on the amount of soil on the dishes. Making a Selection Press the desired cycle or option button on the control panel to make a selection.
CONTROLS AND SETTINGS Eco For lightly soiled and pre-rinsed dishes and silverware. Water usage ranges from approximately 4.3 to 7.7 gallons. Wash time is about 86 min with Air Dry, 96 min. with Medium Dry, and 229 min with MaxBoost. 3 Eco leaf icons illuminate when the Eco cycle is selected. Option Selections 2 Delicate For lightly soiled China and Crystal. Water usage is approximately 4.9 gallons. Wash time is about 95 min. with Air Dry and Medium Dry, and 136 min. with MaxBoost.
CONTROLS AND SETTINGS Press START and close the door immediately (within 4 seconds). A tone indicating that countdown has started sounds while the Close Door LEDs blink. The selected cycle starts when the countdown is completed. If the cycle was not yet started, to cancel a delay time press the delay button until the time returns to zero. If the cycle has started pressing the CANCEL button will reset both the cycle and the delay options.
CONTROLS AND SETTINGS NOTE The Control Lock LED will blink three times and then stay lit if any buttons are pressed while control lock is active. Opening the Door During Operation NOTE Opening the door during normal operation pauses the wash cycle. When the door is opened a running cycle is paused. Once the Start button is pressed the corresponding LED stops blinking and stays on and the Close LED blinks.
OPERATING INSTRUCTIONS Status Window The STATUS window, available on some models, indicates the following activity: 1-12h Indicates number of delay start hours for selected cycle. MINUTES The cycle duration or the remaining time shown in H:MIN the format (ex: 0:30). L0–L6 Level of Rinse Aid dosage. Floor Indicator Light The display on floor indicates the following activities: White The wash cycle is complete. The floor indicator light will turn off once the door is opened.
OPERATING INSTRUCTIONS 11 User Instruction Code Instruction Code Problem Solution Close This indicates the door has been left open or not properly latched. Ensuring the door is properly latched will clear the display. This does not indicate a problem with your dishwasher and service will not need to be contacted. Error Code Error Code* Problem Solution E10 A low fill has been detected. Look for a pinched water supply line, or water shutoff is not completely opened.
OPERATING INSTRUCTIONS NOTE Racks and features in your dishwasher model may vary in appearance from illustrations in this manual. Loading the Dishes Loading the Cutlery Rack Features and appearance of racks and silverware basket may vary from your model. The cutlery rack is designed for flatware and most cooking or serving utensils.
OPERATING INSTRUCTIONS 13 Loading the Upper Rack Features and appearance of racks and silverware basket may vary from your model. The upper rack is designed for flexibility in loading a wide variety of items including cups, glasses, stemware, small plates, bowls, etc. • Load glasses and plastic items in upper rack only. • Load items with open end facing down for better cleaning and draining. • Long-handled knives and utensils can be placed in upper rack.
OPERATING INSTRUCTIONS Flex Wash System The Flex Wash system gives you the ability to wash the inside areas of baby bottles, narrow glassware and other items. To turn this feature on turn these clips to have them pointing upward (B). To turn off just slide them back down toward the rack (A).See images below. Fold-Down Tines for Upper Rack The fold-down tines in the top and bottom racks makes it easy to load those extra large and hard-to-fit items.
OPERATING INSTRUCTIONS 15 The Stemware holder is used to securely hold your wine glasses in place for the best wash. To properly secure you glass simply press the stem of the glass into the center of the Cupshelf the plastic pieces will secure around the stem to hold the glass in place. 8 place settings standard loading pattern Loading the bottom rack Features and appearance of racks and silverware basket may vary from your model. The lower rack is best for plates, saucers, bowls, and cookware.
OPERATING INSTRUCTIONS Fold-down tines lower rack Be sure nothing protrudes through bottom of basket or rack to block the The fold-down tines in the top and spray arm. bottom racks makes it easy to load those extra large and hard-to-fit items. The tines Do not mix silver and stainless to avoid damaging the silver finish. may be left up for normal use or folded down for more flexible loading.
OPERATING INSTRUCTIONS 17 Dishwasher dispenser and detergents • Use only fresh automatic dishwashing detergent. Other detergents may cause oversudsing. SmartBoostTM Clean • When using automatic dishwashing detergent tabs, place one tab in main wash cup and close. • Add detergent just before starting cycle. • Store detergent in a cool, dry location. Moist or caked detergent may not dissolve properly. This dishwasher includes the SmartBoostTM Clean system.
OPERATING INSTRUCTIONS Filling the rinse aid dispenser Rinse aid greatly improves drying, reduces water spots, filming, and lubricates wash arm bearing for proper rotation. With it water “sheets” off dishes rather than forming water droplets that cling and leave spots. A dispenser, located next to the detergent cup, automatically releases a measured amount of rinse aid during the last rinse. If spotting and poor drying are problems, increase the amount of rinse aid dispensed.
CARE AND CLEANING Cleaning Outside Occasionally wipe with a mild nonabrasive detergent and water. Rinse and dry. 19 To replace the fine filter, press down and rotate clockwise until the arrows are aligned. A mechanical click will indicate that the filter is firmly in place. Care of drain air gap If a drain air gap was installed for your built-in dishwasher, check to make sure it is clean so the dishwasher will drain properly.
CARE AND CLEANING Winterizing A dishwasher left in an unheated place should be protected from freezing. Have a qualified person do the following. To Disconnect Service: 1. Turn off electrical power to the dishwasher at the supply source by removing fuses or tripping circuit breaker. 2. Shut off water supply. 3. Place a pan under the inlet valve. Disconnect water line from the inlet valve and drain into pan. 4. Disconnect drain line from pump and drain water into pan. To Restore Service: 1.
SAVING ENERGY Energy use The yellow energy guide label that came on your unit tells how much energy it would use in one year and how it compares to others that are available. The energy is based on the NORMAL cycle response to tests that apply soils and dishware that simulate the average use. Eight place settings of dishware and some serving pieces are used during the test.
NORMAL OPERATING SOUNDS Normal operating sounds Your dishwasher uses energy efficient motors for the wash and drain portions of the cycle you select. Each cycle has a series of water fills and drains for washing and rinsing dishes. As each cycle begins, you may or may not hear the drain motor. You may also hear the splashing of water as it enters the tub and the spray arms as they rotate and circulate water.
TROUBLESHOOTING 23 Factors affecting performance Water Pressure The hot water line to dishwasher must provide water pressure between 20 and 120 psi. Low water pressure may occur when laundry or showers are in operation. If you experience poor wash performance you may need to wait until water use is reduced before starting dishwasher. Water temperature Hot water is needed for best dish washing and drying results. Water entering dishwasher should be at least 120°F (49°C) to give satisfactory results.
TROUBLESHOOTING NOTE Dishes not Dry By selecting Heat Dry, High Temp Wash or Sanitize options this will The control panel will timeout in 4 improve drying. seconds if the START button is not • Make sure the rinse aid dispenser is pressed after opening the door. filled. The start button must be pressed to • Increase the discharge setting of resume the wash if power is lost and rinse aid. (See Rinse Aid). then restored during a running cycle.
TROUBLESHOOTING Dishware Chipped • Load with care and do not overload. (See Preparing and Loading Dishes). • Place delicate items in top rack. • Place glasses securely against pins and not over pins. • Load items so they are secure and don’t jar loose when moving racks in and out. Move racks in and out slowly. • Make sure tall glasses and stemware will clear top of tub when rack is pushed in. • Fine antique china and crystal should be hand-washed.
TROUBLESHOOTING • Check to see that the dishwasher is level. (See Installation Instructions). • Avoid oversudsing by using the correct amount of detergent designed for automatic dishwashers. Dishwasher Won’t Run • Check to see if circuit breaker is tripped or if a fuse is blown. • Make sure water supply is turned on. • Check to see if cycle is set correctly. (See Operating Instructions). • Is dishwasher set for Delay Start Option? • There will be a “new” smell when first installed.
LIMITED WARRANTY 27 Your appliance is covered by a one year limited warranty. For one year from your original date of purchase, Electrolux will pay all costs for repairing or replacing any parts of this appliance that prove to be defective in materials or workmanship when such appliance is installed, used and maintained in accordance with the provided instructions. Exclusions This warranty does not cover the following: 1.
welcome home. Our home is your home. Visit us if you need help with any of these things: owner support accessories service registration (See your registration card for more information.) Frigidaire.com 1-800-374-4432 Frigidaire.