All about the Use & Care o f your Built-in Microwave Oven TA B L E O F C O N T E N T S SENSOR COOKING ............................................. 20 IMPORTANT SAFETY INSTRUCTIONS ......................2 CONVENIENT FEATURES......................................22 PART NAMES ........................................................8 CLEANING AND CARE ..........................................25 CONTROL PANEL .................................................. 9 SERVICE CALL CHECK ....................
WELCOME & CONGRATULATIONS Questions? Congratulations on your purchase of a new microwave oven! At Electrolux Home Products, we are very proud of our product and are completely committed to providing you with the best service possible. Your satisfaction is our number one priority. 1-800-374-4432 We know you’ll enjoy your new microwave oven and Thank You for choosing our product. We hope you consider us for future purchases.
IMPORTANT SAFETY INSTRUCTIONS Definitions This is the safety alert symbol. It is used to alert you to potential personal injury hazards. Obey all safety messages that follow this symbol to avoid possible injury or death. WARNING CAUTION WARNING indicates a potentially hazardous situation which, if not avoided, could result in death or serious injury. CAUTION indicates a potentially hazardous situation which, if not avoided, may result in minor or moderate injury.
• Do not clean with metal scouring pads. Pieces can burn off the pad and touch electrical parts involving risk of electric shock. • Thermometer— Do not use regular cooking or oven thermometers when cooking by microwave or combination. The metal and mercur y in these thermometers could cause arcing and possible damage to the oven. Do not use a thermometer in food you are microwaving unless the thermometer is designed or recommended for use in the microwave oven.
UNPACKING AND EXAMINING YOUR MICROWAVE OVEN SAVE THE CARTON AS IT MAYMAKE INSTALLATION EASIER. • Remove the feature sticker from the outside of the door, if there is one. • DO NOT REMOVE THE WAVEGUIDE COVER, which is located on the ceiling in the microwave oven cavity. Read enclosures and SAVE the Use and Care Manual.
ABOUT MICROWAVE COOKING • Arrange food carefully. Place thickest areas towards outside of dish. • Watch cooking time. Cook for the shortest amount of time indicated and add more as needed. Food severely overcooked can smoke or ignite. • Cover foods while cooking. Check recipe or cookbook for suggestions: paper towels, wax paper, microwave plastic wrap or a lid. Covers prevent spattering and help foods to cook evenly.
IMPORTANT SAFETY INSTRUCTIONS These items can be used for short time reheating of foods that have little fat or sugar in them: • wood, straw, wicker DO NOT USE • metal pans and bakeware • dishes with metallic trim • non-heat-resistant glass • non-microwave-safe plastics (margarine tubs) • recycled paper products • brown paper bags • food storage bags • metal twist-ties Should you wish to check if a dish is safe for microwaving, place the empty dish in the microwave oven and microwave on HIGH for 30 seconds
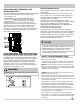
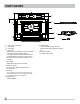
PART NAMES 5 1 4 7 9 4 3 6 1. Auto-Touch control panel 2. Door gasket 3. Door hinges 4. Oven vents Warm air may be released from the top and bottom vents before, during and after cooking. It is normal to see steam escaping from these vents, and condensation may collect in this area. Do not block any vents, since they are important for air circulation. 5. Time display Digital display, 99 minutes, 99 seconds. 6. Safety door latches The oven will not operate unless the door is securely closed. 7.
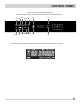
CONTROL PANEL Number next to the control panel illustration indicates pages on which there are feature descriptions and usage information. 17 17 22-24 18 19 14-17 12 19 20-21 20-21 10 10 11 10 Words in the lower portion of the display will light to indicate what function is in progress.
BEFORE OPERATING 1. Before operating your new oven make sure you read and understand this Use and Care Guide completely. 2. Before the Built-in Convention Microwave Oven can be used, follow these procedures: • Plug in the oven. Close the door. The oven display will show 12:00. • If no operation after 3 seconds, the oven will show 12:00. 3. Set clock. See below. TO SET THE CLOCK TO SET THE TIMER • Set the timer for 3 minutes. Touch Display Shows: 1. 2.
MANUAL COOKING USING ONE TOUCH START This is a time saving pad that will automatically start cooking 2 seconds after selected. Numeric key 1 to 9 can be touched for a 1 minute to 9 minutes automatic start cooking feature. • Suppose you want to cook 3 minutes at 100% power. Touch Display Shows: SETTING TIMED COOKING WITH POWER LEVEL This feature lets you program a specific cook time and power. For best results, there are 11 power level settings in addition to HIGH (100%) power.
MANUAL COOKING SETTING TWO-STAGE COOKING For best results, some recipes call for different power levels during a cook cycle. You can program your oven for two power level stages during the cooking cycle. • To set a 2-stage cook cycle. The first stage is a 2 minutes cook time at 30% cook power then a 4 minutes cook time at 70% cook power. Touch 1. 2 Display Shows: 0 0 2. 3. 3 4. “ENTER STAGE 2 POWER" will show on the display. 5. 7 6. “ENTER STAGE 2 COOK TIME" will show on the display. 7.
MANUAL COOKING MICROWAVE POWER LEVELS For best results, some recipes call for different cook powers. The lower the cook power, the slower the cooking. Each number from 1 to 9 stands for a different percentage of full cook power. The following table gives the percentage of cook power each number pad stands for, and the cook power name usually used. COOK POWER 100% of full power LEVEL High The table also tells you when to use each cook power. Follow recipe or food package instructions if available.
AUTO COOKING USING AUTO DEFROST OPERATING TIPS Three defrost sequences are preset in the oven. The auto defrost feature provides you with the best defrosting method for frozen foods. The cooking guide will show you which defrost sequence is recommended for the food you are defrosting. For added convenience, the Auto Defrost includes a built-in beep mechanism that reminds you to check, turn over, separate, or rearrange the food in order to get the best defrost results.
AUTO COOKING AUTO DEFROST TABLE NOTE: Meat of irregular shape and large, fatty cuts of meat should have the narrow or fatty areas shielded with foil at the beginning of the defrost sequence. MEAT SETTINGS FOOD SETTING AT BEEP SPECIAL INSTRUCTIONS BEEF Ground Beef, Bulk MEAT Remove thawed portions with fork. Turn over. Return remainder to oven. Do not defrost less than 1/4 lb. Freeze in ball shape. Ground Beef, Patties MEAT Separate and rearrange. Do not defrost less than 2 oz. patties.
AUTO COOKING AUTO DEFROST TABLE (CONTINUED) POULTRY SETTINGS FOOD CHICKEN Whole (up to 6 lbs.) SETTING POULTRY Cut-up AT BEEP SPECIAL INSTRUCTIONS Turn over breast side down. Cover warm Place chicken breast-side up in a areas with aluminum foil. microwave safe dish. Finish defrosting by immersing in cold water. Remove giblets when chicken is partially defrosted. Separate pieces and rearrange. Place in a microwave safe dish. Turn over. Cover warm areas with aluminum foil.
AUTO COOKING DEFROSTING TIPS When using Auto Defrost, the weight to be entered is the net weight (the weight of the food minus the container). Before starting, make sure to remove any and all metal twist-ties that often come with frozen food bags, and replace them with strings or elastic bands. Open containers, such as cartons, before placing in the oven. Always slit or pierce plastic pouches or packaging. If food is foil wrapped, remove foil and place food in a suitable container.
AUTO COOKING MELT/SOFTEN TABLE SETTING MELT/SOFTEN The oven uses low power to melt and soften items. See the following table. CATEGORY • Suppose you want to melt 8 oz. of Chocolate. Touch Display Shows: BUTTER 1. CHOCOLATE 2. ICE CREAM 3. CREAM CHEESE 8 4. 5. Then time will count down Key Food Melt / Soften x1 Melt Butter Melt / Soften x2 Melt Chocolate Melt / Soften x3 Melt / Soften x4 18 Soften Ice Cream Soften Cream Cheese Amount Key 1 stick 2 sticks 2 oz. 4 oz. 1 2 2 4 8 oz.
AUTO COOKING SETTING BEVERAGE Press key 1,2 or 3 to select the amount of beverage. • Suppose you want to have 3 cups of beverage. Touch Display Shows: 1. SETTING BAKE POTATO The bake potato touch pad lets you bake potato without selecting cooking times and power levels. See table below. Touch Display Shows: 1. 2. 2. 3. 3 Then time will count down 4.
SENSOR COOKING SENSOR OPERATING INSTRUCTIONS Sensor Cook allows you to cook most of your favorite foods without selecting cooking times and power levels. The display will show the selected food type during the initial sensing period. The oven automatically determines required cooking time for each food item. When the internal sensor detects a certain amount of humidity coming from the food, it will tell the oven how much longer to heat. The display will show the remaining heating time.
SENSOR COOKING SENSOR COOK TABLE DIRECTION CATEGORY Bacon Frozen Dinner White Rice Frozen Breakfast Frozen Pizza AMOUNT Place bacon strips on a microwave bacon rack for best results (Use dinner plate lined with paper towels if rack is not available). 1-3 slices Place in an appropriately sized microwave container. Cover with plastic wrap. After cooking, stir and allow to stand for 3 minutes. 10 oz./ 20 oz.
CONVENIENT FEATURES USER REFERENCE SETTING AUDIO LOW/MED/HIGH/OFF This section gives instructions for operating each function. Please read this section carefully. • Suppose you want to turn on the Audio Off. Touch USER PREF The microwave oven has settings that allow you to customize the operation for your convenience Below is the table showing the various settings. Touch the User Pref key multiple times to scroll to the desired setting function.
CONVENIENT FEATURES SETTING WEIGHT LBS/KG SETTING LANGUAGE MODE • Suppose you want to toggle weight between pounds & kilograms. Touch • Suppose you want to enter Language Mode. Touch Display Shows: 1. 1. 2. 2. 3. 3. Display Shows: 4. 4. Display for 2 seconds then clear. 5. NOTE Repeat steps to change pounds. Display for 2 seconds then clear.
CONVENIENT FEATURES SETTING DEMO MODE • Suppose you want to enter Demo Mode. When Demo mode is ON programming functions will work in a rapid countdown mode with no cooking power. Touch 1. 2. 3. 4. 5. 6. Display for 2 seconds then clear.
CLEANING AND CARE Disconnect the power cord before cleaning or leave the door open to deactivate the oven during cleaning. EXTERIOR ODOR REMOVAL The outside surface is precoated steel and plastic. Clean the outside with mild soap and water; rinse and dry with a soft cloth. Do not use any type of household or abrasive cleaner. Occasionally, a cooking odor may remain in the microwave oven.
SERVICE CALL CHECK 3OHDVH FKHFN WKH IROORZLQJ EHIRUH FDOOLQJ IRU VHUYLFH 3ODFH RQH FXS RI ZDWHU LQ D JODVV PHDVXULQJ FXS LQ WKH PLFURZDYH RYHQ DQG FORVH WKH GRRU VHFXUHO\ 2SHUDWH WKH PLFURZDYH RYHQ IRU RQH PLQXWH DW +,*+ A 'RHV WKH PLFURZDYH RYHQ OLJKW FRPH RQ" <(6 BBBB 12 BBBB B 'RHV WKH WXUQWDEOH URWDWH" ,W LV QRUPDO IRU WKH WXUQWDEOH WR WXUQ LQ HLWKHU GLUHFWLRQ <(6 BBBB 12 BBBB C ,V WKH ZDWHU LQ WKH PLFURZDYH RYHQ ZDUP" <(6 BBBB 12 BBBB If “NO” is the answer to any of the above qu
MAJOR APPLIANCE WARRANTY INFORMATION Your appliance is covered by a one year limited warranty. For one year from your original date of purchase, Electrolux will pay all costs for repairing or replacing any parts of this appliance that prove to be defective in materials or workmanship when such appliance is installed, used and maintained in accordance with the provided instructions. Exclusions This warranty does not cover the following: 1.