Refrigerator use & care Introduction........................................................2 Automatic Water Dispenser....................... 21 Important Safety information.....................3 Ice Maker.......................................................... 22 Features (2-Door Model)..............................6 Storage Features........................................... 24 Features (3-Door Model)..............................7 Storing Food and Saving Energy............ 27 Installation....
INTRODUCTION Welcome to our family Thank you for bringing Frigidaire into your home! We see your purchase as the beginning of a long relationship together. This manual is your resource for the use and care of your product. Please read it before using your appliance. Keep it handy for quick reference. If something doesn’t seem right, the troubleshooting section will help you with common issues.
IMPORTANT SAFETY INFORMATION WARNING Please read all instructions before using this appliance. Safety Definitions This is the safety alert symbol. It is used to alert of potential personal injury hazards. Obey all safety messages that follow this symbol to avoid possible injury or death. DANGER DANGER indicates an imminently hazardous situation which, if not avoided, will result in death or serious injury.
IMPORTANT SAFETY INFORMATION Child Safety We strongly encourage responsible appliance recycling/disposal methods. This appliance is not intended for use by Check with your utility company or visit persons (including children) with reduced energystar.gov/products/recycle for more physical, sensory or mental capabilities, or information on recycling your lack of experience and knowledge, unless old appliance.
IMPORTANT SAFETY INFORMATION WARNING These guidelines must be followed to ensure that safety mechanisms in this appliance will operate properly. Electrical information • Plug the appliance into its own dedicated 115 Volt, 60 Hz., 15 Amp, AC only electrical outlet. The power cord of the appliance is equipped with a 3-prong grounding plug for your protection against electrical shock hazards. Plug it directly into a properly grounded 3-prong receptacle.
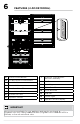
FEATURES (2-DOOR MODEL) G H F M H I L P I L J N E D C B O K B A A Lower Freezer Basket B Ice Bin/Upper Freezer Basket C Ice Maker D Center Mullion E PurePour Water Filter F Internal Water Dispenser G PureAir Air Filter H Spillsafe® Shelves I CrispSeal® Fresh Crispers with Auto Humidity J Deli Drawer K Door Hinges L Gallon Door Bins M 2-Liter Door Bin N Strap Bin O Freezer Light P Appliance Control Display IMPORTANT Accessories are available for your appli
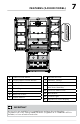
FEATURES (3-DOOR MODEL) I G G J K H L G F P J G G L G M N E C D B E F O B A A Lower Freezer Basket I PureAir Air Filter B Ice Bin/Upper Freezer Basket J Spillsafe® Shelves C Ice Maker K Internal Water Dispenser D Center Mullion L E Door Hinges CrispSeal® Fresh Crispers with Auto Humidity F Strap Bins M PurePour Water Filter G Gallon Door Bins N Deli Drawer H Flipper Mullion O Freezer Light P Appliance Control Display IMPORTANT Accessories are available fo
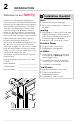
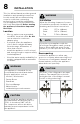
INSTALLATION This Use & Care Manual provides general installation and operating instructions for this model. We recommend using a service or kitchen contracting professional to install the refrigerator. Use the appliance only as instructed in this Use & Care Manual. Before starting the appliance, follow these important first steps. Location • Choose a place near a grounded, non-GFCI, electrical outlet. Do Not use an extension cord or an adapter plug.
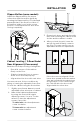
INSTALLATION 9 Flipper Mullion (some models) Adjust the flipper mullion for proper connection with the mullion guide by ensuring the flipper mullion is folded and perpendicular to the fresh food door. If the mullion guide is not in the correct position, it could prevent the door from closing completely. 3. WRONG Cabinet Leveling / 3-Door Model Door Alignment (if necessary) Ensure both doors are bind-free with their seals touching the cabinet on all 4 sides and the cabinet is stable. 4.
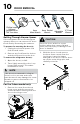
DOOR REMOVAL Tools Necessary: (OR) Phillips head/ flat head Screwdriver or T20 Torx driver AND OR AND 8mm Socket 6mm Wrench Allen Wrench Getting Through Narrow Spaces If the refrigerator will not fit through an entrance area, you can remove the doors. Check first by measuring the entrance. To prepare for removing the door(s): 1. Unplug the electrical power cord from the wall outlet. 2. Remove any food from the shelves and door bins and close the door. To remove the refrigerator door(s): 1.
DOOR REMOVAL 3. If the center hinge is still preventing access through the entryway, open the bottom drawer and remove the center hinge pin using an adjustable wrench and set it aside. Remove the center hinge by unscrewing the 3 center hinge screws. 11 For the 2-door model only: 1. With the door closed, use a plastic putty knife to remove the left hand top hinge cover. Then, unsnap the right hand top hinge cover and set both aside. Remove the three 8 mm screws from the top hinge. 2.
DOOR REMOVAL Removing the Freezer Drawer CAUTION Drawer is heavy. Use caution when lifting. 1. Open the drawer and fully extend it. 2. Remove the freezer bins and basket. 3. Inside the cabinet, press the 2 tabs on both sides to release the sliders. 4. Remove the drawer with brackets and sliders. Reinstalling the Freezer Drawer 1. Place the drawer with brackets and sliders inside the cabinet and click into place. 2. Replace the basket and bins.
DOOR REVERSAL For the 2-door model only: 13 2. Unscrew the center hinge pin using an adjustable wrench and set it aside. 3. Using the putty knife remove the three plastic plugs on the center left hand side. NOTE For the following steps, find replacement parts in the plastic bags located in the Crispers. Center Hinge Pin CAUTION The door is heavy. We recommend two people to remove or replace the door assembly from the cabinet. 1.
5. DOOR REVERSAL Screw in and fully tighten the center hinge pin using an adjustable wrench. 9. Lower the refrigerator door onto the center hinge pin at a 90 degree angle, and then close the door. Apply the silicon grease from the bag in the Crisper inside the bushing on the door for the top hinge. Center Hinge Pin 6. Locate the three new plastic plugs in the bag in the Crisper, and install them on the center right hand side.
DOOR HANDLE INSTALLATION (SOME MODELS) 15 CAUTION Wear gloves and safety goggles. Use extreme CAUTION when installing these handles. Handle Installation Instructions Part quantities vary per model. 1. Position the handles over the handle mounts, ensuring the holes for the Allen set screws are facing toward the opposite door. 2. 3. Repeat Steps 1 and 2 for the opposite door (if applicable).
WATER SUPPLY CONNECTION WARNING To avoid electric shock, which can cause death or severe personal injury, disconnect the refrigerator from electrical power before connecting a water supply line to the refrigerator. To install the water supply line, you will need the following: • Basic Tools: adjustable wrench, flathead screwdriver, and PhillipsTM screwdriver • Access to a household cold water line with water pressure between 30 and 100 psi. • A water supply line made of ¼ in. (6.
WATER SUPPLY CONNECTION To Connect the Water Tube to the Household Water Supply 1. Disconnect the refrigerator from the electrical power source. 2. Place the end of the water supply line into a sink or a bucket. Turn ON the water supply and flush the supply line until water is clear. Turn OFF the water supply at the shutoff valve. 3. 5. 17 Using two ½ in. wrenches (one to hold the household water line nut and the other to hold the water inlet fitting nut), tighten a half turn with a wrench.
CONTROLS AND SETTINGS Appliance Control Display 1 1 Ice Maker Press and hold for 3 seconds to turn the ice maker on/off. 2 Freeze Boost Prior to grocery shopping we recommend you activate Freeze Boost to freeze your food faster. It remains active for up to 12 hours before automatically deactivating or you manually exit. Press Freeze Boost to turn the function off. This resets the freezer to the previous temperature setting. 3 Temp F-C Press to toggle from Fahrenheit to Celsius.
CONTROLS AND SETTINGS IMPORTANT If food is freezing in the fresh food compartment, increase the temperature setting 1 or 2 degrees. Alarms DOOR OPEN If you leave a door open for 5 minutes or more, an alarm sounds and the DOOR OPEN indicator illuminates on the control display. Turn the alarm off by closing the door or pressing any key. The control display returns to normal operations after you close the door.
CONTROLS AND SETTINGS Sabbath Mode The Sabbath Mode is a feature that disables portions of the refrigerator and its controls in accordance with observance of the weekly Sabbath and religious holidays within the Orthodox Jewish community. In the Sabbath Mode, the High Temp alarm is active for health reasons. For example, if you leave the door ajar the High Temp alarm is activated. The refrigerator will function normally once you close the door, without any violation of the Sabbath/Holidays.
AUTOMATIC WATER DISPENSER 21 If the water dispenser function becomes disabled, enable the water dispenser by pressing and holding Water Dispenser on the appliance control display. When the Before using the water dispenser for the water dispenser is turned on, the LEDs first time or after changing the water filter, above Water Dispenser are illuminated. you must prime your water supply system. The Internal water dispenser is mounted inside the cabinet, along the left-hand cabinet wall.
ICE MAKER CAUTION If the water supply to the refrigerator is softened, be sure the softener is properly maintained. Chemicals from a water softener can damage the ice maker. Your appliance has an automatic ice maker that will provide a sufficient supply of ice for normal use. The unit will not produce ice during the first 24 hours of initial operation. Ice Maker Tips • If you turn the ice maker for a long period of time, turn the water supply valve to the closed position.
ICE MAKER Ice Maker Storage Bin Capacity The ice maker should produce about 3.5 lbs of ice per 24 hours, depending on conditions of use. How much ice can be stored in the ice bins? When completely full, the bins will hold about 8 lbs of ice. Remove and empty the ice bin if: An extended power failure (one hour or longer) causes ice cubes in the ice bin to melt and refreeze together after power is restored.
STORAGE FEATURES Glass shelves Change the Position of a Shelf CAUTION When removing the shelf, disable Water Dispenser on the appliance control display to avoid water spillage. 1. Remove all food from the shelf. 2. Lift the front edge up and pull the shelf out. 3. Replace by inserting the mounting bracket hooks into the desired support slots. 4. Lower the shelf and lock it into position. Drawers The refrigerator includes a variety of storage drawers.
STORAGE FEATURES To remove the auto humidity control membrane for cleaning: 1. Reach to the back of humidity control cover. 2. Place fingers between the humidity control and the back wall; pull up on cover. 3. Pull the cover toward the front of the cabinet and remove it. 4. Remove the humidity membrane from the housing by lifting it up and sliding it over. 5. Clean the humidity membrane with hot soapy water. Thoroughly dry it before replacing. 6.
STORAGE FEATURES Freezer Features IMPORTANT Make sure all wheels on the bottom of the drawer are aligned on their respective tracks for proper function. If drawer is not aligned properly, it will cause problems with the door operation. NOTE If the basket is not resting on the stabilizer bar retainer clips, the drawer will not close properly. To remove freezer basket: Freezer Drawer To remove the upper freezer drawer: 1. 2. Open the freezer compartment completely.
STORING FOOD AND SAVING ENERGY Ideas for storing foods • Activating Freeze Boost will help the freezer more efficiently maintain the selected temperature after placing new purchases with pre-existing frozen foods. • Avoid adding too much warm food to the freezer at one time. This overloads the freezer, slows the rate of freezing, and can raise the temperature of frozen foods. • Leave a space between packages, so cold air can circulate freely, allowing food to freeze as quickly as possible.
NORMAL OPERATING SOUNDS Understanding the sounds coming from the refrigerator High-efficiency refrigerators may introduce unfamiliar sounds. These sounds normally indicate the refrigerator is operating correctly. Some surfaces on floors, walls, and kitchen cabinets may make these sounds more noticeable. The following is a list of major components in the refrigerator and the sounds they can cause: A Evaporator Refrigerant through the evaporator may create a boiling or gurgling sound.
FILTER REPLACEMENT PurePour™ Water Filter 29 More about your advanced water filter The refrigerator is equipped with a water filtering system. The water filtering system filters water used to produce ice. The water filter is located at the top left side of the fresh food compartment. Ordering your replacement water filter If you have not used your refrigerator for a period of time (during moving for example), change the filter before reinstalling the refrigerator.
FILTER REPLACEMENT It is not necessary to turn the water supply off to change the filter. Be ready to wipe up any small amounts of water released during the filter replacement. 1. Turn off Ice Maker on the appliance control display. 2. Remove the old filter by rotating it counterclockwise (to the left) 90 degrees to release it. 3. Slide the old filter cartridge straight out of the housing and discard it. 4. Unpackage the new filter cartridge.
FILTER REPLACEMENT PureAir PK-2 Produce Keeper Plus™ Keep fruits and vegetables fresher longer with PureAir PK-2 Produce Keeper Plus. Our produce keeper absorbs ethylene gas, the natural gas that causes produce to ripen quicker. Reduce food waste, save money and enjoy fresh-tasting produce with a longer storage life. To order replacement filters, please visit our online store at Frigidaire.com, by calling tollfree at 1-800-372-4432, or by visiting the dealer where you purchased your unit.
CARE AND CLEANING Care and Cleaning Tips Keeping the refrigerator clean maintains its appearance and prevents odor build-up. Wipe up any spills immediately and clean the freezer and fresh food compartments at least twice a year. NOTE Do not use abrasive cleaners such as window sprays, scouring cleansers, flammable fluids, cleaning waxes, concentrated detergents, bleaches, or cleansers containing petroleum products on plastic parts, interior doors, gaskets, or cabinet liners.
CARE AND CLEANING 33 Vacation and moving tips Occasion Tips Short • Leave the refrigerator operating during vacations of 3 weeks or less. Vacations • Use all perishable items from refrigerator compartment. • Turn the automatic ice maker off and empty the ice bucket, even if only away a few days. Long • Remove all food and ice if leaving for 1 month or more. Vacations • Turn the cooling system off (see CONTROLS AND SETTINGS for the location of the On/Off button) and disconnect the power cord.
TROUBLESHOOTING Let us help you troubleshoot your concern! This section will help you with common issues. If you need us, visit our website, chat with an agent, or call us. We may be able to help you avoid a service visit. If you do need service, we can get that started for you! 1-800-265-8352 (Canada) Frigidaire.ca 1-800-374-4432 (United States) Frigidaire.com Concern Potential Cause Automatic Ice Maker Ice maker is not making any ice. Ice maker is not making enough ice.
TROUBLESHOOTING Concern Potential Cause Opening/Closing Of Doors/Drawers Door(s) will not close. Drawers are difficult to move. 35 Common Solution • Door was closed too hard, causing other door to open slightly. • Close both doors gently. • Refrigerator is not level. It rocks on the floor when moved slightly. • Ensure floor is level and solid, and can adequately support the refrigerator. Contact a carpenter to correct a sagging or sloping floor. • Refrigerator is touching a wall or cabinet.
Concern TROUBLESHOOTING Potential Cause Common Solution Water/Moisture/Frost Inside Refrigerator Moisture collects on inside of refrigerator walls. • Weather is hot and humid. • The rate of frost buildup and internal sweating increases. • Flipper mullion • Adjust flipper mullion. (See Flipper Mullion in INSTALLATION.) Water collects on bottom side of drawer cover. • Vegetables contain and give off moisture. • It is not unusual to have moisture on the bottom side of the cover.
LIMITED WARRANTY 37 Your appliance is covered by a one year limited warranty. For one year from your date of delivery, Electrolux will pay all costs for repairing or replacing any parts of this appliance that prove to be defective in materials or workmanship when such appliance is installed, used and maintained in accordance with the provided instructions. Exclusions This warranty does not cover the following: 1.
welcome home Our home is your home. Visit us if you need help with any of these things: owner support accessories service registration (See your registration card for more information.) Frigidaire.com 1-800-374-4432 Frigidaire.