Refrigerator use & care Introduction........................................................2 Storage Features........................................... 23 Important Safety Information.....................3 Storing Food and Saving Energy............ 29 Features...............................................................5 Normal Operating Sounds.........................30 Installation..........................................................6 Filter Replacement....................................
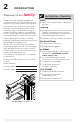
INTRODUCTION Welcome to our family Thank you for bringing Frigidaire into your home! We see your purchase as the beginning of a long relationship together. This manual is your resource for the use and care of your product. Please read it before using your appliance. Keep it handy for quick reference. If something doesn’t seem right, the troubleshooting section will help you with common issues.
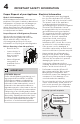
IMPORTANT SAFETY INFORMATION WARNING Please read all instructions before using this refrigerator. Safety Definitions This is the safety alert symbol. It is used to alert of potential personal injury hazards. Obey all safety messages that follow this symbol to avoid possible injury or death. CAUTION CAUTION Risk of fire or explosion. Dispose of refrigerator properly in accordance with the applicable federal or local regulations. Flammable refrigerant used.
IMPORTANT SAFETY INFORMATION Proper Disposal of your Appliance Electrical information Risk of child entrapment • The refrigerator must be plugged into its own dedicated 115 Volt, 60 Hz., 15 Amp, AC only electrical outlet. The power cord of the appliance is equipped with a three-prong grounding plug for protection against electrical shock hazards. It must be plugged directly into a properly grounded three prong receptacle. The receptacle must be installed in accordance with local codes and ordinances.
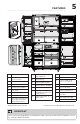
FEATURES L E A P M F V Q C 5 W N X D D G H Y G O H R B I I S D D T D J U D K A Ice and Water Dispenser** B Custom-Flex Zone Controls K Anti-tip Leg C Flipper Mullion L Flipper Mullion Guide D Door Bin M E Fresh Food Ice Maker N F Flip Shelf G Auto CrispSeal™ Drawers H Adjustable Hinges I Reversible Custom-Flex Zone Slide Shelf with Wine Rack Feature** *Optional Accessory Shown J K O P Custom-Flex™ Zone Drawer** Q Slide-Under Shelf R Freezer Ice Mak
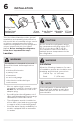
INSTALLATION Tools Necessary: (OR) AND Phillips Head or Quadrex Head Screwdriver OR AND 10 mm Wrench This Use & Care Manual provides general installation and operating instructions for this model. We recommend using a service or kitchen contracting professional to install the refrigerator. Use the refrigerator only as instructed in this Use & Care Manual. Before starting the refrigerator, follow these important first steps.
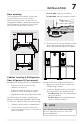
INSTALLATION 7 To raise unit: turn leg clockwise. The refrigerator should be positioned to allow easy access to a counter when removing food. For best use of refrigerator drawers and freezer baskets, the refrigerator should be in a position where both can be fully opened. To lower unit: turn leg counterclockwise. 1 in Door opening 12.25 in 8.75 in 3. Ensure both doors are bind-free with their seals touching the cabinet on all 4 sides and the cabinet is stable. 25.4 mm 1 in 56.75 in Door 9.
INSTALLATION Bottom Doors Alignment In a few cases the doors might not align vertically. To correct this condition a snap ring shim is supplied with the door alignment kit (in the literature pack). To assemble it, lift the lower door slightly to access the door hinge pin and insert the snap ring as illustrated. Flipper Mullion Adjust the flipper mullion for proper connection with the mullion guide by ensuring the flipper mullion is folded and perpendicular to the fresh food door.
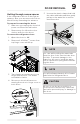
DOOR REMOVAL Getting through narrow spaces If the refrigerator will not fit through an entrance area, you can remove the doors. Check first by measuring the entrance. 5. 9 Unscrew the plastic clamps that hold the cables and tubes and then gently pull up on the water line to remove them from door. To prepare for removing the doors: 1. Make sure you unplug the electrical power cord from the wall outlet. 2. Remove any food from the door shelves and close the doors. To remove the refrigerator doors: 1.
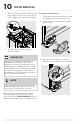
1. DOOR REMOVAL Remove three 8 mm bolts from both top hinges. Lift the doors up off the lower hinges and carefully set aside. To remove bottom doors 1. Fully open the bottom doors in order to remove the bottom hinge cover. 2. Remove the screw and the bottom hinge cover. 3. Disconnect the switch connector and detach the wires from the guide. x2 2. To reinstall the doors, reverse the procedure. IMPORTANT Make sure the water line tubing goes through the hole at the top of the dispenser pocket.
DOOR REMOVAL 4. Make sure you removed the top doors. 5. 11 7. Repeat this procedure for both bottom doors. 8. To reinstall the doors, reverse the procedure. With the bottom doors closed, remove the center hinge unscrewing the 3 screws fixing them to the cabinet. NOTE To gain access to center hinge, unscrew the 3 hinge screws and remove the hinge. Center Hinge Removal 6. Carefully remove the door by opening it and pushing it upward.
WATER SUPPLY CONNECTION WARNING To avoid electric shock, which can cause death or severe personal injury, disconnect the refrigerator from electrical power before connecting a water supply line to the refrigerator. CAUTION To Avoid Property Damage: • We recommend using Copper or Stainless Steel braided tubing for the water supply line. We do not reommend using water supply tubing made of ¼" plastic.
WATER SUPPLY CONNECTION Connection to Household Water Supply with 1/4" compression fitting Water inlet fitting Plastic tubing to water valve 4. If you use (recommended) stainless steel braided tubing - the nut and ferrule are already assembled on the tubing. Slide the compression nut onto the water inlet fitting and finger tighten. 5. 6 ft. (1.8 Meters) Stainless Steel water line from household water supply line Plastic Cap Place 1/2" wrench here. Turn clockwise.
CONTROLS AND SETTINGS Frigidaire Gallery Display Sleep Mode Display Sleep Mode As a default, the display will go to sleep after a short time. If any icon is pressed, the display will be awakened. After a short time, it will go back to sleep. When in sleep mode, wake up the display to confirm ice maker is On/Off. Sleep mode can be turned off to have the display on full time (awake mode). When sleep mode is Off, the display will always be illuminated.
CONTROLS AND SETTINGS 15 Frigidaire Gallery Display (continued) Appliance Control Display Settings 1 13 5 14 6 15 2 7 8 9 16 3 10 4 11 1 Freeze Boost (on/off) Prior to grocery shopping, activate Freeze Boost to lower the temperature and freeze food faster. Freeze Boost remains active for up to 12 hours before automatically deactivating or manually exiting by pressing Freeze Boost to turn the function off. This will reset the freezer to the previous temperature setting.
CONTROLS AND SETTINGS Appliance Display Settings (Continued) 6 Adjusting Temp illuminates when you press either + or — to change temperature setting on the appliance display and will remain illuminated until the the refrigerator and freezer reach the desired temperatures inside. Freezer temp Control temperatures range from -6°F / -21°C to 6°F / -15°C. Refrigerator temp Control temperatures range from 34°F / 1°C to 44°F / 7°C. This unit is designed to operate at 37°F Refrigerator/0°F Freezer.
CONTROLS AND SETTINGS Setting Temperatures NOTE The recommended settings for a product installed in a kitchen is 37˚F for the fresh food compartment and 0˚F for the freezer. IMPORTANT If food is freezing in the fresh food compartment, increase the temperature setting by 1 or 2 degrees. Wait 24 hours for temperature to stabilize. IMPORTANT Food placed within 1 inch in front of the air ports may cause food to freeze. Ensure air ports are not blocked.
CONTROLS AND SETTINGS NOTE You must manually turn off the optional freezer ice maker to comply with sabbath mode. Sabbath Mode The Sabbath Mode is a feature that disables portions of the refrigerator and its controls in accordance with observance of the weekly Sabbath and religious holidays within the Orthodox Jewish community. Turn Sabbath Mode ON and OFF by simultaneously pressing and holding both — (freezer side) and + (refrigerator side) for 5 seconds.
ICE MAKER Using the Ice Maker after Installation Before making ice for the first time, be sure to prime the water supply system. Air in new plumbing lines can result in 2 or 3 empty ice maker cycles. Furthermore, if you do not flush the system, the first ice cubes may be discolored or have an odd flavor. Priming the Water Supply System CAUTION We recommend a water supply pressure between 30 psi and 100 psi. The system may malfunction with excessive pressure. 1.
ICE MAKER NOTE The ice maker also has a built-in plastic signal arm that automatically stops ice production when the ice bin is full. Do not use this signal arm to manually stop the ice maker. Ice maker/dispenser tips If refrigerator is not connected to a water supply or the water supply is turned off, turn off the ice maker as described in the previous section. The following sounds are normal when the ice maker is operating: IMPORTANT Turning off the ice maker simply disables ice making.
ICE MAKER Remove and empty the ice bin if: • • An extended power failure (1 hour or longer) causes ice cubes in the ice bin to melt and refreeze together after power is restored, jamming the dispenser mechanism. You use the ice dispenser. Ice cubes will freeze together in the bin, jamming the dispenser mechanism. (2) Pull Bin Straight Out 21 IMPORTANT When removing or replacing the ice bin, avoid rotating the auger in the ice bin.
ICE MAKER Freezer Ice Maker (optional accessory) Turning the Ice Maker On and Off Press the power button to turn the ice maker on (button should illuminate). Ordering Optional Freezer Ice Maker Order the optional freezer ice maker at Frigidaire.com, by calling 1-800-374- 4432 or through the dealer from which you purchased the refrigerator. Ice Maker Operation and Care After you have properly installed the refrigerator, the ice maker can produce ice within 24 hours.
STORAGE FEATURES CAUTION To avoid personal injury or property damage, handle tempered glass shelves carefully. Shelves may break suddenly if nicked, scratched, or exposed to sudden temperature change. Allow the glass shelves to stabilize to room temperature before cleaning. Do not wash in the dishwasher. You can easliy adjust shelf positions in the fresh food compartments as needed. The shelves have mounting brackets that attach to slotted supports at the rear of each compartment.
STORAGE FEATURES SnackZone - Recessed Snack Drawers These drawers are ideal for storing deli meats and cheeses. To open: slide back the cover to allow access to the drawers. Removing Auto Humidity Control Membrane NOTE We do not recommend replacing the auto-humidity membrane unless it becomes damaged or ruined. If the membrane becomes soiled, you can wash it with soap and water. Ensure the membrane is dry before replacing it in the unit. To remove the Auto CrispSeal drawer for cleaning: 1.
STORAGE FEATURES 25 Custom-Flex Zone You can adjust the Custom-Flex Temp Zone from -6° F to 45° F, giving you versatility and control of your appliance. 1 CAUTION Do not store glass bottles in the Custom-Flex Zone when the temperature setting is in Freezer, Meat/ Seafood, or Cold Drink modes. The glass may break and shatter, causing physical harm and injury.
STORAGE FEATURES Custom-Flex Zone To remove Custom Flex-Zone shelves and drawers: 1. Open doors completely to gain access to shelves/drawers. 2. Pull the shelf/drawer to the stopper. Lift the shelf/drawer up and pull it to remove it from the cabinet. 3. Reverse the steps to reinstall the shelf/drawer. Possible Shelf Configuration Example To remove the Wine Rack Mat: 1. Unhook the rack from the shelf. 2. Pivot as shown in the image and remove the silicone mat.
STORAGE FEATURES 27 Doors Storage bins The doors use a system of modular storage bins. You can remove all of these bins for easy cleaning. Adjust the bins as needed. Use the door bins to store jars, bottles, cans, and large drink containers. You can also quickly select frequently used items. Adjustable door bins Move the adjustable door bins to suit individual needs. To adjust the collapsible door bin: 1. Make sure the bin is securely seated on rail in the door. 2.
STORAGE FEATURES To remove freezer ice container: 1. Open the doors completely to gain access to the drawers. 2. Pull the freezer drawer to its most forward position. 3. Lift up the front side of the ice container and pull it out of the drawer. 4. Allow the ice container to dry completely before replacing it in the freezer. Reverse the steps to reinstall the ice container.
STORING FOOD AND SAVING ENERGY Ideas for storing foods Fresh food storage • Keep the fresh food compartment between 34°F and 44°F with an optimum temperature of 37°F. • Avoid overcrowding the refrigerator shelves, which reduces air circulation and causes uneven cooling. • • Store fruits and vegetables in crispers, where trapped moisture helps preserve food quality for longer time periods. • Do not wash items until you are ready to use them. Remove excess water before placing them inside the unit.
NORMAL OPERATING SOUNDS Understanding the Sounds Coming from the Refrigerator High-efficiency refrigerators may introduce unfamiliar sounds. These sounds normally indicate you are correctly operating the refrigerator. Some surfaces on floors, walls, and kitchen cabinets may make these sounds more noticeable. The following is a list of major components in the refrigerator and the sounds they can cause: A Evaporators Refrigerant through the evaporators may create a boiling or gurgling sound.
FILTER REPLACEMENT PureAir Ultra II Air Filter 31 Ordering Replacement Air Filters The air filter is located in the top center of Order replacement filters online at Frigidaire.com, by calling the fresh food compartment. 1-800-374-4432 or through the dealer Replacing the Air Filter from which the refrigerator was purchased. we recommend replacing To ensure optimal filtering of refrigerator filters at least once every 6 months.
FILTER REPLACEMENT Ordering Replacement Water Filters Order replacement filters online at Frigidaire.com, by calling 1-800-374- 4432 or through the dealer from which the refrigerator was purchased. We recommend replacing filters at least once every 6 months.
CARE AND CLEANING 33 Care and Cleaning Tips Keeping the refrigerator clean maintains its appearance and prevents odor build-up. Wipe up any spills immediately and clean the freezer and fresh food compartments at least twice a year. NOTE Do not use abrasive cleaners such as window sprays, scouring cleansers, flammable fluids, cleaning waxes, concentrated detergents, bleaches, or cleansers containing petroleum products on plastic parts, interior doors, gaskets, or cabinet liners.
CARE AND CLEANING Part Care & Cleaning Tips What To Use Tips and Precautions Interior & Door Liners • Soap and water • Baking soda and water Use two tablespoons of baking soda in one quart of warm water. Be sure to wring excess water out of sponge or cloth before cleaning around controls, light bulb or any electrical part. Door Gaskets • Soap and water Wipe gaskets with a clean soft cloth. Drawers & Bins • Soap and water Use a soft cloth to clean drawer runners and tracks.
TROUBLESHOOTING 35 Let us help you troubleshoot your concern! This section will help you with common issues. If you need us, visit our website, chat with an agent, or call us. We may be able to help you avoid a service visit. If you do need service, we can get that started for you! 1-800-374-4432 (United States) Frigidaire.com Concern Potential Cause Automatic Ice Maker Ice maker is not making any ice. Ice maker is not making enough ice. 1-800-265-8352 (Canada) Frigidaire.
TROUBLESHOOTING Concern Potential Cause Common Solution Automatic Ice Maker (continued) Ice cubes are freezing together. • Ice cubes are not being used frequently enough or interruption of power for prolonged time. • Remove ice container and discard ice. The ice maker will produce fresh supply. Ice should be used at least twice weekly to keep the cubes separated. • Ice cubes are hollow (shells of ice with water inside).
TROUBLESHOOTING 37 Concern Potential Cause Common Solution Dispenser (Ice & Water) (continued) Water not cold enough. • As warmer tap water goes through the filter and enters the water supply system, the chilled water is pushed through to the dispenser. Once the chilled water is used up, it will take several hours to bring the freshly replaced water to a cooler temperature. • Water has an odd taste and/or odor. Add ice to cup or container before dispensing water.
TROUBLESHOOTING Concern Potential Cause Running of Refrigerator Compressor does not run. Refrigerator seems to run too much or too long. Common Solution • Refrigerator is in defrost cycle. • This is normal for a fully automatic defrost refrigerator. The defrost cycle occurs periodically, lasting about 30 minutes. • Plug at electrical outlet is disconnected. • Ensure plug is tightly pushed into outlet. • House fuse blown or tripped circuit breaker.
TROUBLESHOOTING 39 Concern Potential Cause Common Solution Water/Moisture/Frost Outside Refrigerator Moisture collects on outside of refrigerator or between doors. • Weather is humid. • This is normal in humid weather. When humidity is lower, the moisture should disappear. Food/Drinks in Fresh Food Compartment/Custom-Flex Drawer Food is freezing. • Temperature setting is too low. • Move the setting to a higher degree. • Temperature sensor is covered by food (right side of fresh food area).
LIMITED WARRANTY Your appliance is covered by a one year limited warranty. For one year from your original date of purchase, Electrolux will pay all costs for repairing or replacing any parts of this appliance that prove to be defective in materials or workmanship when such appliance is installed, used and maintained in accordance with the provided instructions. Exclusions This warranty does not cover the following: 1.
welcome home Our home is your home. Visit us if you need help with any of these things: owner support accessories service registration (See your registration card for more information.) Frigidaire.com 1-800-374-4432 Frigidaire.