All about the Use & Care of your Refrigerator TA B L E O F C O N T E N T S Storage Features..................................................17 Features at a Glance...............................................4 Storing Food and Saving Energy............................20 Installation............................................................5 Normal Operating Sounds and Sights.....................21 Door Removal Instructions......................................9 Changing the Filter.............
IMPORTANT SAFETY INSTRUCTIONS Installation Checklist WARNING Please read all instructions before using this refrigerator. For your Safety • DO NOT store or use gasoline, or other flammable liquids in the vicinity of this or any other appliance. Read product labels for warnings regarding flammability and other hazards. • DO NOT operate the refrigerator in the presence of explosive fumes. • Avoid contact with any moving parts of automatic ice maker. • Remove all staples from the carton.
IMPORTANT SAFETY INSTRUCTIONS Child Safety prong receptacle. The receptacle must be installed in accordance with local codes and ordinances. Consult a qualified electrician. Avoid connecting refrigerator to a Ground Fault Interrupter (GFI) circuit. Do not use an extension cord or adapter plug. Destroy or recycle the carton, plastic bags, and any exterior wrapping material immediately after the refrigerator is unpacked. Children should NEVER use these items to play.
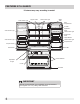
FEATURES AT A GLANCE *Features may vary according to model *LED Cluster Light Flipper Guide Water Filter *LED Cluster Light Dairy Compartment Air Filter SpillSafe™ Shelf *LED Cluster Light *LED Cluster Light Slide Under Shelf Flipper Mullion *LED Cluster Light *LED Cluster Light Crisper Drawer Crisper Drawer Door Bin Deli Drawer Adjustable Hinges *Ice Maker Freezer Baskets Ice Bin Toe Grille IMPORTANT Features not included with your refrigerator can be purchased at www.frigidaire.
INSTALLATION Required Tools You will need the following tools: Components Provided: Top Hinge Cover Front Screw Tools Necessary: Top Hinge Cover Rear Screw (OR) Top Hinge Screw Lower Hinge Screw Phillips™ Head or #2 Square Drive Head This Use & Care Guide provides general installation and operating instructions for your model. We recommend using a service or kitchen contracting professional to install your refrigerator. Use the refrigerator only as instructed in this Use & Care Guide.
INSTALLATION Leveling Freezer Drawer (if necessary) 1 Check gasket seal around top, bottom, and sides of freezer drawer. 2 If gasket is not sealed, open drawer and slightly loosen four drawer screws (two on each side) to allow drawer to rotate. 3 Close drawer and recheck the seal on the gasket (A). Open the drawer grabbing by the sides in the center (B). Be careful not to rotate the drawer. Remove Hex Head Drawer Screw Remove Hex Head Drawer Screw Do Not Remove Other Screws 1 Slightly open freezer drawer.
INSTALLATION To adjust the door stop: 5 Retighten screw. Door stop is adjustable between 85 to 145 degrees. NOTE Rotate Door Stop View shown is looking up at the bottom of the refrigerator door. Lower Hinge Re-tighten Screw Door Stop Retighten Screw Min Open Screw Max Open Adjustable Door Stop 1 Open door to provide access to screw. 2 Loosen screw. 3 Adjust door to desired location. 6 Ensure door stops in desired location before resuming normal use.
INSTALLATION 4 Lift the door while adjusting the washer. To raise the door, rotate washer clockwise (when viewed from the bottom). To lower door, rotate washer counterclockwise (when viewed from the bottom). 2 Adjust flipper mullion height. For proper connection with the flipper mullion guide, there should be a separation about the thickness of a coin (0.060 inches, or 1.5 mm) between the guide and flipper mullion.
DOOR REMOVAL INSTRUCTIONS Getting through narrow spaces If your refrigerator will not fit through an entrance area, you can remove the doors. Check first by measuring the entrance. To remove the refrigerator doors: 1 Trace lightly around the door’s top hinges with a pencil. This makes reinstallation easier. To prepare for removing the doors: 1 Make sure the electrical power cord is unplugged from the wall outlet. 2 Open the freezer drawer and remove the toe grille (see “Installation” section).
DOOR REMOVAL INSTRUCTIONS Installing Freezer Drawer NOTE You will be pulling approximately three feet of water tube from the back of the refrigerator. 1 With lower slides pulled out, hang drawer onto slide brackets ensuring pins on each side are fully inserted into slots on each side. 4 Unscrew the three lower hinge screws and hinge if necessary. Drawer Assembly To reinstall the right door, reverse the above steps.
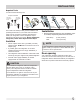
INSTALLING DOOR HANDLES Door Handle Mounting Instructions for Frigidaire Gallery® 1 Remove handles from carton and any other protective packaging. 2 Position fresh food handle end over upper and lower pre-installed shoulder bolts (A) that are fastened into door, ensuring the holes for the set screws are facing towards the opposite door. 3 While holding handle firmly against door, fasten upper and lower Allen set screws (B) with supplied Allen wrench. 4 Repeat steps 2 and 3 to install opposite handle.
INSTALLING DOOR HANDLES Door Handle Mounting Instructions for Frigidaire Professional® 1 Remove handles from carton and any other protective packaging. 2 Position fresh food handle end over upper and lower pre-installed shoulder bolts (A) that are fastened into door, ensuring the holes for the set screws are facing towards the opposite door. 3 While holding handle firmly against door, fasten upper and lower Allen set screws (B) with supplied Allen wrench. 4 Repeat steps 2 and 3 to install opposite handle.
CONNECTING THE WATER SUPPLY WARNING To avoid electric shock, which can cause death or severe personal injury, disconnect the refrigerator from electrical power before connecting a water supply line to the refrigerator. CAUTION To Avoid Property Damage: • Copper or Stainless Steel braided tubing is recommended for the water supply line. Water supply tubing made of ¼ inch plastic is not recommended to be used.
CONTROLS IQ-TouchTM A red indicator light will be illuminated above most active features. Touch the icon to activate the options below. quick ice Increases the production of ice water filter Press and hold for three seconds to reset after filter change. C/F Touch to toggle display from Fahrenheit to Celsius. default settings Resets all refrigerator settings such as temp, temp display and tones to their factory default settings.
CONTROLS IQ-TouchTM “Sabbath Mode” The Sabbath Mode is a feature that disables portions of the refrigerator and its controls in accordance with observance of the weekly Sabbath and religious holidays within the Orthodox Jewish community. Sabbath Mode is turned ON and OFF by pressing and holding both the freezer “∨” and refrigerator “∧” indicators for five seconds. The display shows “Sb” while in Sabbath mode. In the Sabbath Mode, the High Temp alarm is active for health reasons.
AUTOMATIC ICE MAKER (select models) Ice maker operation & care After the refrigerator is installed properly, the ice maker can produce ice within 24 hours. It can completely fill an ice bin in about three days. When using the ice maker for the first time and in order for the ice maker to work properly, it is necessary to clear air from water filter tubing. Once ice maker begins making ice, allow the bucket to fill completely, then discard the first TWO FULL buckets of ice.
STORAGE FEATURES CAUTION To avoid personal injury or property damage, handle tempered glass shelves carefully. Shelves may break suddenly if nicked, scratched, or exposed to sudden temperature change. Allow the glass shelves to stabilize to room temperature before cleaning. Do not wash in dishwasher. NOTE Features may vary according to model. Your refrigerator includes SpillSafeTM glass shelves that are designed to catch and hold accidental spills.
STORAGE FEATURES Crisper humidity control Crisper drawers include a sliding control for adjusting the humidity inside the crisper. Leafy vegetables keep best when stored with the Humidity Control set on Higher Humidity. Fresh fruits keep best when stored with the Humidity Control set on Lower Humidity. Vegetables Fruits Humidity Control Higher Humidity Doors Storage bins The doors to your fresh food compartment use a system of modular storage bins. All of these bins are removable for easy cleaning.
STORAGE FEATURES Accessories (varies by model) To Remove Lower Basket Dairy compartment Use the dairy compartment, at the top of the fresh food compartment door, for shortterm storage of cheese, spreads, or butter. The dairy compartment is designed to be warmer than the open area and includes a lift-up cover and a dairy divider (select models). Dairy Compartment Freezer Features (varies by model) Stabilizer Bar Basket Retainer Removing Lower Basket 1 Remove all items from basket.
STORING FOOD AND SAVING ENERGY Ideas for storing foods Fresh food storage • Keep the fresh food compartment between 34° F and 40° F with an optimum temperature of 37° F. • Avoid overcrowding the refrigerator shelves, which reduces air circulation and causes uneven cooling. Fruits and vegetables • Store fruits and vegetables in crisper drawers, where trapped moisture helps preserve food quality for longer time periods. • Wash items and remove excess water.
NORMAL OPERATING SOUNDS AND SIGHTS Understanding the sounds you may hear NOTE Your new, high-efficiency refrigerator may introduce unfamiliar sounds. These sounds normally indicate your refrigerator is operating correctly. Some surfaces on floors, walls, and kitchen cabinets may make these sounds more noticeable. Energy efficient foam in your refrigerator is not a sound insulator.
CHANGING THE FILTER Locating the Filters Your refrigerator is equipped with water filtering system. The water filter system filters all dispensed drinking water, as well as the water used to produce ice. Water Filter The water filter is located at the top right side of the fresh food compartment. Replacing the Water Filter In general, you should change the water filter every six months to ensure the highest possible water quality.
CHANGING THE FILTER Air filter (select models) The air filter is located under the utility bin. Replacing your PureAdvantageTM air filter To ensure optimal filtering of refrigerator odors, you should change the air filter every six months (the filter status light on the Touch Panel prompts you to replace the filter after six months). 1 Open the air filter door. 2 Remove the old filter and discard it. 3 Unpack the new filter and slide it into the housing.
CARE & CLEANING Protecting your investment Keeping your refrigerator clean maintains its appearance and prevents odor build-up. Wipe up any spills immediately and clean the freezer and fresh food compartments at least twice a year. NOTE Do not use abrasive cleaners such as window sprays, scouring cleansers, flammable fluids, cleaning waxes, concentrated detergents, bleaches, or cleansers containing petroleum products on plastic parts, interior doors, gaskets, or cabinet liners.
CARE & CLEANING Care and cleaning tips Part Interior & Door Liners Door Gaskets Drawers & Bins Glass Shelves Toe Grille Exterior & Handles Exterior & Handles (Stainless Steel Models Only) Cleaning Agents Tips and Precautions • Soap and water • Baking soda and water • Soap and water • Use two tablespoons of baking soda in one quart of warm water. • Be sure to wring excess water out of sponge or cloth before cleaning around controls, light bulb or any electrical part.
CARE & CLEANING Replacing LED Lights (select models) The fresh food compartments of your refrigerator may have LED lights. Always use Frigidaire parts for replacement. To replace LED Lights: 1 Unplug your refrigerator’s power cord. 2 Remove lens cover. 3 Remove LED board. 4 Replace LED board and snap in place assuring the light is facing in toward the unit (inside fresh food). 5 Replace lens cover.
BEFORE YOU CALL 1-800-944-9044 (United States) Visit our web site at www.frigidaire.com. 1-800-265-8352 (Canada) CONCERN POTENTIAL CAUSE COMMON SOLUTION AUTOMATIC ICE MAKER Ice maker is not making any ice. • Ice maker power switch is Off. • Turn power switch to On (“I”) position. • Ice maker has small cube caught in mechanism. • Remove small cube from ice maker. The ice and water filter cartridge may be clogged. Replace filter cartridge.
BEFORE YOU CALL (CONTINUED) CONCERN POTENTIAL CAUSE RUNNING OF REFRIGERATOR Compressor does not • Freezer control is set to “OF” run. or “0”. Refrigerator runs too much or too long. COMMON SOLUTION • Set freezer control. • Refrigerator is in defrost cycle. • This is normal for a fully automatic defrost refrigerator. The defrost cycle occurs periodically, lasting about 30 minutes. • Plug at electrical outlet is disconnected. • Ensure plug is tightly pushed into outlet.
MAJOR Information APPLIANCE WARRANTY Major Appliance Warranty Your appliance is covered by a one year limited warranty. For one year from your original date of purchase, Electrolux will pay all costs for repairing or replacing any parts of this appliance that prove to be defective in materials or workmanship when such appliance is installed, used and maintained in accordance with the provided instructions. Exclusions This warranty does not cover the following: 1.