
Specification


3
6. Remove screws securing Access Cover to cabinet
(interior condensers only - see gure 2C).
7. Use small kitchen knife to cut Ice Maker Installation
label on dashed lines located on outside rear panel of
refrigerator in top, right corner. See Figure 3. Push aps
inward until they stick to unit.
NOTE
On some models, there are two plugs on the left freezer
wall that must be removed. These holes will be used to
mount the Ice Maker (1). (There is also a plug on the back
wall where the water inlet tube (11) will be inserted.)
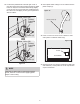
NOTE
Your refrigerator may have an exterior condenser, as
shown in Figure 2A, or an interior condenser, shown in
gure 2B. If your refrigerator has an exterior condenser,
it may be necessary to loosen the two brackets on the
right side of the condenser. Then the condenser can be
pulled away from the back of the refrigerator far enough
to gain easy entry during the installation process.
Figure 2C shows the location of the screws and the
cutout on the access cover.
1. Unplug refrigerator from electrical outlet.
2. Remove ice tray rack from freezer (some models).
3. Remove spacer. Remove freezer shelf (some models) by
pushing shelf to left until right side of shelf comes free
from holes. Then slowly lift up and pull shelf free from
holes on right side.
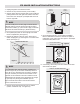
4. Use a plastic putty knife to remove plugs from inside
freezer compartment. (See Figure 1.)
5. Remove the harness connector cover, where the ice
maker will plug into, by removing the ¼ inch hex head
screw. (See Figure 1.)
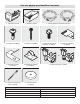
ICE MAKER INSTALLATION INSTRUCTIONS
Harness Connector
Cover
Plastic Plugs
¼" Screw
Figure 1
A B
C
Exterior
Condenser
Interior
Condenser
Figure 2
Cut on dashed lines
and push in on flaps
Figure 3
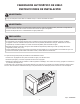
8. If necessary, remove any foam from within access hole
with needle nose pliers.
Remove and Discard Foam
ICE MAKER
INSTALLATION
ICE MAKER
INSTALLATION
Figure 4