
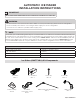
Aftermarket Installation Information


4
1
2
A
B
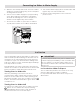
Figure 15
Back of Cabinet Water Valve Installation Instructions
IMPORTANT
Make sure the water inlet tube is sitting inside the
fill cup. See Figure 16.
16. Push the water inlet tube through the small hole
where the Installation label is located. Start the
install with the tube at 45° (A). Fully insert the
tube, and then twist it clockwise to 90° (B) to
lock it in place. Pull lightly to make sure the tube
is secure. See Figure 15.
Figure 16
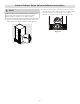
15. If necessary, remove any foam from within the
access hole with needle nose pliers. See Figure 14.
Remove and Discard Foam
ICE MAKER
INSTALLATION
ICE MAKER
INSTALLATION
Figure 14
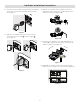
CAUTION
Wear gloves and use extreme CAUTION when
handling the access cover.
13. Remove the 4 screws securing the access cover
to the cabinet. See Figure 12.
14. Cut the Ice Maker Installation label on dashed
lines located on the outside rear panel of the
refrigerator at the top, right corner. Push the flaps
inward until they stick to the unit. See Figure 13.
Cut on dashed lines
and push in on flaps
Figure 13
Figure 12