
Aftermarket Installation Information


2
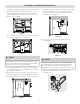
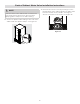
Figure 4
Ice Maker Installation Instructions
1. Unplug the refrigerator from the electrical outlet.
2. Remove the spacer. Remove the freezer shelf
(some models) by pushing the shelf to the left
until the right side of the shelf comes free from
the holes. See Figure 1.
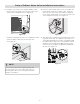
3. Use a plastic putty knife to remove the 2 plugs on
the left wall of the freezer compartment. Discard
the plugs. See Figure 3.
4. Remove the harness connector cover, where the
ice maker will plug in, with a flathead screwdriver.
Discard the harness connector cover. See Figure 3.
NOTE
Some models have two plugs on the left freezer wall
that must be removed. These holes will be used to
mount the Ice Maker. (You will also insert the Water
Inlet Tube in the plug on the back wall.)
5. Place two, long, ice maker mounting screws (A)
into freezer wall where plugs were removed
in Step 3. Turn each screw clockwise until ½"
remains out. See Figure 4.
NOTE
You will need both hands to hook up and secure
the Ice Maker to the freezer wall. DO NOT let the
Ice Maker dangle free after the wiring harness is
plugged into the connector on the back freezer wall.
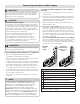
7. Place the ice maker harness into the cover.
See Figure 6.
6. Unhook one loop of the ice maker harness.
See Figure 5.
Figure 3
Figure 5
Figure 6
Then slowly lift up and pull the shelf free from the
holes on the right side. See Figure 2.
Figure 1
Figure 2
A