
Aftermarket Installation Information


8
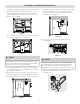
Connecting Ice Maker to Water Supply
5. With the steel clamp and screw, secure the water
supply line (copper tubing only) to the rear panel
of refrigerator as shown.
6. Coil the excess water supply line (copper tubing
only), about 2½ turns, behind the refrigerator
as shown and arrange the coils so they do not
vibrate or wear against any other surface.
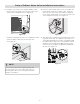
7. To turn the ice maker on, press the ice maker’s
On/O power switch so the LED is illuminated.
8. Turn ON the water supply at the shuto valve and
tighten any connections that leak.
9. Reconnect the refrigerator to the electrical
power source.
Ice Service
If your refrigerator has an automatic ice maker, mini-
mal ice will be produced during the first 24 hours of
operation. Air in new plumbing lines may cause the
ice maker to cycle 2 or 3 times before making a full
tray of ice. With no usage, it will take approximately 1
to 2 days to fill the ice bin.
New plumbing connections may cause the first pro-
duction of ice cubes to be discolored or have an odd
flavor. Discard ice made during the first 24 hours.
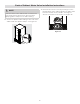
Turning Your Ice Maker On
After the plumbing connections have been
completed, the water supply valve must be opened.
Place the ice bin under the ice maker, pushing it as
far back as possible. Press the ice maker’s On/O
button. The button will illuminate in green when the
ice maker is On.
Turning Your Ice Maker O
To stop the ice maker, press the ice maker’s On/O
button. The ice maker also stops producing
ice automatically when the bin is full, and then it
resumes when the level in the bin drops.
IMPORTANT
To ensure proper function for your ice maker, hook
up water supply immediately or turn ice maker OFF.
If the ice maker is on and the water supply is not
connected, the water valve can make a loud chat-
tering noise.
Ice Production: What To Expect
The ice maker will produce 1.5 to 2 lbs of ice every
24 hours depending on usage conditions.
Ice is produced at a rate of 10 cubes every 100 to
160 minutes.