All about the Use & Care of your Electric Range with Induction Cooktop TABLE OF CONTENTS www.frigidaire.com USA 1-800-944-9044 Before Setting Oven Controls . . . . . . . . . . . . . . . . Setting Oven Controls . . . . . . . . . . . . . . . . . . . . . . Care and Cleaning . . . . . . . . . . . . . . . . . . . . . . . . Before You Call . . . . . . . . . . . . . . . . . . . . . . . . . . . Warranty . . . . . . . . . . . . . . . . . . . . . . . . . . . . . . . . www.frigidaire.
PRODUCT RECORD AND REGISTRATION Product Registration . . . . . . . . . . . . . . . . . . . . . . . . . .2 Product Record and Registration . . . . . . . . . . . . . . . . . 2 Need Help? . . . . . . . . . . . . . . . . . . . . . . . . . . . . . . . . .2 Important Safety Instructions . . . . . . . . . . . . . . . . . . . . 3 Cooking Recommendations . . . . . . . . . . . . . . . . . . . . . 9 Before Setting Surface Controls . . . . . . . . . . . . . . . . . 12 Setting Surface Controls . . . . . . . . . . . . .
IMPORTANT SAFETY INSTRUCTIONS Read all instructions before using this appliance. This manual contains important safety symbols and instructions. Please pay attention to these symbols and follow all instructions given. Do not attempt to install or operate your appliance until you have read the safety precautions in this manual. Safety items throughout this manual are labeled with a WARNING or CAUTION statement based on the risk type.
IMPORTANT SAFETY INSTRUCTIONS IMPORTANT INSTRUCTIONS FOR UNPACKING AND INSTALLATION Remove all tape and packaging before using the appliance. Destroy the carton and plastic bags after unpacking the appliance. Never allow children to play with packaging material. Do not remove the wiring label and other literature attached to the appliance. Do not remove model/ serial number plate. Proper Installation—Be sure your appliance is properly installed and grounded by a qualified technician.
IMPORTANT SAFETY INSTRUCTIONS IMPORTANT INSTRUCTIONS FOR USING THE APPLIANCE WARNING Storage In or On Appliance—Flammable materials should not be stored in an oven or microwave, near surface burners or elements, or in the storage or warmer drawer (if equipped). This includes paper, plastic, and cloth items, such as cookbooks, plastic ware, and towels, as well as flammable liquids. Do not store explosives, such as aerosol cans, on or near the appliance.
IMPORTANT SAFETY INSTRUCTIONS IMPORTANT INSTRUCTIONS FOR USING YOUR INDUCTION COOKTOP CAUTION CAUTION Wear proper apparel - Loose-fitting or hanging garments should never be worn while using the appliance. Do not let clothing or other flammable materials contact hot surfaces. Do not touch surface burners or elements, areas near these burners or elements, interior surfaces of the oven, or the warmer drawer (if equipped). Surface burners and elements may be hot even though they appear cool.
IMPORTANT SAFETY INSTRUCTIONS Never leave surface elements unattended. Boilovers may cause smoking and greasy spills that may ignite. A pan that has boiled dry could be damaged and may damage the cooktop. When you are flaming foods under a ventilating hood, turn on the fan. IMPORTANT INSTRUCTIONS FOR GLASS AND CERAMIC COOKTOPS Do Not Clean or Operate a Broken Cooktop. If cooktop should break, cleaning solutions and spillovers may penetrate the broken cooktop and create a risk of electric shock.
IMPORTANT SAFETY INSTRUCTIONS Always follow the manufacturer’s recommended directions for use of kitchen cleaners and aerosols. Be aware that excess residue from cleaners and aerosols may ignite causing damage and injury. defects, or other reproductive harms, and requires businesses to warn customers of potential exposures to such substances. Clean ventilating hoods frequently - Grease should not be allowed to accumulate on hood or filter. Follow the manufacturer’s instructions for cleaning vent hoods.
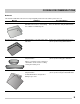
COOKING RECOMMENDATIONS Bakeware The material of bakeware affects how evenly and quickly it transfers heat from the pan to the food. Material Attributes Recommendation Shiny metal bakeware Shiny, aluminum, and non-coated bakeware is the best for even heating. It is suitable for all baked goods. Recommended cooking temperatures and times are based on shiny metal bakeware. Dark metal bakeware Dark bakeware cooks hotter than shiny bakeware.
COOKING RECOMMENDATIONS Cooking Conditions Conditions in your kitchen can affect the performance of your appliance when cooking food. Condition Aging cookware High altitude Attributes Recommendation As pans age and become discolored, cooking times may need to be reduced slightly. If food is too dark or overcooked, use the minimum cook time in the recipe or packaging. Air is drier and air pressure is lower. Adjust cooking temperature, cooking time, or recipes as needed.
COOKING RECOMMENDATIONS Cooking Tips Broiling / Roasting Broiling pan For best results when broiling, use a broil pan with a broil pan insert designed to drain the fat from the food, help avoid spatter, and reduce smoking. The broiler pan will catch grease spills, and the insert helps prevent grease splatters. If a broiler pan and insert are not supplied with this appliance, they may be purchased from Frigidaire.com.
BEFORE SETTING SURFACE CONTROLS What is Electromagnetic Induction? An induction cooking zone uses an electromagnet to induce heat in iron or steel cookware. CAUTION Although induction cooking zones do not produce heat, they can become hot from contact with hot cookware. Burns may occur if a cooking zone or the surrounding area is touched before it has cooled to a safe temperature. Below each cooking zone on an induction cooktop, there is a copper coil.
BEFORE SETTING SURFACE CONTROLS Using Proper Cookware The Magnet Test The size and type of cookware used will influence the heat setting needed for best cooking results. Be sure to follow the recommendations for using proper cookware as illustrated in Figure 2 and Figure 3. To see if a piece of cookware will work on your induction cooktop, try to stick a magnet to it (see Figure 3). Check for flatness by rotating a ruler across the bottom of the cookware (see Figure 2).
BEFORE SETTING SURFACE CONTROLS Pan Sensing Sensors beneath the cooktop surface require that certain cookware conditions be met before an induction cooking zone will operate. If a cooking zone is turned on and no cookware is detected, the zone display showing the power setting will flash (Figure 5). Magnet Sticks Figure 5: Flashing error message Magnet Falls • Cookware base material has good magnetic characteristics. • Cookware base material is non-magnetic.
BEFORE SETTING SURFACE CONTROLS Induction Cooking When turned on, an induction cooking zone will not get hot. The induction cooking zone creates heat in the cookware, not in the cooktop. Heat is not created unless there is an iron or steel object on the cooking zone. CAUTION • Although induction cooking zones do not directly generate heat, they can become hot from contact with hot cookware. Burns may occur if a cooking zone or the surrounding area is touched before it has cooled to a safe temperature.
SETTING SURFACE CONTROLS Cooktop Display Windows Lockout Window Message (- ) The range backguard provides a digital window for each of the cooking zones located on the cooktop. Power levels and messages are easily monitored and controlled using the window displays in combination with the corresponding controls. The (-) message will appear in all the surface control displays whenever the Lockout or Self-clean feature is active (Figure 16).
SETTING SURFACE CONTROLS NOTE The Hot Surface indicator light will turn on when heat is detected in a cook zone. The light will remain on until the heated surface area has cooled sufficiently. Induction surface cooking zones Figure 17: Induction cooking zone control 185 - 200°F • The size and type of utensil used and the amount and type of food being cooked will influence the setting needed for best cooking results.
SETTING SURFACE CONTROLS Moving Cookware on a Smooth Cooktop Home Canning Always lift cookware before moving on the ceramic glass smoothtop. Cookware that has a rough or dirty bottom can mark and scratch the ceramic glass surface. Always start with clean cookware. Be sure to read and observe all the following points when home canning with your appliance.
BEFORE SETTING OVEN CONTROLS Oven Vent Location Types of oven racks The oven is vented as shown below. When the oven is on, warm air is released through the vent. This venting is necessary for proper air circulation in the oven and good baking results. Do not block oven vent. Never close off the openings with aluminium foil or any other material. Steam or moisture may appear near the oven vent. This is normal.
SETTING OVEN CONTROLS 2 10 3 11 1 9 7 4 5 6 8 12 13 Oven Control Features 1. Control Lock - Use to lock oven and cooktop controls. Feature 2. Bake - Use to select bake feature. Bake 170°F (77°C) 550°F (287°C) Broil LO 400°F (205°C) HI 550°F (287°C) 0:01 Min. 11:59 Hr./Min. Clock Time 12 Hr. 1:00 Hr./Min. 12:59 Hr./Min. Bake Time 0:01 Min 5:59 Hr./Min. 3. Broil - Use to set Broil feature. Mode Min Temp/Time Max Temp/Time 4.
SETTING OVEN CONTROLS Setting the Clock When the appliance is first plugged in or when the power supply to the appliance has been interrupted, the display will flash 12:00. It is recommended to always set the clock for the correct time of day before using the appliance. To set the clock: 1. Press Set Clock once (do not hold clock key down). 2. Within 5 seconds, press and hold or the correct time of day appears in the display.
SETTING OVEN CONTROLS Setting the control lockout Setting the minute timer The control can be programmed to lockout the oven and cooktop controls. 1. Press Timer on-off. To set the control lockout feature: 1. Press the lock icon and hold for 3 seconds. Loc will appear in the display for a few seconds before showing the time of day (clock). 2. The controls are inactive when - (dashes) appear in the display windows. 3.
SETTING OVEN CONTROLS Setting Bake To set Bake: The oven can be programmed to bake at any temperature from 170°F to 550°F (77°C to 287°C). The factory preset automatic bake temperature is 350°F (177°C). 1. Press Bake. — — — appears in the display. The oven indicator light will turn on when first set to bake while the oven is heating. When the set temperature is reached the oven control will beep once indicating the oven is fully preheated and time to place food in the oven.
SETTING OVEN CONTROLS Setting Bake Time Setting Start Time (delayed start) The Bake Time key sets the amount of time needed for baking. The oven will turn on immediately and stop automatically after the set bake time ends. Use the Start Time key to delay the starting time (delayed timed bake). The oven will turn on at a later time and stop automatically after the set bake time ends.
SETTING OVEN CONTROLS Setting Broil To set Broil Broiling is direct heat cooking and will produce some smoke. If smoke is excessive, place food further away from the element. Watch food to prevent burning. 1. Arrange the oven rack while oven is still cool. When broiling, always remember to arrange the oven racks while oven is still cool. Position the rack as suggested in Table 1. WARNING 2. Press Broil. — — will appear in display. 3. Press for HI broil or for LO broil.
SETTING OVEN CONTROLS Table 1: Broil recommendations Food item Rack Position Temp Cook time in minutes Internal 1st side 2nd side Temperature Doneness Steak 1” thick 5 or 6 HI(550°F) 6:00 5:00 135°F (57°C) Rare** Steak 1” thick 5 or 6 HI(550°F) 7:00 5:00 145ºF (63ºC) Medium-well Steak 1” thick 5 or 6 HI(550°F) 8:00 7:00 170°F (77ºC) Well Pork Chops 3/4 “thick 5 HI(550°F) 8:00 6:00 170°F (77ºC) Chicken - Bone In 4 LO(400°F) 20:00 10:00 170°F (77ºC) Well Chicken Bonele
SETTING OVEN CONTROLS Steam Clean The Steam Clean feature offers a chemical free and time saving method to assist in the routine cleaning of small and light soils. CAUTION • Do not add bleach, ammonia, oven cleaner, or any other abrasive household cleaners to the water used for Steam Clean. • Before cleaning any part of the oven, be sure all controls are turned off and the oven is cool. The oven may be hot and can cause burns. 8. Take care opening the door when the steam clean is finished.
SETTING OVEN CONTROLS Adjusting the oven temperature Your appliance has been factory calibrated and tested to ensure an accurate baking temperature. For the first few uses, follow your recipe times and temperature recommendations carefully. If you think the oven is cooking too hot or too cool for your recipe times, you can adjust the control so the oven cooks hotter or cooler than the temperature displayed.
CARE AND CLEANING Remove spills and any heavy soiling as soon as possible. Regular cleaning will reduce the difficulty of major cleaning later. CAUTION • Before cleaning any part of the appliance, be sure all controls are turned off and the appliance is cool. • If ammonia or appliance cleaners are used, they must be removed and the appliance must be thoroughly rinsed before operating. Follow manufacturer's instructions and provide adequate ventilation.
CARE AND CLEANING Oven door Use mild dish detergent and water or a 50/50 solution of vinegar and water to clean the top, sides, and front of the oven door. Rinse well. Glass cleaner may be used on the outside glass of the door. Ceramic smoothtop cleaner or polish may be used on the interior door glass. Do not immerse the door in water. Do not spray or allow water or cleaners to enter the door vents.
CARE AND CLEANING Cooktop Maintenance Consistent and proper cleaning is essential to maintaining your ceramic glass cooktop. Prior to using your cooktop for the first time, apply a ceramic cooktop cleaning cream (available in most hardware, grocery, and department stores) to the ceramic surface. Clean and buff with a clean paper towel. This will make cleaning easier when soiled from cooking. Cooktop cleaning creams leave a protective finish on the glass to help prevent scratches and abrasions.
CARE AND CLEANING Aluminum Foil and Utensils WARNING Replacing the Oven Light CAUTION Never cover any slots, holes, or passages in the oven bottom or cover an entire oven rack with materials such as aluminum foil. Aluminum foil linings may trap heat, causing a fire hazard. Replacing the oven interior light bulb: Protective Liners — Do not use aluminum foil to line the oven bottom. Improper installation of these liners may result in risk of electric shock or fire.
CARE AND CLEANING Removing and Replacing the Oven Door To remove oven door: Oven door hinge locations CAUTION The door is heavy. For safe, temporary storage, lay the door flat with the inside of the door facing down. 1. Open oven door completely, horizontal with floor (See Figure 32). 2. Pull the door hinge locks on both left and right door hinges down from the oven frame completely towards the oven door (See Figure 33). A tool such as a small flat-blade screwdriver may be required.
BEFORE YOU CALL Oven Baking For best cooking results, preheat the oven before baking cookies, breads, cakes, pies, pastries, etc. There is no need to preheat the oven for roasting meat or baking casseroles. The cooking times and temperatures needed to bake a product may vary slightly from your previously owned appliance. Baking Problems and Solutions Baking Problems Causes Cookies and biscuits burn • on the bottom. Cookies and biscuits put into • oven before oven is preheated. • Oven rack is overcrowded.
BEFORE YOU CALL Solutions to Common Problems: Before you call for service, review the following list. It may save you time and expense. Possible solutions are provided with the problem listed. Problem Cause / Solution Entire appliance does not operate. Appliance not connected. Make sure power cord is plugged properly into outlet. Check your fuse box or breaker box to make sure the circuit is active. Electrical power outage. Check house lights to be sure.
BEFORE YOU CALL Problem Cause / Solution Cooktop Problems Surface element is too hot or not hot enough. Incorrect induction cooktop power level setting. Adjust power level setting higher or lower as needed. Be sure the correct surface control is activated for the cooking zone. Be sure to use the correct cookware material type for induction cooking. Use cookware specifically identified by the manufacturer to use for induction cooking.
BEFORE YOU CALL Problem Cause / Solution Areas of discoloration with metallic sheen on cooktop surface. Mineral deposits from water and food. Remove them using cooktop cleaning creme applied to the ceramic surface. Buff with a non-abrasive cloth or sponge. Scratches or abrasions on cooktop surface. Coarse particles such as salt or hardened soils between cooktop and utensils can cause scratches. Be sure the cooktop surface and bottoms of utensils are clean before use.
WARRANTY Your appliance is covered by a one year limited warranty. For one year from your original date of purchase, Electrolux will pay all costs for repairing or replacing any parts of this appliance that prove to be defective in materials or workmanship when such appliance is installed, used and maintained in accordance with the provided instructions. Exclusions This warranty does not cover the following: 1. 2. 3. 4. 5. 6. 7. 8. 9. 10. 11. 12. 13.