All about the Use & Care of your Electric Range TA B L E O F C O N T E N T S Setting Oven Controls .................................. 16-26 Features at a Glance ......................................... 6 Self-Cleaning ..............................................27-28 Before Setting Oven Controls ........................... 7-9 Care & Cleaning (EC/SD) .............................. 29-32 Before Setting Surface Controls ........................ 10 Before You Call ..................................
PRODUCT RECORD AND REGISTRATION Contents Thank you for choosing Frigidare. Product Registration ...................................................... 2 Important Safety Instructions ............................ 3-5 Features at a Glance .............................................. 6 Before Setting Oven Controls ............................... 7-9 Removing, replacing & arranging the oven racks ........... 7 Effortless™ Oven Rack system and assembly ................ 8 Before Setting Surface Controls .....
IMPORTANT SAFETY INSTRUCTIONS Read all instructions before using this appliance. Do not attempt to install or operate your appliance until you have read the safety precautions in this manual. Safety items throughout this manual are labeled with a WARNING or CAUTION statement based on the risk type. Definitions This is the safety alert symbol. It is used to alert you to potential personal injury hazards. Obey all safety messages that follow this symbol to avoid possible injury or death.
IMPORTANT SAFETY INSTRUCTIONS WARNING • Storage in or on appliance—flammable materials should not be stored in an oven, warmer drawer, near surface units or in the storage drawer. This includes paper, plastic and cloth items, such as cookbooks, plasticware and towels, as well as flammable liquids. Do not store explosives, such as aerosol cans, on or near the range. • DO NOT LEAVE CHILDREN ALONE —children should not be left alone or unattended in the area where appliance is in use.
IMPORTANT SAFETY INSTRUCTIONS SELF-CLEANING OVENS • Clean in the self-cleaning cycle only the parts listed in this Use & Care Manual. Before self-cleaning the oven, remove the broiler pan and any utensils or foods from the oven. • Do Not Use Oven Cleaners—No commercial oven cleaner or oven liner protective coating of any kind should be used in or around any part of the oven. • Do Not Clean Door Gasket—The door gasket is essential for a good seal. Care should be taken not to rub, damage or move the gasket.
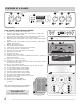
FEATURES AT A GLANCE 7 7 7 8 TIMED CHICKEN NUGGETS PIZZA DELAY TIMER 2 7 7 1 DOOR CONVECT BAKE COOKTOP ROAST BROIL 9 3 4 5 6 Your electric range features include: 1. 2. 3. 4. 5. 6. 7. 8. 9. 10. 11. 12. 13. 14. 15. 16. 17. 18. 19. 20. 21. 22. 23. 24. 25. 26. 27. 28. 29. 30. Electronic oven control with kitchen timer. Left front single (some models), dual (some models) or triple (some models) radiant element control. Left rear single (some models) or dual (some models) radiant control.
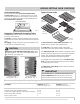
BEFORE SETTING OVEN CONTROLS Oven vent location Types of oven racks The oven vent is located under the left side of the control panel (See Fig. 1). When the oven is on, warm air passes through this vent. This venting is necessary for proper air circulation in the oven and good baking results. Do not block the oven vent. flat handle oven rack flat oven rack oven vent location half oven rack Fig. 1 Removing, replacing & arranging racks To remove - pull the rack forward until it stops.
BEFORE SETTING OVEN CONTROLS Effortless™ Oven Rack system Some models are equipped with a special oven rack system that automatically partially extends the oven rack from the interior oven glides to assist in easier access to your food items. This feature works whenever the oven door is opened or closed. To assemble the Effortless™ Oven Rack system: 1. Locate all required parts.
BEFORE SETTING OVEN CONTROLS Air circulation in the oven Element ON & hot surface indicator lights For best baking results allow 2-4" (5-10 cm) around the cookware for proper air circulation and be sure pans and cookware do not touch each other, the oven door, sides or back of the oven cavity. Hot air must be able to circulate around the pans and cookware in the oven for even heat to reach around the food.
BEFORE SETTING SURFACE CONTROLS Types of cooktop elements The ceramic glass cooktop has radiant surface elements located below the surface of the glass. The patterns on the ceramic glass will outline the size and type of element available. The single radiant element will have one round outline pattern shown (keep warm zone is designed to keep food warm only).
SETTING SURFACE CONTROLS Single radiant surface elements (all models) To operate the single radiant element: 1. Place correctly sized cookware on single radiant surface element. 2. Push in and turn the surface control knob in either direction (Fig. 2) to the desired setting (Refer to the Suggested radiant surface element settings table Fig. 1). Start most cooking operations on a higher setting and then turn to a lower setting to finish cooking.
SETTING SURFACE CONTROLS Dual radiant surface elements (some models) Symbols on the backguard are used to indicate which coil of symbol indicates the dual radiant element will heat. The symbol indicates both inner and the inner coil only. The outer coils will heat. To operate a dual radiant element: 1. Place correctly sized cookware on dual radiant surface element. 2. Push in and turn the surface control knob clockwise to begin heating both the inner and outer portions of the dual element.
SETTING SURFACE CONTROLS Keep warm (some models) The purpose of the keep warm zone is to keep hot cooked foods at serving temperature. Use the keep warm feature to keep cooked foods hot such as; vegetables, gravies, casseroles, soups, stews, breads, pastries and oven-safe dinner plates. Always start with hot food. It is not recommended to heat cold food on the keep warm zone. All food placed on the warming zone should be covered with a lid to maintain quality.
SETTING SURFACE CONTROLS Home Canning Be sure to read and observe all the following points when home canning with your appliance. Check with the USDA (United States Department of Agriculture) website and be sure to read all the information they have available as well as follow their recommendations for home canning procedures. • Use only quality flat bottom canners when home canning. Use a straight-edge to check canner bottom (see “Cookware material types” in the Before setting surface controls section).
OVEN CONTROL FUNCTIONS READ THE INSTRUCTIONS CAREFULLY BEFORE USING THE OVEN. For satisfactory use of your oven, become familiar with the various pad functions of the oven as described below. bake time — Use to enter the length of baking time needed. timer on / off — Use to set or cancel the minute timer. bake —Use to enter the normal Bake feature. delay start — Use with bake, convection, convect convert and self-clean features to program a delayed timed bake or delayed selfcleaning cycle.
SETTING OVEN CONTROLS Setting the clock Setting 12 or 24 hour display modes When the range is first powered up, “12:00” will flash in the display (See Fig. 1). The clock display mode allows you to choose between 12 or 24 hr mode. The factory pre-set clock display mode is 12 hr. See the example below to change the default mode to 24 hr display. To set the clock to 1:30: Step Press To set 12 or 24 hour mode: Step 1. Press set clock. Press 1. Press and hold set clock 2. Enter 1:30. for 6 seconds. 2.
SETTING OVEN CONTROLS Setting a silent control panel Silent mode allows the oven control to operate without sounds. The control may be programmed for silent operation and later returned to operating with all the normal sounds. To set silent mode: Step Press 1. Press and hold delay start for 6 seconds. Fig. 3 Setting the minute timer The timer allows you to track your cooking times without interferring with the cooking process. The timer may be set from 1 minute up to 11 hours and 59 minutes.
SETTING OVEN CONTROLS Setting quick preheat Setting bake time Use the quick preheat feature when using single rack baking to quickly heat the oven to bake temperatures. Use this feature only for standard baking. A reminder tone will sound indicating when to place the food in the oven. Use the timed bake feature to automatically turn the oven off after a desired length of time. When the oven is finished preheating quick preheat will become just like the bake feature and continue to bake until cancelled.
SETTING OVEN CONTROLS To program oven for delayed bake time and to shut-off automatically The delay start feature allows you to set a starting and ending time to the baking process. Prior to setting a delay start, be sure the time of day is set correctly. If the delay start needs to be set more than 12 hours in advance (12-24 hours), the control must first be programmed for 24 hour display mode. See “Setting 12 or 24 hour display modes” section. When the set bake time runs out: 1.
SETTING OVEN CONTROLS Convect bake (all models) Benefits of the convect feature — Foods may cook up to 25 to 30% faster, saving time and energy. — Multiple rack baking. — No special pans or bakeware needed. Convect uses a fan to circulate the oven's heat uniformly and continuously around the oven. This improved heat distribution allows for fast, even cooking and browning results. It also gives better baking results when using two racks at the same time.
SETTING OVEN CONTROLS Convect broil (some models*) Setting convect (convection) convert Use the convect broil feature to cook thicker cuts of meats that require direct exposure to radiant heat and the convection fan for optimum browing results. The convect convert feature allows you to convert any baking recipe using the convect (convection) feature. The control uses the normal recipe settings and adjusts to a lower temperature for convection baking.
SETTING OVEN CONTROLS Broil Use the broil feature to cook meats that require direct exposure to flame heat for optimum browning results. When broiling always remember to arrange the oven racks while oven is still cool. Position the oven rack as suggested in the broil settings table (See Fig. 4). To set broil: Step Insert 7 6 5 4 Press 3 1. Place the broiler insert on the broil pan, then place meat on the insert. Remember to follow all warnings and cautions. 2 1 Broil pan Fig. 2 Fig. 1 2.
SETTING OVEN CONTROLS Setting pizza feature Setting chicken nuggets feature (cont’d) For your convenience the pizza feature provides 2 different settings. You may use the pizza feature whether starting with fresh or frozen pizza. To set the pizza feature: Step Press 1. Press pizza once to cook frozen pizza (Fig.1) or twice when setting for fresh pizza (Fig. 2). You may adjust the oven temperature to fit your needs.
SETTING OVEN CONTROLS Adjusting the oven temperature Your appliance has been factory calibrated and tested to ensure an accurate baking temperature. For the first few uses, follow your recipe times and temperature recommendations carefully. If you think the oven is cooking too hot or too cool for your recipe times, you can adjust the control so the oven cooks hotter or cooler than the temperature displayed.
SETTING OVEN CONTROLS To Set the Sabbath Feature (for use on the Jewish Sabbath & Holidays) For further assistance, guidelines for proper usage and a complete list of models with the Sabbath feature, please vist the web at http:\\www.star-k.org. WARNING FOOD POISONING HAZARD. Do not let food sit for more than one hour before or after cooking. Doing so can result in food poisoning or sickness. The bake time and delay start pads are used to set the Sabbath feature.
SETTING OVEN CONTROLS To Set the Sabbath Feature (cont’d) To turn off the oven but keep the Sabbath feature active: Press cancel. To turn off the Sabbath feature: Press and hold both the + bake time and delay start pads for at least 3 seconds. The control will beep and SAb will disappear from the display. The oven is no longer programmed for the Sabbath feature.
SELF-CLEANING Self-cleaning A self-cleaning oven cleans itself with high temperatures (well above normal cooking temperatures) which eliminate soils completely or reduces them to a fine powdered ash you can wipe away with a damp cloth. Your oven allows you to set 3 different self-cleaning cycle durations. A 3-hour cleaning time is best used for normal cleaning; 2-hour time for light soils and a 4-hour time option for heavier burnt-on soils.
SELF-CLEANING Setting a self-clean cycle or a delayed start self-clean cycle Examples: To start an immediate self-cleaning cycle and/or how to add a delay start time of 9:00 o’clock and shut-off self-clean automatically: Step Press 1. Be sure the clock is set with the correct time of day, ALL the oven racks are removed and the oven door is closed. When the self-clean cycle has completed: 1. The time of day and “Hot” will appear in the display window (See Fig.3). 2.
CARE & CLEANING Cleaning recommendation table Surface type Recommendation • Aluminum (trim pieces) & vinyl Use hot, soapy water and a cloth. Dry with a clean cloth. • Painted and plastic control knobs • Painted body parts • Painted decorative trim For general cleaning, use hot, soapy water and a cloth. For more difficult soils and built-up grease, apply a liquid detergent directly onto the soil. Leave on soil for 30 to 60 minutes. Rinse with a damp cloth and dry.
CARE & CLEANING Cooktop maintenance IMPORTANT Consistent and proper cleaning is essential to maintaining your ceramic glass cooktop. Prior to using your cooktop for the first time, apply some of the glass-ceramic cooktop cleaner supplied with your new appliance. Buff with a non-abrasive cloth or no-scratch cleaning pad. This will make cleaning easier when soiled from cooking. The special cooktop cleaning cream leaves a protective finish on the glass to help prevent scratches and abrasions.
CARE & CLEANING Cooktop cleaning (cont’d) Plastic or foods with a high sugar content: These types of soils need be removed immediately if spilled or melted onto the ceramic cooktop surface. Permanent damage (such as pitting of the cooktop surface) may occur if not removed immediately. After turning the surface elements OFF, use a razor blade scraper or a metal spatula with a mitt and scrape the soil from the hot surface (as illustrated).
CARE & CLEANING Removing and replacing the lift-off oven door CAUTION Oven door hinge locations with oven door fully open. The door is heavy. For safe, temporary storage, lay the door flat with the inside of the door facing down. To remove oven door: 1. Open oven door completely (horizontal with floor - See Fig. 1). 2. Pull the door hinge locks on both left and right door hinges down from the oven frame completely towards the oven door (See Fig. 2).
Solutions to common problems • Problem BEFORE YOU CALL Solution Poor baking results. • Many factors affect baking results. Make sure the proper oven rack position is used. Center food in the oven and space pans to allow air to circulate. Allow the oven to preheat to the set temperature before placing food in the oven. Try adjusting the recipe's recommended temperature or baking time. If you feel the oven is too hot or cool, see “Adjusting Oven Temperature” section in this Use & Care Guide.
BEFORE YOU CALL • Solutions to common problems Problem Solution Soil not completely removed after selfcleaning cycle. • Failure to clean bottom, front top of oven, frame of oven or door area outside oven seal. These areas are not in the self-cleaning area, but get hot enough to burn on residue. Clean these areas before the self-cleaning cycle is started. Burned-on residue can be cleaned with a stiff nylon brush and water or a nylon scrubber. Be careful not to damage the oven gasket.
MAJOR APPLIANCE WARRANTY Your appliance is covered by a one year limited warranty. For one year from your original date of purchase, Electrolux will pay all costs for repairing or replacing any parts of this appliance that prove to be defective in materials or workmanship when such appliance is installed, used and maintained in accordance with the provided instructions. Exclusions This warranty does not cover the following: 1.
This page is left blank intentionally