
Dryer LP Conversion Kit Instructions


2
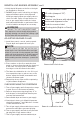
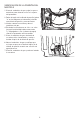
ORANGE/WHITE
ORANGE/YELLOW
ON
BACK
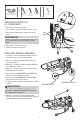
REMOVING BURNER ASSEMBLY
PREPARING DRYER FOR
LP CONVERSION
To gain access to burner assembly, remove 1.
top panel, console, and front panel.
Remove 2 inlet pipe mounting screws (a) 2.
from dryer base.
Remove 1 screw (b) from mounting bracket 3.
to combustion tube.
Remove 1 screw (c) on back of dryer near 4.
threaded gas inlet pipe.
Disconnect long ORANGE and WHITE wire 5.
harness under combustion tube.
Disconnect short ORANGE and YELLOW 6.
wire harness below gas valve.
Carefully remove burner assembly from dryer 7.
cabinet.
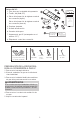
Disconnect electrical power.1.
Shut off gas at the individual shutoff valve.2.
Disconnect flexible gas supply at back of 3.
dryer.
WARNING
Failure to disconnect electrical and gas sup-
ply could result in personal injury or even
death.
Disconnect exhaust venting.4.
Slide dryer away from wall.5.
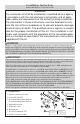
Tools Needed:
Adjustable
pliers
Phillips, straight, &
square bit screwdrivers
Adjustable
wrench
OR OR
AND
3/8” or
10 mm
box wrench
3/16”
allen wrench
AND
IMPORTANT
Take care not to damage the ignitor coils as
you remove the burner assembly. If broken,
the ignitor will not function.
Remove 2 screws (d) from burner tube 8.
mount. Save screws for reassembly. Remove
galvanized burner tube and discard.